Proxmox Private Cloud Provider: Introduction, Configuration & Installation Guide
Introduction
Our PROXMOX Private Cloud provider allow you to create WordPress server containers on your PROXMOX nodes from inside the WPCD dashboard. With it, you do not need to manually configure your containers and then treat them as custom servers.
Once setup, the integration with the WPCD UI is as seamless as other public cloud services such as DigitalOcean, AWS etc.
However, to make this work requires a lot of setup inside PROXMOX itself. Private clouds are complex to setup and configure so this should not be a surprise.
Availability
Promox is a complex beast to properly setup and run. A production level cluster will likely start at $500 per month at a hosting provider. If you’re running a smaller cluster this provider will likely not work well for you.
Our provider offers a basic codebase and deploys WP servers properly using most implementations of default Proxmox software. But it is fully expected that, based on how you configure your networking, server groups, firewalls etc., you will need some customization.
Because of this expectation, the provider is not available without a services contract and we do not offer free support for it.
Proxmox Prerequisites
Before attempting to install the WPCD Proxmox Private Cloud provider, please check the following 8 items on your Proxmox nodes. These are the requirements for using the unmodified baseline version of this provider.
1. Check Versions
We have tested this provider on Proxmox V 7.2.7.
Earlier versions will not work.
Later versions may or may not work (though we expect that they would work).
2. Install SnapD and CertBot on All Proxmox Nodes
Each Proxmox server node that will host a container must have SNAPD installed as well as the CERTBOT SNAP on it. Without these two items on the PROXMOX host the container will not be able to install Certbot. (If you’re not familiar with it, CERTBOT is the process that allow us to obtain free SSL certificates from LetsEncrypt).
apt-get install snapd -y
snap install core
snap install --classic certbot
snap set certbot trust-plugin-with-root=ok
snap install certbot-dns-cloudflare
snap set certbot trust-plugin-with-root=ok
snap install certbot-dns-dnsmadeeasy
snap set certbot trust-plugin-with-root=ok
snap install certbot-dns-google
snap set certbot trust-plugin-with-root=ok
snap install certbot-dns-ovh
snap set certbot trust-plugin-with-root=ok
snap install certbot-dns-route53
snap set certbot trust-plugin-with-root=ok
3. Create An APPARMOR Profile On All Proxmox Nodes
Each Proxmox server node that will host a container must have a custom APPARMOR profile file setup inside the /etc/apparmor.d/ folder. You can name the file anything you like but we suggest using the name wpcd. (So nano /etc/apparmor.d/wpcd will create an empty file in which you can add the following profile lines.)
profile wpcd flags=(attach_disconnected,mediate_deleted) {
mount fstype=fuse,
mount fstype=securityfs -> /sys/kernel/security/,
deny /sys/kernel/security/** rwklx,
}
4. All Containers Must Use The New APPARMOR Profile
The easiest way to get all new containers to use the new APPARMOR profile is to include it in the default APPARMOR configuration file. Open the file using NANO:
nano /etc/lxc/default.conf
Add the following line to the end of it:
lxc.apparmor.raw = #include </etc/apparmor.d/wpcd>
Save the file using CTRL-O and exit with CTRL-X.
Each container must then reference this file by modifying it’s configuration file:
nano /etc/pve/etc/<container ID>.conf
Where <container id> is usually a number such as 100. eg: nano /etc/pve/etc/100.conf
Add in the following lines:
lxc.apparmor.raw: #include <wpcd>
5. Create A Pool
You will need to add at least one POOL under your datacenter. The default Proxmox installation does not create a pool for you so you need to create one yourself.
You can create a pool using DATACENTER->PERMISSIONS->POOLS screen.
The pool must be given the permissions of the ROOT user.
6. Add Storage To The Pool
Then, you will need to add storage to the pool. You can do this under the MEMBERS tab for the pool – use the ADD button at the top of the tab.
7. Templates
Unfortunately you cannot use the default Proxmox templates for Ubuntu 18.04, 20.04 and 22.04. Instead you need to create customized versions of these templates:
Each Ubuntu template needs to be modified for the following and then saved with a new name.:
- Root admin is allowed ssh access.
We will ask for these new names when configuring the provider in the WPCD settings area.
8. Other
- You should verify that containers you manually create are accessible from the internet. Then you should use similar settings when configuring this provider.
- You should verify that the default DNS settings for PROXMOX containers allow for access TO internet services (i.e.: that containers using the default DNS can successfully ping websites such as Google etc.)
Installing the Proxmox Private Cloud Provider
Once you’ve taken care of ALL the prerequisites on the PROXMOX cluster mentioned above, you can install the provider for WPCD.
The provider is just a regular WordPress plugin – upload and activate it from the WordPress PLUGINS screen.
Configuring the Proxmox Private Cloud Provider
Unlike all the other providers, there is a lot more to configure here. You will see the following sections on the settings screen for the provider:
- API Keys
- Container Placement
- OS Templates
- IP Addresses
- Container Sizes
- SSH Keys
Below is an explanation of how to proceed with configuring each section.
Start by navigating to the WPCLOUDDEPLOY → SETTINGS → CLOUD PROVIDERS tab and click on the PROXMOX sub-tab.
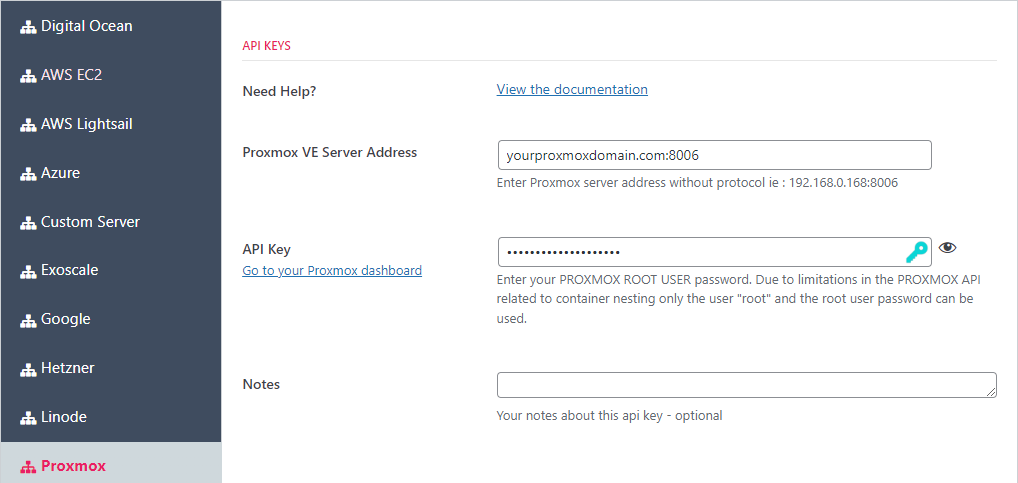
Fill out the following fields in the API KEYS section:
- Proxmox VE Server Address: This is usually the URL you navigate to when accessing your Proxmox dashboard. Usually the port is 8006
- API Key: This is the password for the proxmox cluster ROOT user. (Due to certain limitations in the Proxmox API, this provider does not use API Tokens).
Click the SAVE SETTINGS button at the bottom of the screen – click it TWICE. This will cause provider to reach out to the cluster and collect some information which will populate some of the fields in the other sections.
Container Placement
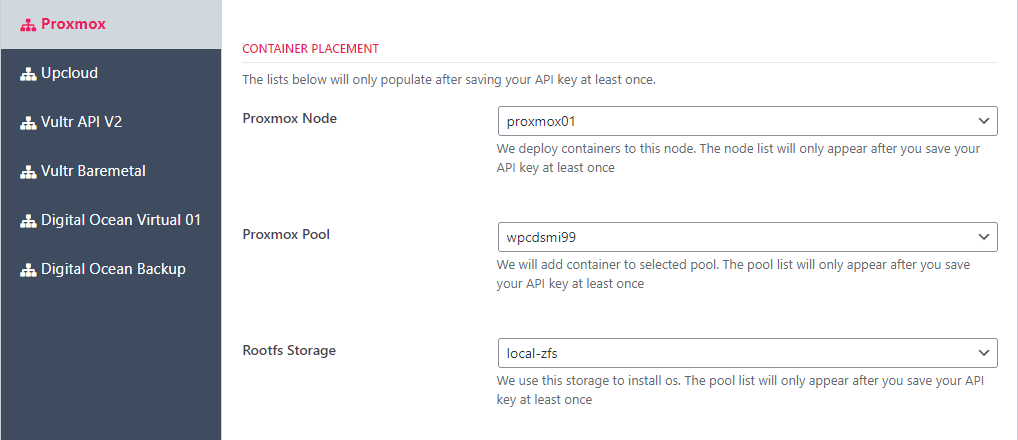
Under the CONTAINER PLACEMENT section choose your PROXMOX NODE, PROXMOX POOL and STORAGE. If you met the pre-requisites and the api key is correct then there should be at least one entry in each of these drop-downs.
Then, click the SAVE SETTINGS button.
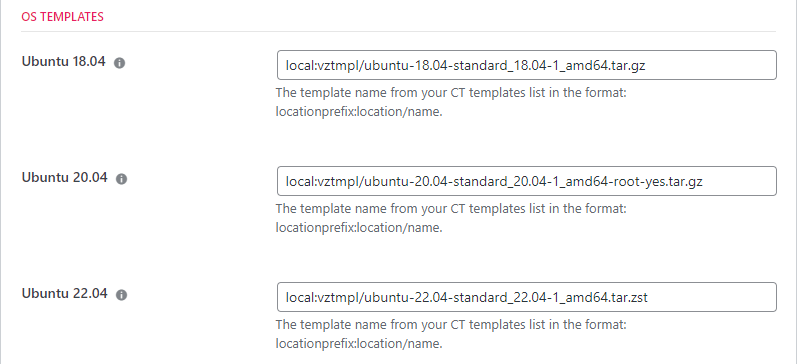
OS Templates
Next, you need to enter the names of the templates for each of the Ubuntu Operating Systems – 18.04, 20.04, 22.04.
One of the nice benefits about using our private cloud providers is you can customize these images and use them as the baseline operating system – a feature we don’t offer in our public cloud providers.
For more information about the format of these names please see the OS TEMPLATE NAMES section later in this document.
Public IP Addresses
Since you’re using a private cloud, you need to let the provider know which public IP addresses can be used for containers. Every time we create a container, we will use one of these addresses. We track used addresses and restore them to the available pool when a container is deleted.
There is a special format for these addresses:
ipv4/cidr|gateway|mac-address
You can see an example in the image below.
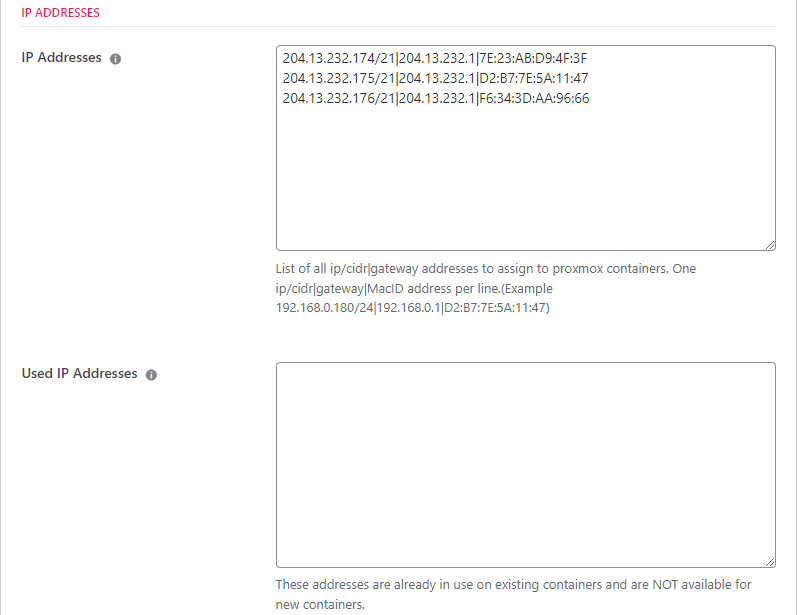
The mac-address is optional but is sometimes needed because many hosting companies cache the IPv4->MAC ADDRESS relationship at their network edge. This caching can cause networking issues if an IPv4 address is reused with a different mac address. We recommend you use it if you’re not sure whether or not your host does this type of caching.
You do not need to enter any data into the USED IP ADDRESSES field. We will update this field as the IP addresses are used to create new containers.
Server/Container Sizes
One of the benefits of your own private cloud is you get to create your own server sizes instead of using the predefined ones given to you by the major cloud providers.
You can create as many sizes as you like. But you do need to create at least one.
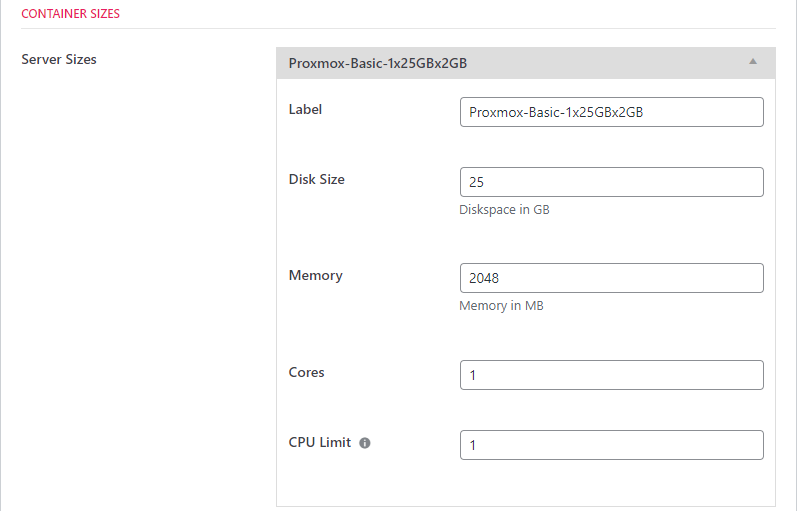
- Label: This is the size name that will be shown when selecting a size when creating a new server.
- Disk Size: Enter a number here – this is in Gigabytes.
- Memory: Enter a number here – this is in megabytes
- Cores: This is the number of virtual cores that the container will see. The only relationship it has to the real physical cores is that it must be less than that. We do not recommend setting this to less than 2.
- CPU Limit: This is the number of physical cores that the container is allowed to used. You can set multiple virtual cores while still restricting the container to 1 physical CPU (but we don’t recommend that.) If you set this to zero, all cores will be available to the container and the OS will be able to decide how to allocate cpu resources to it. We do not recommend setting this to anything less than 2.
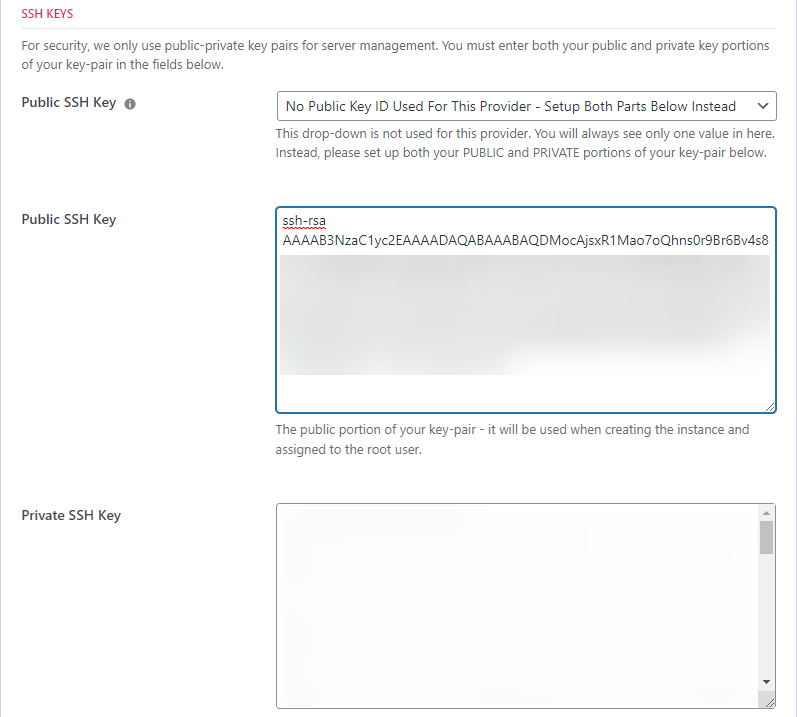
SSH Keys
As with the other providers you need to setup your SSH keys. Unlike most of them, you need to provide BOTH the public and private keys.
OS Template Names
In the WPCD settings area for the Proxmox provider we ask for the name of the template for each operating system. The template names have the following restrictions as follows:
- Format: local:vztmpl/ubuntu-20.04-standard_20.04-1_amd64-root-yes.tar.gz
- Ubuntu 22.04 template might end in a different extension (.zst) eg: local:vztmpl/ubuntu-22.04-standard_22.04-1_amd64.tar.zst
Using Multiple Nodes
The basic Proxmox provider can only be used to assign containers to a single node. In order to use it on multiple nodes, you need to install the VIRTUAL PROVIDER add-on. Once that has been installed, you can create a virtual provider for each node– learn more in the Virtual Provider documentation.
Known Issues & Limitations
- When the server is being installed you will see the following messages – these are ok and expected.
snapd.failure.service is a disabled or a static unit, not starting it.
snapd.snap-repair.service is a disabled or a static unit, not starting it.
- When the server is being installed or during other operations you might see the following message – this is ok and expected:
sudo: setrlimit(RLIMIT_CORE): Operation not permitted
- When the server is being installed or during other operations you might see the following message – this is ok and expected:
'unknown': unknown terminal type
- When the server is being installed you will see far more output than you would when using other providers. This is expected.
You can suppress the setrlimit message by running the following command in each container after its provisioned:
echo "Set disable_coredump false" >> /etc/sudo.conf
If your only server provider is PROXMOX then you can also modify the bash script that sets up our server to run this command.
Notes
- Only the ROOT user password can be used for the API key because of restrictions in the use of ‘nesting’ with the api. If you’re curious why, see this thread: https://forum.proxmox.com/threads/set-features-via-http-api2-doesnt-work.102966/ and this part of the proxmox code: https://github.com/proxmox/pve-container/blob/9d9ac8a9ae66012a5b22bc74b4964bd32c3528ed/src/PVE/LXC.pm#L1283
More Topics In Multicloud
- All About Cloud Server Providers
- Alibaba ECS Provider: Introduction, Installation & Configuration Guide
- DigitalOcean Provider: Introduction, Installation & Configuration Guide
- EC2 Provider: Introduction, Installation & Configuration Guide
- Exoscale Provider: Introduction, Installation & Configuration Guide
- Linode Provider: Introduction, Installation & Configuration Guide
- UpCloud Provider: Introduction, Installation & Configuration Guide
- Hetzner Provider: Introduction, Installation & Configuration Guide
- Vultr Provider: Introduction, Installation & Configuration Guide
- Google Compute Engine: Introduction, Installation & Configuration Guide
- Microsoft Azure Provider: Introduction, Installation & Configuration Guide
- Lightsail Provider: Introduction, Installation & Configuration Guide
- OpenStack Private Cloud Provider: Introduction, Configuration & Installation Guide
- Changing SSH Keys For A Cloud Provider
- Custom Images
