Advanced Backups
Introduction
WPCD has always had a backup process for your WordPress site. However, while the current backup process is easy to use, that ease of use brings some limitations:
- It only sends data to Amazon S3
- The scheduling is fixed and
- Multiple remote targets and accounts are not supported.
In order to provide flexibility and additional features, we are introducing a new backup script.
This backup script allows for the following:
- Additional targets such as Backblaze B2, DigitalOcean spaces, Dropbox and more. In fact it has 30+ separate targets!
- Is based upon the well-known and well-supported rclone project. You can view a list of all the remote targets that are supported here.
- Backups for separate components – database, files, nginx configuration or all items.
- Multiple cron/automatic schedules for each or all components
- Differential backups for files
- Easier bare-metal restores and downloads from remote locations
- Send each backup to multiple remotes
- Exclude files by size and by path to avoid backing up extra-large files and unnecessary paths
The feature set sounds great, right? Well, there is a catch. Right now you can only use it from the command line.
The reason for this limitation is because the feature set is so large, it will take us forever to write a UI that works. And, for most users, the basic S3 backup we have now is good enough. So this advanced backup script is only likely to be used by advanced users – those with a comfort level on the command line anyway.
Eventually we might include a UI for a few of the more popular remote targets such as backblaze and DigitalOcean spaces. But, for now, it’s a command-line only option.
Installing The Scripts
The first thing you need to do is to upload the scripts to your server.
Log into your server via SFTP as root and navigate to root’s home directory.
Then, upload the following two scripts from our plugin:
- 41-wp-backup2.txt
- wp-backup2-helper
Notice that the second script does not have a file extension!
These scripts are located in the includes/core/apps/wordpress-app/scripts/v1/raw folder folder in the WPCloudDeploy plugin .zip file.
Once uploaded you need to then ssh into your server as root. This should place you into root’s home directory. If not, switch to it using a cd ~ command.
In there, you should execute the following command:
-
sudo dos2unix *wp-backup2*
You should see confirmation that the files were processed.
 At this point the script is ready to be run via the BASH command.
Setting Up Your First Remote Backup Location
Before you can perform a backup, you must configure a remote backup location. If you do not, then the only place your backups will be located is on the server itself.
In order to setup your first remote backup location you need to run the script. To do this, make sure you are in the folder where the scripts were uploaded. Then run the following command:
sudo bash ./41-wp-backup2.txt
You will be using this command often so get used to it!
When you run that command you will see a screen that looks like this:

To configure your first remote backup location, type the number 16 (corresponding to the “Configure Rclone” menu option) and hit ENTER.
You will be dumped into a new screen – the RCLONE configuration screen.

Type “n” and hit the enter key to set up a new remote configuration.
Then, follow the prompts to create a name and enter the parameters required.
Each remote will require a different information-set in order to be configured properly. You can review the RCLONE Documentation on their site to understand more about what each request means.
You should make a note of the remote name that you assigned. It is going to be needed later!
Test Your Remote By Running A Manual Backup
Once you’ve created a remote, the first thing you’ll want to do is test it by running a manual backup.
Invoke our script again:
sudo bash ./41-wp-backup2.txt
Then choose option 1 from the menu (“Make a backup”)
You will then be asked which site you would like to backup:

Type the number corresponding to the site and hit ENTER. You will then need to choose the type of backup:

Type 1 (“full backup”) and hit ENTER. You will then be asked for a description or label for the backup. We suggest you make this a short description.
Finally, you will be asked for the RCLONE remote name and bucket or path – make sure you enter it exactly and hit ENTER. If you make a mistake, the backup will be completed and stored locally but never uploaded to the remote.
The path name or bucket syntax will depend on the type of remote you’re using.
You can select multiple remotes by separating them with a comma (“,”).
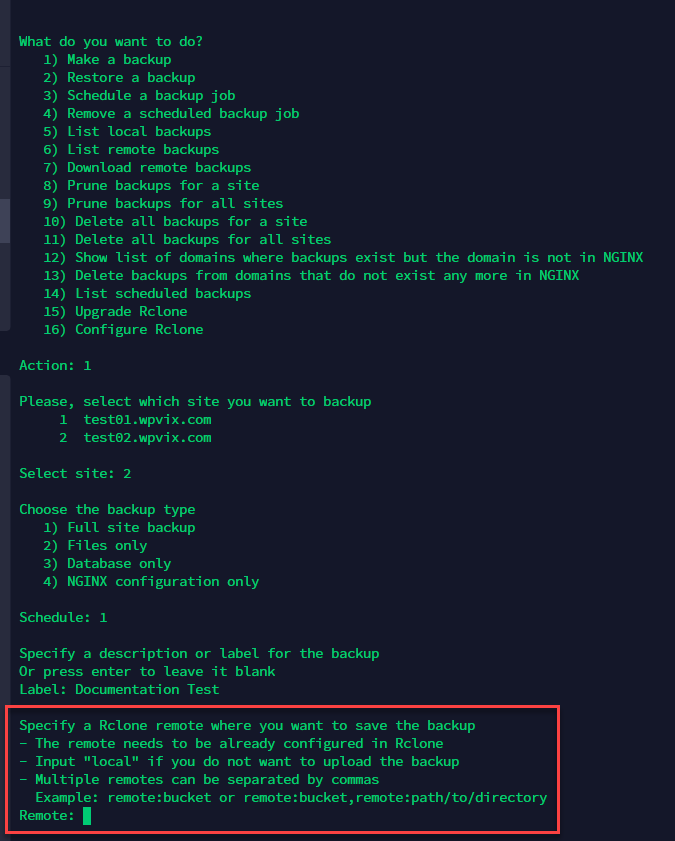
The next few questions will be about file size exclusions and path or filename exclusions. Just hit the ENTER key to bypass them and backup everything. You will then see the result of the backup.
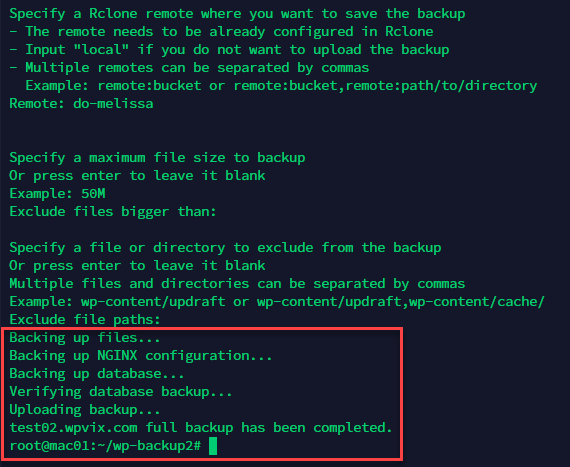
You should double-check that your backup made it to the remote location by logging into your remote location providers’ console.
If the backup files cannot be uploaded to the remote, you’ll see errors – the most common being permission errors.
Setup A Backup Schedule
Now that you are sure your remote is configured properly and backup files are being uploaded, you can set up an automatic backup.
Invoke our script again:
sudo bash ./41-wp-backup2.txt
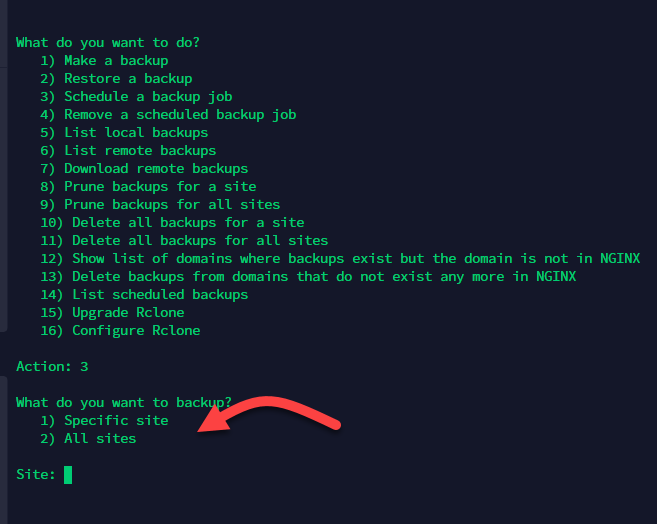
Then choose option 3 from the menu (“Schedule a backup job”).
You will be asked what sites should be backed up – a single site or all sites on the server:
You will then be asked what type of backup to perform:
- Full Site
- Files Only
- Database Only
- NGINX configuration only
Now you have to choose the backup plan. The choices are:
- Complete Backup
- Incremental Backup
Then you get to choose from four frequencies:
- Hourly
- Daily
- Weekly
- Monthly
Finally, you must enter the RCLONE remote configuration name and bucket or path name where the files will be sent. Make sure you enter it exactly and hit ENTER. If you make a mistake, the backup will be completed and stored locally but never uploaded to the remote. The path name or bucket syntax will depend on the type of remote you’re using. And, you can enter multiple remotes & buckets/paths by separating them with a comma (“,”).
The next few options will be about excluding large files and or paths. If you have a backup plugin installed, we strongly recommend that you exclude the path where it stores its backup files. And unless you’re storing large media files you should consider excluding file sizes greater than, say 50M.
You should then be greeted with a message that the backup job has been scheduled and you will be assigned an ID for that job.

You should monitor your remote location to see if the files end up in there after the specified schedule!
Incremental (Differential) Backups
(Experimental/beta)
As you use this new script you’ll notice that one of the options is “incremental” backups. This is a feature that isn’t as fully tested as we’d like. Usually, when we introduce a feature in the plugin we test it with our own sites. But we are not fans of incremental backups so we don’t use it ourselves. Thus, this feature might remain in permanent beta status.
The reason we personally avoid any kind of incremental backups is because losing a single incremental backup file will cause the entire incremental backup chain to be worthless. Loss of a single file can mean losing multiple days or weeks of incremental backups. That’s a lot of risk. So we avoid the whole thing ourselves. (WPJohnny has a nice little summary on why you shouldn’t do incremental backups.)
The only reason we included it as a feature is because many users asked for it as a way to save on backup storage costs. For us though, we just use Amazon’s deep glacier service which is ridiculously cost effective.
So, our recommendation is to avoid incremental backups if you can. But, if you must use them, make sure you test them thoroughly – including restores – before depending on them 100%. And send them to multiple remote storage locations so that if one piece is lost at one provider you’ll still end up with a useable backup.
Restoring Data
After running a backup, you should run a test restore to make sure that the restore works well. The last thing you want is to find out later that your restores don’t work!
We recommend running test restores frequently to make sure that your backups are valid and accessible. This is the recommended practice for all backups you do across all your computer systems!
Notes
Here are some important notes to keep in mind with regards to this backup script:
- The backup schedule will run each backup sequentially to avoid overloading the server. Thus, if you have 5 sites scheduled for an hourly backup, it will process each site sequentially instead of trying to backup all 5 sites simultaneously.
- To save file space on the target, we compress all files into .gz archives before invoking rclone. This also makes it faster to download as well. However it removes the ability to use rclone’s dedup command.
Support Notes
Unfortunately, we are not experts in all 30+ of the remote targets that RCLONE supports nor do we have access to accounts at each of those targets. So, we can only officially offer support for few remotes. These include:
- AWS
- Digital Ocean Spaces
- Backblaze
- Dropbox (limited support)
Most other remote targets should work but if, for some reason, you end up having issues configuring them, we’re likely going to be unable to help in any meaningful way.
However, once a remote is configured and proved to be working, we support everything else around it regardless of which type of remote location is being used.
Provider Specific Notes
Here are some notes about individual providers – we gathered these during our development phase and from reports from customers.
AWS S3
AWS S3 is difficult to configure because of the use of IAM policies. Here are a few things you might want to check:
- Start with rclone’s baseline IAM policy and then tweak from there for your use case: https://rclone.org/s3/#s3-permissions
More Topics In Command Line
