AWS EC2 Premium Template
Introduction
We have created an image on the AWS marketplace that you can use to quickly create a WordPress server & site with the Premium All Access version of WPCloudDeploy already pre-installed.
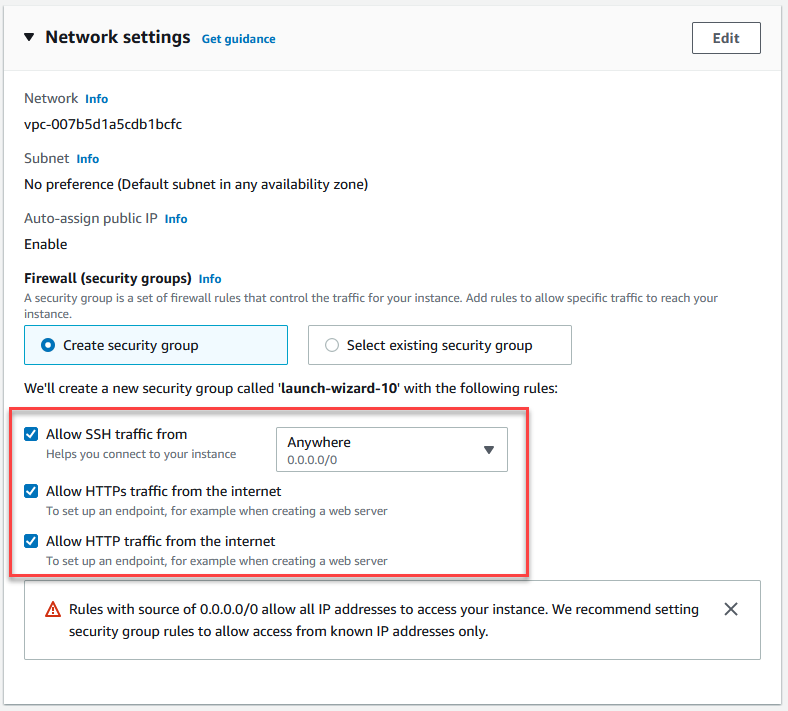
When creating the instance, you should ensure that you enable the options for SSH, HTTP and HTTPS in the NETWORK SETTINGS section as shown in the image below:
Once the instance has been created you will need to login to it via SSH to continue the setup process.
When you login for the first time you will be asked to choose your domain and to provide your email address.
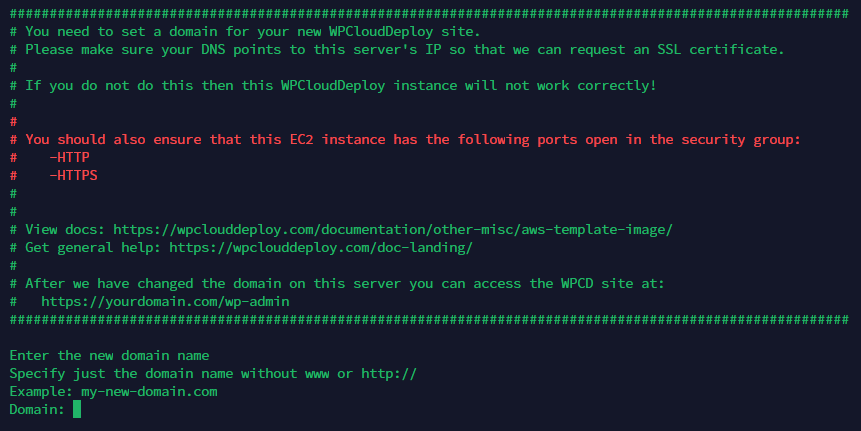
If the domain you provide is pointed to the IP address of the new droplet we’ll request an SSL certificate. We strongly recommend that you point your domain IP address to the new droplet PRIOR to entering the domain name here so that the SSL certificate can be issued.
When you get to the end of the process you will see additional instructions on how to access the site.

Generally your site can be accessed at https://yourdomain.com/wp-admin.
Using WPCloudDeploy For The First Time: Easy Setup
When you log into WPCLOUDDEPLOY for the first time you will see a green banner at the top of the screen. This will allow you to invoke an easy on-boarding process as long as you are deploying your new servers into the DigitalOcean cloud.

If you are NOT deploying servers into the DigitalOcean cloud and you have one of our premium providers (eg: AWS EC2, AWS LightSail, Linode, Vultr etc.), you can skip this on-boarding process and use the advanced instructions shown later in this document.
Click the button in the green banner to get started and you’ll see the first page of the on-boarding wizard.

Because we have automatically created an encryption key for you with this AWS EC2 instance you can just click the green CONTINUE button to move to the next step:
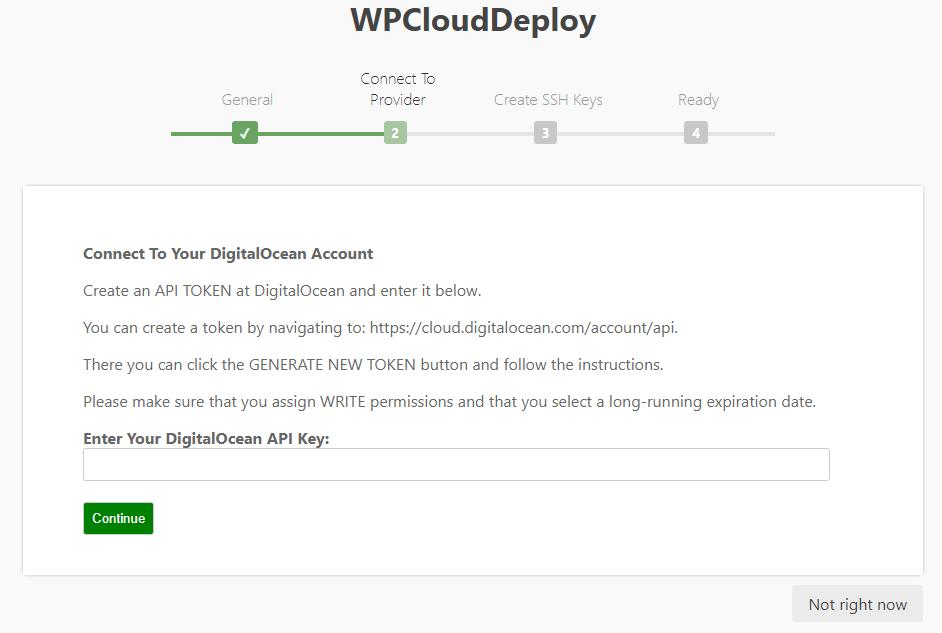
You can get your API Key from your DigitalOcean dashboard – use the API Menu option to generate a key. Make sure the key has WRITE permissions!
Enter the key and click the green CONTINUE button to generate your SSH key-pair:
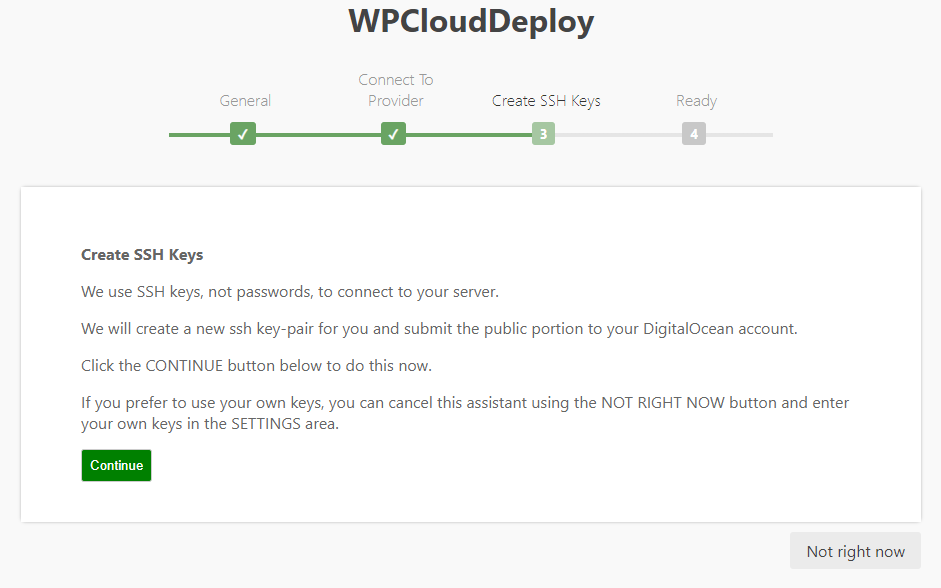
We use SSH keys instead of passwords to access your servers. This step will allow us to generate a unique pair for you, submit the public portion to DigitalOcean and securely store the private portion in WPCD.
Just click the green CONTINUE button to proceed.
At the next step click the green CONTINUE button to complete the process and go to the servers list.
1. Create Your First Server
To create your first server:
- Go to WPCLOUDDEPLOY → CLOUD SERVERS.
- Click the DEPLOY A NEW WORDPRESS SERVER at the top of the screen.
- Follow the instructions on the screen and then go get a cup of coffee – it’ll take about 20 minutes for the server to be deployed.
Important: Please choose a server size with at least 1 GB RAM. DigitalOcean offers droplets with as little as 512MB but those will not work for WPCD WordPress servers.
After a server is provisioned you will be returned to the servers list where you will see the new server available for use. You will also see a message in the health column about CALLBACKS being unavailable – you can ignore that message because they will eventually be installed in the background.
It’s now time to install your first WordPress site.
2. Install Your First Site
To create your first site after creating your first server:
- Go to WPCLOUDDEPLOY → CLOUD SERVERS
- Click the INSTALL WORDPRESS button in the Server Actions column. This should take no more than 5 minutes to complete.
- Update your DNS for the new site/domain to point to the server.
Using WPCloudDeploy For The First Time: Advanced Setup For AWS EC2
To deploy servers into the AWS cloud you need a premium license for WPCloudDeploy – you can purchase one from our pricing page.
After you’ve made your purchase, please download the EC2 provider file and install it as you would any WordPress plugin into your new WPCloudDeploy site. (Full installation and usage instructions can be found here: https://wpclouddeploy.com/documentation/cloud-providers/ec2-provider/)
1. Connect To AWS EC2
Before you can create servers and sites in your AWS account, you do need to:
- Do some preliminary work in your AWS account to configure and prepare it for WPCloudDeploy.
- Perform some setup work inside the WPCloudDeploy application to link to your AWS account.
Configure your AWS account:
- You will need to create an IAM user (or use an existing IAM user) with the proper permissions to create EC2 instances. You will obtain your EC2 ACCESS KEY and EC2 SECRET KEY from this user.
- Create or upload an SSH key pair to the region where you will be building your servers. You cannot use the ‘default’ ssh keys that AWS provides – you must create a new pair or upload your own pair. AWS keypairs are specific to a region. If you need to use the same keypair in all regions then you must upload it to all regions. (How To Create SSH Keys.)
- Verify that the default security group for your account has ports 22, 80 and 443 (SSH, HTTP and HTTPS) open. All servers are provisioned in your default security group.
Once you’ve got those preliminaries handled:
- In your new WPCloudDeploy site, navigate to the WPCloudDeploy → Settings → Cloud Providers tab.
- Click the SAVE button
- Click the SAVE button AGAIN. This will cause the REGION drop-down to be populated from data in your AWS account
- Select a region from the REGION drop-down
- Click the SAVE button
- Click the SAVE button AGAIN
- Click the CLEAR CACHE button at the bottom of the screen to force a cache refresh of your keys list. This will cause the PUBLIC SSH keys drop-down to be populated from data in your AWS account.
- Select a key from the PUBLIC SSH KEY drop-down. Be careful – this drop-down is initially populated with keys from your account’s default region. If you’re using a different region, you should make sure that the list shown here is the one for your selected region. You might have to save the screen a couple of times to force it to refresh.
- Enter your private key that correspond to the public key. It is very very important that you make sure the private key data matches the public key you selected in the prior step. View important notes about private ssh keys.
- Add your private key password if any (but if you do have a password for your key please see the important notes link we provided in the step above which contains information about passwords on private keys)
- Click the SAVE button
- Click the SAVE button AGAIN
Now you’re ready to quickly run through the steps to get your first server and site up and running.
2. Create Your First Server
To create your first server:
- Go to WPCLOUDDEPLOY → CLOUD SERVERS.
- Click the DEPLOY A NEW WORDPRESS SERVER at the top of the screen.
- Follow the instructions on the screen and then go get a cup of coffee – it’ll take about 20 minutes for the server to be deployed.
Important: Please choose a server size with at least 1 GB RAM. Your provider might offer instances with as little as 512MB but those will not work for WPCD WordPress servers.
After a server is provisioned you will be returned to the servers list where you will see the new server available for use. You will also see a message in the health column about CALLBACKS being unavailable – you can ignore that message because they will eventually be installed in the background.
3. Install Your First Site
To create your first site after creating your first server:
- Go to WPCLOUDDEPLOY → CLOUD SERVERS
- Click the INSTALL WORDPRESS button in the Server Actions column. This should take no more than 5 minutes to complete.
- Update your DNS for the new site/domain to point to the server.
Using WPCloudDeploy For The First Time: Advanced Setup (All Other Cloud Providers)
1. Connect To Your Cloud Provider
Before you can create servers and sites, you do need to perform some setup work in your Cloud Provider account to link it to the WPCloudDeploy app. In these advanced setup instructions we’ll assume that your cloud provider is DigitalOcean but it might be a different one such as Linode or Vultr or Upcloud. Just replace the “DigitalOcean” term in the instructions below with the name of your provider.
- Make sure you have at least one SSH key pair installed at Digital Ocean. If you don’t have a key pair, use this guide to learn how to generate one. And this one explains how to upload your public key to the Digital Ocean control panel.
- It is very important that you do this BEFORE you proceed to the next step. The reason is that once you add your API key to our plugin, it will attempt to retrieve your SSH keys and it will cache them. If you then proceed to change or add new keys, you’ll need to wait until the cache times out (around 15 minutes) before you’ll be able to see the new keys in WPCloudDeploy.
- Create an API key at DigitalOcean – you can do this inside your DigitalOcean dashboard. Look for the API menu option when logged into your account.
- Go back to WPCloudDeploy and navigate to the WPCloudDeploy → Settings → Cloud Providers tab.
- Fill out the API Key field then click the save button at the bottom of the screen.
- Now, the SSH key dropdown will be filled in with the keys you uploaded to DigitalOcean. Select one of them. If you do not see this dropdown, you can try one of the following:
- Click the SAVE button again – sometimes you just need to query the cloud provider a second time (some of them perform a sort of micro-caching)
- Use the CLEAR CACHE button at the bottom of settings screen for the provider
- Wait 15 minutes and try again – see the first step above to understand why this might work.
- Add the private key portion to the PRIVATE SSH KEY box. It is very very important that you make sure the private key data matches the public key you selected in the prior step. View important notes about private ssh keys.
- Add your private key password if any.
- Save the settings.
Now you’re ready to quickly run through the steps to get your first server and site up and running.
2. Create Your First Server
To create your first server:
- Go to WPCLOUDDEPLOY → CLOUD SERVERS.
- Click the DEPLOY A NEW WORDPRESS SERVER at the top of the screen.
- Follow the instructions on the screen and then go get a cup of coffee – it’ll take about 20 minutes for the server to be deployed.
Important: Please choose a server size with at least 1 GB RAM. Your provider might offer instances with as little as 512MB but those will not work for WPCD WordPress servers.
After a server is provisioned you will be returned to the servers list where you will see the new server available for use. You will also see a message in the health column about CALLBACKS being unavailable – you can ignore that message because they will eventually be installed in the background.
3. Install Your First Site
To create your first site after creating your first server:
- Go to WPCLOUDDEPLOY → CLOUD SERVERS
- Click the INSTALL WORDPRESS button in the Server Actions column. This should take no more than 5 minutes to complete.
- Update your DNS for the new site/domain to point to the server.
More Topics In Other & Misc
