Using Our AWS EC2 Core Template
Introduction
We have prebuilt a server image on the AWS marketplace that you can use to quickly create a WordPress server & site with WPCloudDeploy already pre-installed.
You will need some basic SSH skills to be able to log into the server and follow the prompts so you can connect your domain and setup WPCD.
After navigating to the AWS Marketplace page with the above button, please click the CONTINUE TO SUBSCRIBE button to get started.
When using this option, you have a few choices during the process:
- Connect to your DigitalOcean Cloud with our DigitalOcean Wizard (even though you’re launching WPCD inside EC2)
- Connect to your EC2 or other premium server provider account using a lengthier quick-start process (requires a WPCD Premium Subscription)
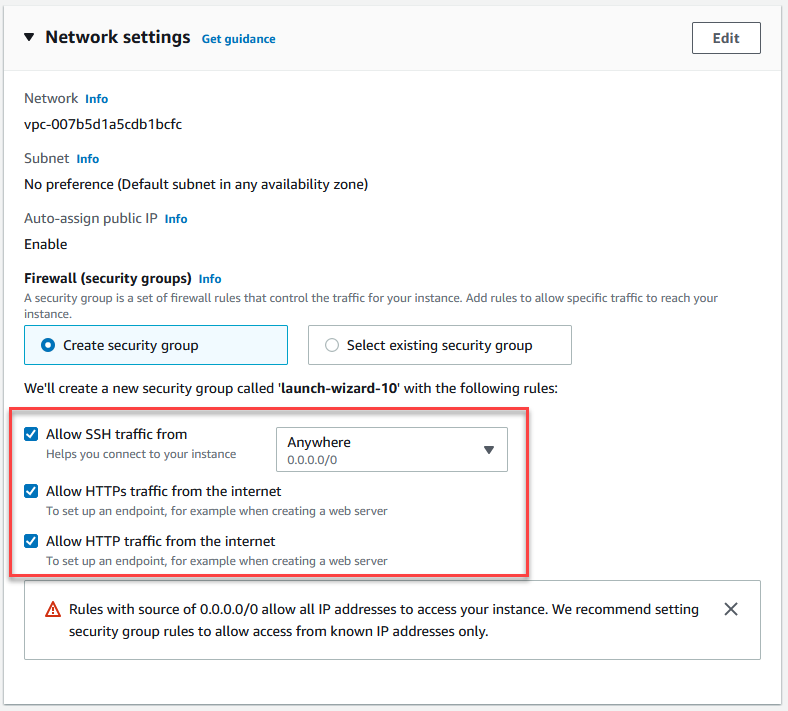
When creating the instance, you should ensure that you enable the options for SSH, HTTP and HTTPS in the NETWORK SETTINGS section as shown in the image below:
Once the instance has been created you will need to login to it via SSH to continue the setup process.
When you login for the first time you will be asked to choose your domain and to provide your email address. Your email address is required to setup your SSL certificate and to make sure that your WPCD site knows where to send any alerts.
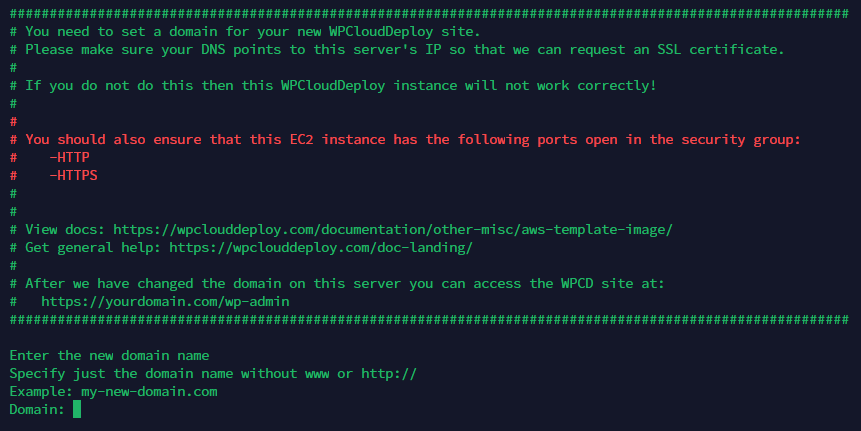
If the domain you provide is pointed to the IP address of the new droplet we’ll request an SSL certificate. We strongly recommend that you point your domain IP address to the new droplet PRIOR to entering the domain name here so that the SSL certificate can be issued.
When you get to the end of the process you will see additional instructions on how to access the site.

Generally your site can be accessed at https://yourdomain.com/wp-admin.
Remove The Start up Script
If you log out and log back into the server using SSH, you will be prompted to setup the site again. This is because the setup script is part of the root user after-login script.
If you proceed to run through the setup again, you will irreversibly damage the original site. Instead you should CTRL-BREAK / CTRL-C out of the script.
To prevent the script from accidentally running again you can remove the script from the root user start up sequence as follows:
Edit the root user start up script:
nano ~/.bashrc
Scroll down to the bottom of the file. There you will see a line that looks like this:
bash /root/800_do_first_login.sh
Just delete the line (and the related comment above it). Then save the file:
ctrl-o <enter>
And exit the nano editor:
ctrl-x
Test that the script no longer runs on login by logging out and then logging back in with ssh.
Upgrade To Latest Plugin Version [Premium License]
If you’ve purchased a license from us, it is possible that you have a more recent version of the plugin than what is on the droplet. So the first thing you should do is upload a copy of the version of the plugin you got from us – you can do this from the regular WordPress PLUGINS screen.
Additionally, if your license include premium providers such as Linode and Vultr, you should upload those and activate them as well. This will allow you to use the quick-start Wizard (described later) with these premium providers.
Setup Options
Once you’re logged into WPCD for the first time, you have a number of ways to proceed with setup.
- Easy Setup – you can use this method if you will be deploying WordPress servers on DigitalOcean, Linode, Vultr, Hetzner or UpCloud AND you will allow WPCD to automatically create SSH key-pairs for you. You cannot use this method if you’ll be deploying servers at other cloud server providers such as Azure, Google Cloud or AWS. Yes, this applies even though your WPCD site is installed on an AWS EC2 instance. Unfortunately our setup Wizard only works with certain providers (DigitalOcean, Linode, Vultr, Hetzner and UpCloud).
- Advanced Setup For EC2 – You will need to use this option if you want to deploy WordPress servers at EC2.
- Advanced Setup – You will need to use this option if you want to deploy WordPress servers at any provider other than DigitalOcean, Linode, Vultr, Hetzner, UpCloud and EC2 – or you want to use your own SSH key-pairs.
Using WPCloudDeploy For The First Time: Easy Setup
When you log into WPCLOUDDEPLOY for the first time you will see a green banner at the top of the screen. This will allow you to invoke an easy on-boarding process as long as you are deploying your new servers into the DigitalOcean cloud.

If you are NOT deploying servers into the DigitalOcean, Linode, Vultr, Hetzner or Vultr clouds and you have one of our other premium providers (eg: AWS EC2, AWS LightSail, GCP, Azure.), you MUST skip this on-boarding process and use the advanced instructions shown later in this document.
To continue with this easy setup, click the button in the green banner to get started and you’ll see the first page of the on-boarding wizard.

Because we have automatically created an encryption key for you with this AWS EC2 instance you can just click the green CONTINUE button to move to the next step:
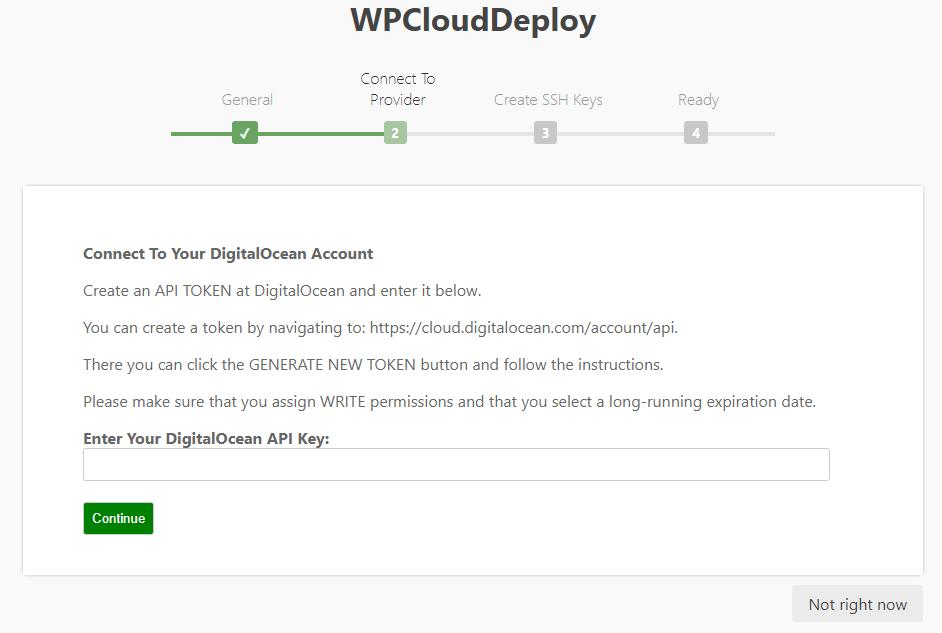
You can get your API Key from your Cloud Provider’s dashboard – use the API Menu option to generate a key. Make sure the key has WRITE permissions!
Enter the api key and click the green CONTINUE button to move to the next step where you will generate your SSH key-pair:
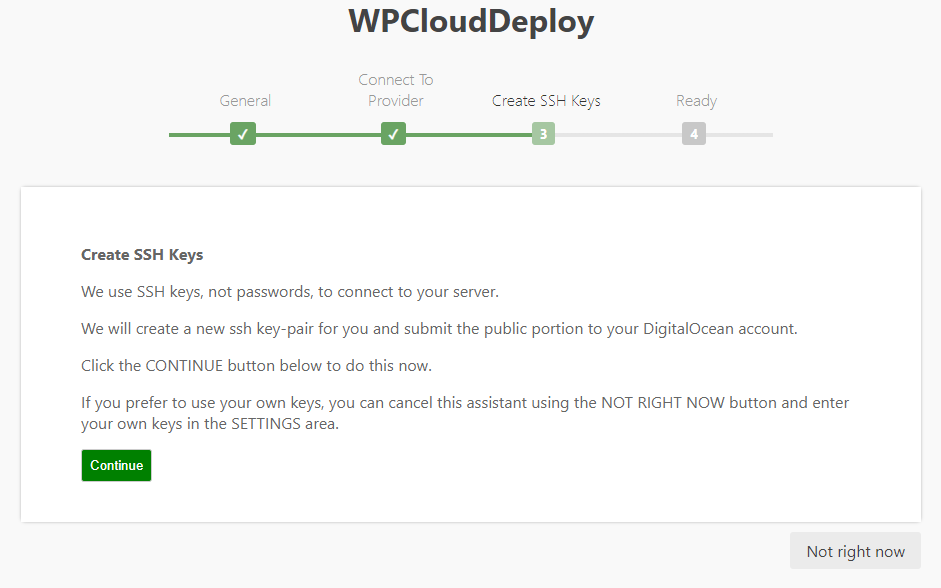
We use SSH keys instead of passwords to access your servers. This step will allow us to generate a unique pair for you, submit the public portion to DigitalOcean and securely store the private portion in WPCD.
Just click the green CONTINUE button to proceed.
At the next step click the green CONTINUE button to complete the process and go to the servers list.
1. Create Your First Server
To create your first server:
- Go to WPCLOUDDEPLOY → CLOUD SERVERS.
- Click the DEPLOY A NEW WORDPRESS SERVER at the top of the screen.
- Follow the instructions on the screen and then go get a cup of coffee – it’ll take about 20 minutes for the server to be deployed.
Important: Please choose a server size with at least 1 GB RAM. DigitalOcean offers droplets with as little as 512MB but those will not work for WPCD WordPress servers.
After a server is provisioned you will be returned to the servers list where you will see the new server available for use. You will also see a message in the health column about CALLBACKS being unavailable – you can ignore that message because they will eventually be installed in the background.
It’s now time to install your first WordPress site.
2. Install Your First Site
To create your first site after creating your first server:
- Go to WPCLOUDDEPLOY → CLOUD SERVERS
- Click the INSTALL WORDPRESS button in the Server Actions column. This should take no more than 5 minutes to complete.
- Update your DNS for the new site/domain to point to the server.
Using WPCloudDeploy For The First Time: Advanced Setup For AWS EC2
As mentioned earlier in this document, you will need to use this option if you want to deploy WordPress servers at any provider other than DigitalOcean OR you want to use your own SSH key-pairs. This includes AWS EC2.
There are the seven groups of actions you will perform:
Summary of Steps
- Upload and activate the EC2 provider (premium plugin)
- Get your EC2 API Keys
- Create your SSH Keys
- Prepare Your AWS Account For Connection From WPCD
- Connect WPCloudDeploy To EC2
- Install your first server
- Install your first site.
To deploy servers into the AWS cloud you need a premium license for WPCloudDeploy – you can purchase one from our store.
After you’ve made your purchase, please download the EC2 provider file and install it as you would any WordPress plugin into your new WPCloudDeploy site. (Full installation and usage instructions can be found here: https://wpclouddeploy.com/documentation/cloud-providers/ec2-provider/)
1. Install and Activate the EC2 Premium Plugin
The Core WPCloudDeploy plugin is already installed on your EC2 instance and ready to be connected to your EC2 account. However, you still need to install the WPCD AWS EC2 premium provider.
Installing any premium provider plugin, including the one for AWS EC2, is just like any other WordPress plugin:
- Download the .zip file from our site
- Go to the WordPress Plugins menu
- Click the Add New button.
- Click the Upload Plugin button at the top of the Add Plugins page.
- Click the Choose File button, navigate to the .zip file from step 1 and then click the Install Now button.
- After the upload is complete, click the Activate Button.
2. Create Your EC2 IAM User / Keys
You will need to create an IAM user (or use an existing IAM user) with the proper permissions to create EC2 instances. You will obtain your EC2 ACCESS KEY and EC2 SECRET KEY from this user.
3. Create Your SSH Keys
You must create or upload an SSH key pair to the region where you will be building your servers. You cannot use the ‘default’ ssh keys that AWS provides – you must create a new pair or upload your own pair. AWS keypairs are specific to a region. If you need to use the same keypair in all regions then you must upload it to all regions. (How To Create SSH Keys.)
Full installation and usage instructions for AWS EC2 can be found here: https://wpclouddeploy.com/documentation/cloud-providers/ec2-provider/
4. Prepare Your AWS Account For Connection From WPCD
Please verify that the default security group for your account has ports 22, 80 and 443 (SSH, HTTP and HTTPS) open. All WordPress servers are provisioned in your default security group.
5. Connect WPCloudDeploy To EC2
- In your new WPCloudDeploy site, navigate to the WPCloudDeploy -> Settings -> Cloud Poviders tab.
- Enter the EC2 ACCESS KEY and EC2 SECRET KEY – these are usually defined in the AWS IAM
- Click the SAVE button
- Click the SAVE button AGAIN. This will cause the REGION drop-down to be populated from data in your AWS account
- Select a region from the REGION drop-down – this must match the region where you uploaded your SSH keys
- Click the SAVE button
- Click the SAVE button AGAIN
- Click the CLEAR CACHE button at the bottom of the screen to force a cache refresh of your keys list. This will cause the PUBLIC SSH keys drop-down to be populated from data in your AWS account.
- Select a key from the PUBLIC SSH KEY drop-down. Be careful – this drop-down is initially populated with keys from your account’s default region. If you’re using a different region, you should make sure that the list shown here is the one for your selected region. You might have to save the screen a couple of times to force it to refresh.
- Enter your private key that correspond to the public key. It is very very important that you make sure the private key data matches the public key you selected in the prior step. View important notes about private ssh keys.
- Add your private key password if any (but if you do have a password for your key please see the important notes link we provided in the step above which contains information about passwords on private keys)
- Click the SAVE button
- Click the SAVE button AGAIN
Now you’re ready to quickly run through the steps to get your first server and site up and running.
6. Create Your First Server
To create your first server:
- Go to WPCLOUDDEPLOY → CLOUD SERVERS.
- Click the DEPLOY A NEW WORDPRESS SERVER at the top of the screen.
- Follow the instructions on the screen and then go get a cup of coffee – it’ll take about 20 minutes for the server to be deployed.
Important: Please choose a server size with at least 1 GB RAM. Your provider might offer instances with as little as 512MB but those will not work for WPCD WordPress servers.
After a server is provisioned you will be returned to the servers list where you will see the new server available for use. You will also see a message in the health column about CALLBACKS being unavailable – you can ignore that message because they will eventually be installed in the background.
7. Install Your First Site
To create your first site after creating your first server:
- Go to WPCLOUDDEPLOY → CLOUD SERVERS
- Click the INSTALL WORDPRESS button in the Server Actions column. This should take no more than 5 minutes to complete.
- Update your DNS for the new site/domain to point to the server.
Using WPCloudDeploy For The First Time: Advanced Setup (All Other Cloud Providers)
As mentioned earlier in this document, you will need to use this option if you want to deploy WordPress servers at any provider other than DigitalOcean, Linode, Vultr, Hetzner and UpCloud OR you want to use your own SSH key-pairs.
Summary of Steps
- (Optional) Upload and activate premium plugins
- Get DigitalOcean API Key (or API keys for your preferred cloud server provider)
- Create your SSH Keys
- Connect WPCloudDeploy To DigitalOcean (or your preferred cloud server provider)
- Install your first server
- Install your first site.
1. (Optional) Installation and Activation (Premium Plugins)
The Core WPCloudDeploy plugin is already installed and ready to be connected to a DigitalOcean account.
However, if you’re going to be connecting to any other cloud provider (eg: Linode, AWS etc.), then you must purchase a license from our store and download the premium provider plugins from your account.
Installing any premium provider plugin is performed just like any other WordPress plugin:
- Download the .zip file from our site
- Go to the WordPress Plugins menu
- Click the Add New button.
- Click the Upload Plugin button at the top of the Add Plugins page.
- Click the Choose File button, navigate to the .zip file from step 1 and then click the Install Now button.
- After the upload is complete, click the Activate Button.
2. Create API Keys For Your Preferred Cloud Server Provider
If you are not going to be use DigitalOcean to deploy your WordPress servers then you must obtain API keys for whichever service you will be using.
Each cloud provider has a different method for creating API keys. We have some caveats on keys and other restrictions for certain providers in our Cloud Provider documentation. Please make sure you read the information for the one(s) you are using before proceeding to the next step.
Also, please make sure you create a read-write keys/tokens – some providers allow you to specify these types of fine-grained permissions.
3. Create Your SSH Keys
We use SSH keys and only SSH keys to connect to your cloud servers. This means that you must have at least one key-pair created and uploaded to your cloud server providers. OR, for certain providers, we can generate and install them for you.
We can automatically generate and upload SSH keys for the following cloud server providers:
- DigitalOcean
- Linode
- Vultr
- UpCloud
- Hetzner
- OpenStack Private Cloud
Certain other providers have different SSH key requirements. Please make sure you read our Cloud Provider documentation for your provider(s).
AWS, GOOGLE CLOUD and UPCLOUD in particular have very specific SSH key requirements.
If you need to generate an SSH key-pair, you can use this guide to learn how to generate one.
If you going to be using your own SSH keys (either because we don’t offer the option to automatically generate them or because you want to use your own), then it is very important that you create and upload them to your cloud server provider before moving on to the next step!
4. Connect To Your Cloud Provider
Connecting to your cloud server provider can be very simple or very complex. Simpler providers include DigitalOcean, Linode & Vultr. Complex providers include AWS EC2 & Lightsail, Google Cloud & Azure.
We recommend that you read any of our Cloud Provider documentation notes for your provider(s).
For this section, we’ll assume you’re using DigitalOcean as your cloud server provider – if you’re using a different provider and have installed and activated the plugin for them, just substitute your provider for DigitalOcean in the instructions below. We’ll insert notes for the more complex providers as well.
- Make sure you have made your decision on how to handle your SSH keys – please see the prior section and do not continue until you have figured out your SSH key strategy.
- Go to the settings screen under the WPCloudDeploy menu option
- Click on the Cloud Providers tab and fill out the API Key field then click the save button at the bottom of the screen.
- If you are using AWS EC2, AWS LIGHTSAIL, GOOGLE CLOUD, UPCLOUD or AZURE, please make sure you read our Cloud Provider documentation – these have very specific setting options that are different from your simpler providers.
- If you have uploaded SSH keys to your provider, the SSH key dropdown will be pre-filled with these keys. Select one of them.
- If you have uploaded SSH keys to your provider and you do NOT see your keys in the drop-down, you can try one of the following:
- Click the SAVE button again – sometimes you just need to query the cloud provider a second time (some of them perform a sort of micro-caching)
- Use the CLEAR CACHE button at the bottom of settings screen for the provider
- Wait 15 minutes and try again.
- If you have NOT uploaded SSH keys to your provider and you see a CREATE SSH KEY-PAIR button, you can use that to automatically generate and upload a keypair.
- Add the private key portion to the PRIVATE SSH KEY box. It is very very important that you make sure the private key data matches the public key you selected in the prior step. View important notes about private ssh keys.
- Add your private key password if any. View important notes about private ssh keys and passwords.
- Save the settings.
Now you’re ready to quickly run through the steps to get your first server and site up and running.
2. Create Your First Server
To create your first server:
- Go to WPCLOUDDEPLOY → CLOUD SERVERS.
- Click the DEPLOY A NEW WORDPRESS SERVER at the top of the screen.
- Follow the instructions on the screen and then go get a cup of coffee – it’ll take about 20 minutes for the server to be deployed.
Important: Please choose a server size with at least 1 GB RAM. Your provider might offer instances with as little as 512MB but those will not work for WPCD WordPress servers.
After a server is provisioned you will be returned to the servers list where you will see the new server available for use. You will also see a message in the health column about CALLBACKS being unavailable – you can ignore that message because they will eventually be installed in the background.
3. Install Your First Site
To create your first site after creating your first server:
- Go to WPCLOUDDEPLOY → CLOUD SERVERS
- Click the INSTALL WORDPRESS button in the Server Actions column. This should take no more than 5 minutes to complete.
- Update your DNS for the new site/domain to point to the server.
Troubleshooting
It is possible in some regions that the password will not be generated. This is because we are unable to get the pwgen package from the Ubuntu repos. We plan on fixing this issue in a future image update.
In the meantime, you can create a file with the commands needed to update the site with a new password.
Create a new file using the NANO editor:
sudo nano fixpw.sh
Add the following into the file and replace the data in the first three lines with your domain and email address.
# set vars - replace the first two lines with your domain name and the third line with your email address.
# Note that there are no spaces around the equal sign!
new_user_name=yourdomain.com
new_domain=yourdomain.com
wps_email=[email protected] #replace this with your email address

# Update repos
apt-get update > /dev/null 2>&1

# Get password for use in wp-config.php - need to set WPCD_ENCRYPTION_KEY
apt install pwgen 1> /dev/null 2>&1
wpcd_encryption_keys=$(pwgen -s 13 7)
wpcd_encryption_key=$(echo $wpcd_encryption_keys | tr -d ' ')
su - $new_user_name -c "wp --skip-plugins config set WPCD_ENCRYPTION_KEY $wpcd_encryption_key"

# Update the default wpcdadmin email and password.
cd /var/www/$new_domain/html/
wps_user=wpcdadmin
wpcd_new_pw=$(pwgen -s 20 1)
su - $new_user_name -c "wp --skip-plugins user update $wps_user --user_email=$wps_email --user_pass=$wpcd_new_pw"

cd ~
CHKPOINT_FOLDER=/home/ubuntu/.wpcd-server-provision-checkpoints
sudo touch "$CHKPOINT_FOLDER/deploy-already-ran-once.txt"

echo -e "${RED}"
echo -e "#########################################################################################################"
echo "# Your new WPCloudDeploy site can be accessed at: $new_domain/wp-admin"
echo "# Login Name: wpcdadmin"
echo "# Password : $wpcd_new_pw"
echo "# Please change these immediately when you login along with the email address associated with this user."
echo "# Alternatively you can add a new WordPress admin user and delete this one."
echo "#"
echo "# Once logged in, please click the green button at the top of the screen to continue the setup process."echo "#"
echo "# Note: When you deploy your first server we recommend you choose a size with at least 1 GB RAM"
echo "#"echo "# How to get help:"
echo "# 1. View docs: https://wpclouddeploy.com/documentation/other-misc/aws-template-image/"
echo "# 2. Get general help: https://wpclouddeploy.com/doc-landing/"
echo "#"
echo "# Register for a free 1-on-1 walkthrough @: https://wpclouddeploy.com/cl/schedule-a-1-on-1-demo/"
echo "#########################################################################################################"
echo -e "${NC}"
Save the file:
ctrl-o <enter>
Exit the NANO editor:
ctrl-x <enter>
Execute the file:
sudo bash ./fixpw.sh
More Topics In Other & Misc
