WooCommerce & WPCloudDeploy Servers
Introduction
WPCloudDeploy makes it easy to offer your customers the opportunity to purchase WordPress cloud servers using WooCommerce. However, in order to use this feature you need to pull together a bunch of moving parts. And, relative to what you might expect in the WordPress world, the components you need are not cheap.
When completely set up, this integration will allow your customers to purchase one of any defined sized servers from any of your server providers. It will provide a way to list their servers on the front-end of the site and then manage them on the back-end.
Customers will be able to pay with Stripe or Paypal. Other payment methods might work but we have not formally tested them. (If you would like us to support another payment provider, we can do so under a custom software development contract.)
Pre-requisites
There are a number of pre-requisites that need to be in place before you can use this feature. These are:
- WooCommerce premium plugins
- Overriding some default actions in WooCommerce
- Adjusting some WooCommerce-related roles and capabilities (see more information in the next section)
- (WooCommerce 8.3+) Create Cart & Checkout pages that uses WooCommerce shortcodes instead of blocks (see more information later below)
Plugins
Here are the items you need to make this happen (in addition to WPCloudDeploy)
- WooCommerce (Free)
- WooCommerce Subscriptions
- The WPCloudDeploy WooCommerce add-on
Pre-requisite: Adjust some WooCommerce-related roles and capabilities
WPCloudDeploy offers both a front-end UI and a secure wp-admin experience. You can grant your customer one or both experiences. Most customers only require the front-end UI.
The difference between the two is that the wp-admin experience has a few functions that are rarely used by customers but if you need them, the wp-admin experience or custom code will the only two options.
If all you need your customers to do is standard WordPress admin functions such as adding new sites, changing existing site domains, backups, tweaking PHP functions etc., they will not need the wp-admin experience. You can get an idea of how the front-end UI works by reading our original Call For Testers for UI article from back in 2022.
If you need to grant customers access to the wp-admin area, you’ll need to handle the following items:
Fix WooCommerce Default Login Action
You will need a method to bypass WooCommerce’s default account page on login. WooCommerce tends to hijack the WordPress login process and send most users to the WC account area. But we want them to be able to go to our servers page instead. You can override the WC default behavior using one of the following options:
- Turn on the option we have specifically for this under SETTINGS → APP:WORDPRESS SETTINGS → WooCommerce Options. This affects ALL WooCommerce users. If that’s not the behavior you want you’ll need to use one of the other options below.
- Custom code
- Giving your users a higher level default role (not recommended)
Roles and Capabilities for WooCommerce Customers
Finally, you will need to grant the SUBSCRIBER roles the following CAPABILITIES so that they can see the WPCloudDeploy menu option in wp-admin:
- wpcd_manage_servers
- wpcd_manage_apps
The SUBSCRIBER role is the default role that WooCommerce assigns to users who have made a subscription purchase. If, for some reason, a different role is set for the user after a purchase (such as CUSTOMER) then you should add these capabilities to that role.
You can control which roles are assigned to a user after purchase on the WOOCOMMERCE → SUBSCRIPTIONS tab.
Pre-requisite: Create WooCommerce Cart & Checkout Pages That Use WooCommerce ShortCodes
In WooCommerce 8.3, WooCommerce replaced the shortcodes in the Cart & Checkout pages with Blocks. Unfortunately, these blocks do not have the standard WC hooks that have been around for many many years. It basically breaks functionality for a ton of plugins that modify the checkout process.
To use WooCommerce short-codes in your Cart & Checkout Pages please do the following:
- Create a new PAGE and give it a title such as MY CART or WPCD CART
- Add in the WooCommerce CART shortcode: [ woocommerce_cart ]
- Create another new PAGE and give it a title such as MY CHECKOUT PAGE or WPCD CHECKOUT PAGE
- Add in the WooCommerce CHECKOUT shortcode: [ woocommerce_checkout ]
- Navigate to the WOOCOMMERCE → SETTINGS → ADVANCED tab and make sure you’re on the PAGE SETUP section (which is the default when you navigate to the ADVANCED tab).
- Replace the CART PAGE and CHECKOUT PAGE settings with your custom pages created earlier
- Scroll down click the SAVE CHANGES button
- Navigate to the wordpress SETTINGS → PERMALINKS screen
- Click the SAVE CHANGES button to update permalinks
Setup Server Sizes
Because each cloud server provider have so many different options for server sizes, the first thing you need to do is decide which sizes you will offer. To keep things simple we have created THREE default sizes that we call “Small”, “Medium” and “Large”. Your customers will then be able to choose one of these three sizes.
To setup these three sizes, go to WPCloudDeploy → SETTINGS→ CLOUD PROVIDERS.
There, at the bottom of each of the cloud providers tabs you can map “small”, “medium” and “large” to one of the server offerings from the provider.
If you need additional sizes, you can create your own complete custom set on the WPCLOUDDEPLOY → SETTINGS → FIELDS tab – just scroll to the bottom where you’ll see the option to setup your own server sizes.
Setup WooCommerce Products
After server sizes have been set up, you can start to create WooCommerce Products.
To create a product:
- Navigate to Products → Add New
- Fill in a product name and description as you would usually do with a WooCommerce product
- Enable the Virtual checkbox
- For the product type, choose Simple Subscription. This will cause a new tab to show up labeled WordPress Server
- Click on the WordPress Server tab and enable the first checkbox with the label This is a WordPress server
- Select the server size from the server size drop-down.
- Click on the General tab to set up your subscription prices.
- Click on the Inventory tab to enable stock management – turn on the option for Sold Individually.
- Finally, click on the PUBLISH button.

Remove Ajax Buttons
If you’ll be using the WC product archive pages, you must remove the AJAX buttons because they bypass the product detail page. The product detail page is where the customer choose their server options.
One way to disable these buttons is via CSS such as the following (your theme might have slightly different classes):
.archive .add_to_cart_button {
display: none; !important
}
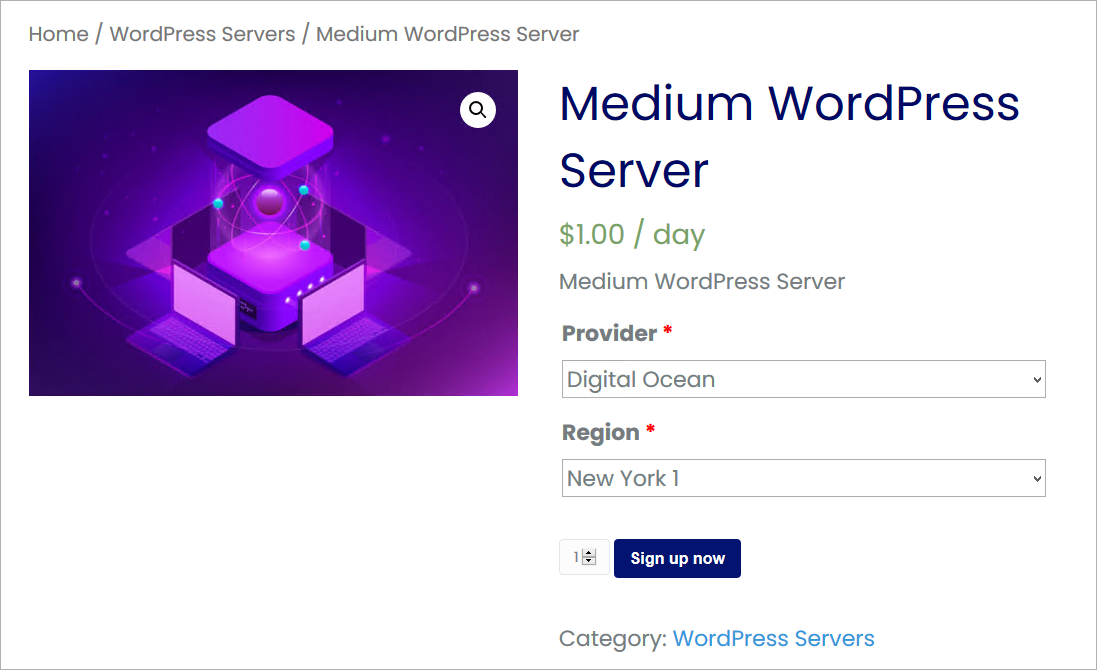
Customer Checkout Flow
When a customer views a WordPress server product, they will be allowed to select their provider (if you have more than one) as well as the location (region) where the server should be deployed.
After checkout is complete, a receipt is shown with an informational message at the top of the screen – this message is blank by default but you can customize it in the WPCLOUDDEPLOY SETTINGS screen (See the THANK YOU page section below for more information about this option.)
In the image below, the area in red is completely customized.
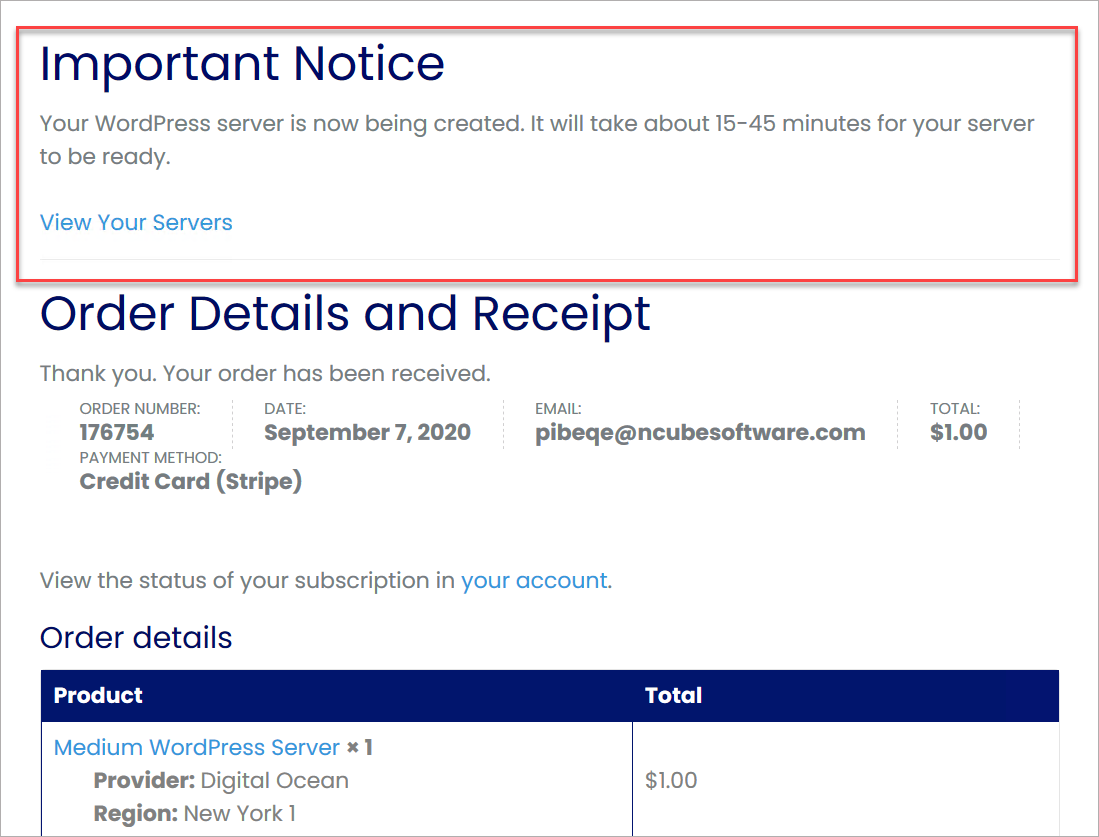
The THANK YOU Page Notice
In the image above we highlighted the customized notice that can be added to the WooCommerce thank-you page. The thank-you page is the page the user sees at the very end of the WC checkout process and is a standard part of all WC checkout flows.
It is important to create your own notice – by default we leave this notice blank. But if you do not create a custom notice, the user will not get a link to the page where they can view and manage their servers.
You can configure this notice as follows:
- Go to WPCLOUDDEPLOY → SETTINGS → APP:WORDPRESS-SETTINGS → SELL WP SERVERS.
- Scroll down to the THANK YOU PAGE section
- Add your text and then click the SAVE SETTINGS button.
You’re probably asking what you should use as the text in there. The answer depends on where you want to send the user after the checkout is complete. You have two options:
- Send them to the front-end servers list page (this page is automatically created when WPCD is first activated – the default title is CLOUD SERVERS)
- Send them directly to the wp-admin backend (https://yourdomain.come/wp-admin)
- Send them to any other URL or custom page.
Once you’ve made your decision you add text that contains the appropriate link.
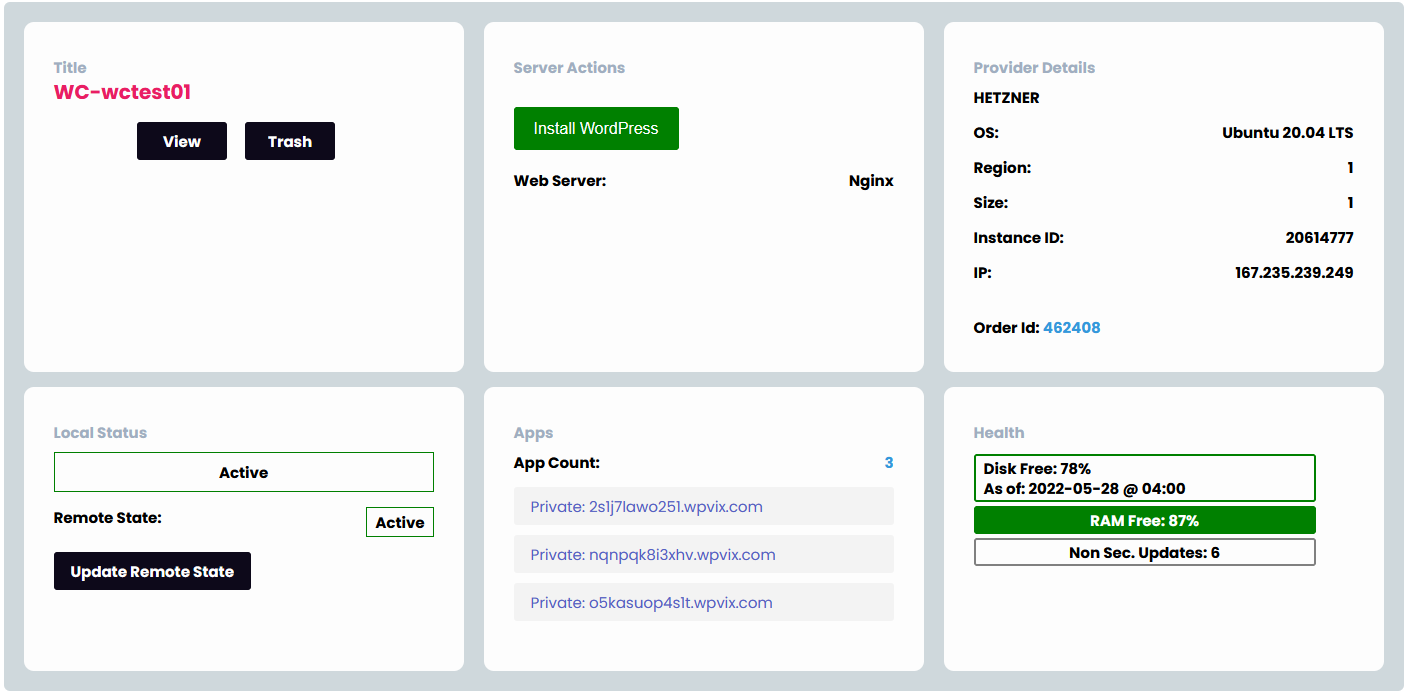
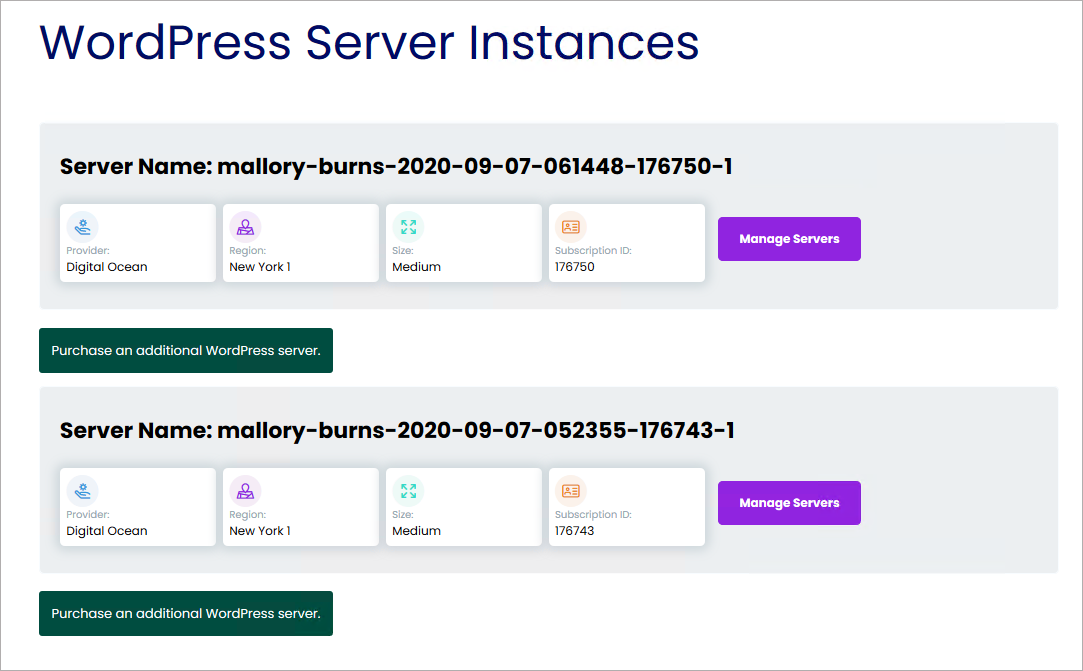
Front-end Server List
When WPCD is installed a new WordPress page is automatically created with the title WORDPRESS SERVERS.
This page provides a very flexible server list:
See ideas for custom styling options on this page including dark mode ideas: wpclouddeploy.com/documentation/tips-techniques-education/customizing-front-end-styles
Automatically Install a WordPress Site on A New Server
A common request is to automatically install a WordPress site on a new server. You can do this as follows:
- Setup a new SITE product with the parameters for the WordPress site (including any template site you would like to use)
- Optionally hide the site product from the WooCommerce catalog if the price is zero.
- Assign the site to the server product as shown in this image:
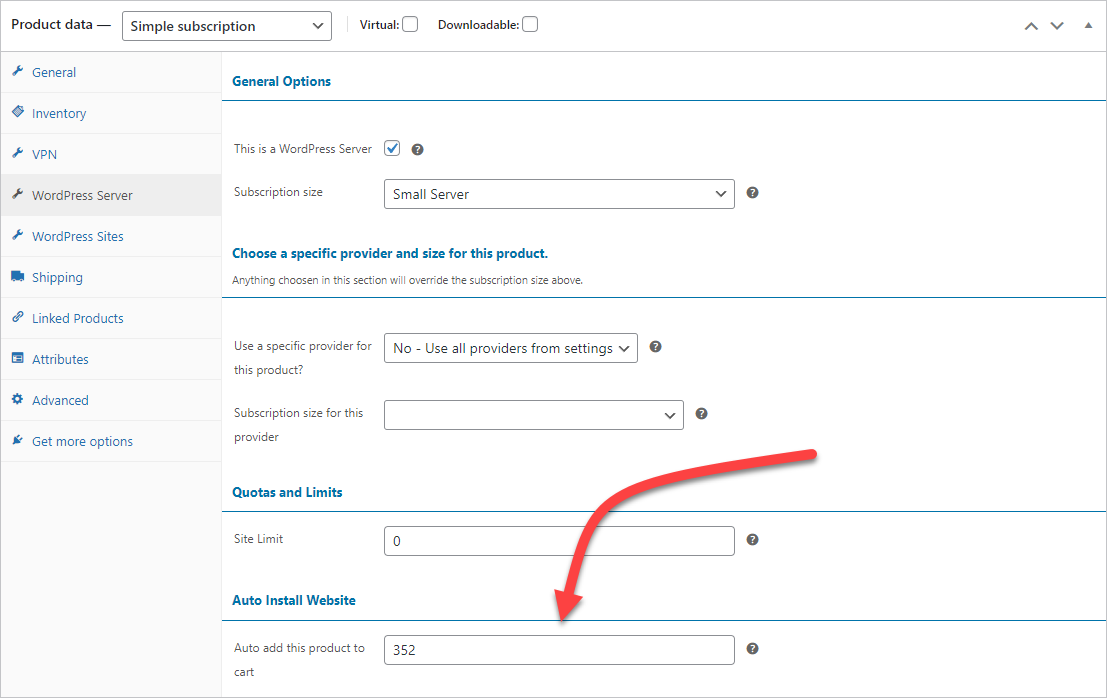
Note: This feature requires WPCD 5.0 and our WooCommerce add-on V 3.0 or later.
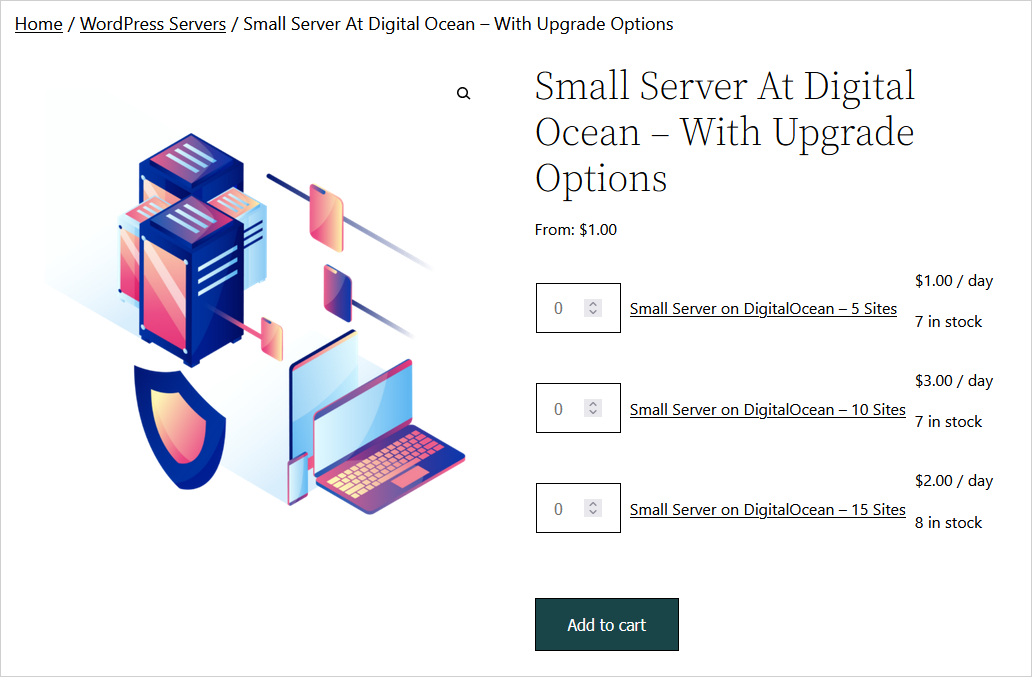
Switching Subscriptions Using WooCommerce Grouped Products Feature
You can configure a group of server products so that customers can upgrade or downgrade their subscriptions. There are some important limitations with this feature though.
- Each product in the product group MUST have a specific provider, region and size since the user is going to add them directly to the cart. (The WooCommerce grouped products UI bypasses the product page where users would traditionally be able to select a server size, provider and region.)
- During a subscription switch (aka upgrade/downgrade), the cart will show an incorrect server name. This is because of a limitation in WooCommerce – they don’t have a hook that allows us to detect and modify switched products being added to the cart which causes this side-effect.
When a subscription is switched, WPCD does not automatically resize the server. Instead, you must do that manually. However, the site limit quota for the server is updated for the new subscription.
Note: This feature requires WPCD 5.0 and our WooCommerce add-on V 3.0 or later.
Important Notes
Server Cancellations
When a subscription is cancelled, the server is automatically deleted. Generally, if the user cancels prior to the end of the subscription period, the subscription will go into a “pending cancellation” status. The server will then be deleted at the end of the period when the subscription switches to “cancelled” status.. But the admin can force immediate deletion by forcing the subscription status to Cancelled.
Basically the rule is this – if the status in the WooCommerce SUBSCRIPTIONS list is “Cancelled” the server is going to be deleted or has been deleted.
This is important because it means that your customer can lose all their server data if they do not renew their subscription or if the subscription is allowed to enter “Cancelled” status for any reason. There is NO grace period!
Backups With S3
When selling server subscriptions, how you configure your S3 backup credentials become very important. Please see the bottom of our backup documentation page for more information.
Other Configuration Options
There are a number of optional configuration items that can be used to help promote sales or inform the user of next steps after the sale is completed. You can find these options under the WPCLOUD DEPLOY → SETTINGS → APP:WORDPRESS SETTINGS tab. There, you’ll see sub-tabs related to WooCommerce. In these tabs you can:
- Configure links to products that encourage the user to purchase additional servers – these links show up in the front-end on the server list screen (see the short-code section above).
- Configure links to products that encourage the user to purchase a server if their server list on the front-end is blank.
- Configure text that goes at the top of the receipt screen at the end of the checkout process (see the THANK YOU section above).

In the above image you might notice a weird token in the THANK YOU PAGE TEXT box – ##WORDPRESSAPPWCSERVERSACCOUNTPAGE##. This is a substitute for the data in the URL TO ACCOUNT PAGE and ACCOUNT PAGE LINK TEXT – it combines the two to make a nice link for you. The use of this token is completely optional and you can choose to just place text with the link directly in the THANK YOU PAGE TEXT box.
Checkout Limitations
Because the user needs to specify certain custom items (such as provider and region) before an item is added to a cart, any links that do direct add-to-cart will not work. The user will be able to checkout and setup a subscription but no server will be provisioned for the order.
The user MUST go through the product detail screen to add a WordPress server product to the cart.
Thus, you will likely want to modify your default WooCommerce display to remove any links or buttons that take the user directly from the product display to the cart. If you only plan on selling a limited number of server-provider-size configurations, you might consider not using the default WooCommerce shop page and create a custom page with product links instead.
Additionally, in order to prevent abuse, you should definitely set an inventory limit for each product. Otherwise, someone can try checkout with 50,000 servers in their cart! (How do we know this? Because someone actually tried to do it on one of our sites!)
Finally, you might want to make sure that only ONE server can be purchased at a time. You can enable this when setting up the product – Click on the Inventory tab to enable stock management and turn on the option for Sold Individually.
WP CRON Requirements
WP CRON needs to be fired on a regular basis. Otherwise, emails will not be sent when a server is provisioned. WPCD should have WP CRON set to fire every minute anyway so if you already have that configured, then this requirement should not be an issue.
Other Comments
When a server is purchased, a WordPress site is NOT added to the server. Instead, the user still needs to be in wp-admin in order to add sites to a server.
Other Considerations
There might be certain tabs on a server screen that you do not want your customers to access. You can disable them in wp-config.php. Learn more under the WPCD_SERVER_HIDE_TABS_WHEN_AUTHOR section in this help document.
Customer Contributions
A customer created and used the following PHP code to change the function of the AJAX button:
add_filter( ‘woocommerce_loop_add_to_cart_link’, ‘replace_add_to_cart_button’, 10, 2 );
function replace_add_to_cart_button( $button, $product ) {
     if (is_product_category() || is_shop()) {
          $button_text = __(“Select Region”, “woocommerce”);
          $button_link = $product->get_permalink();
          $button = ‘<a class=”button” href=”‘ . $product->get_permalink() . ‘”>’ . $button_text . ‘</a>’;
          return $button;
     }
}
Note: No support is provided for customer contributions – we’re providing these in case you find them useful.
Short Code
Applies to V 4.x and earlier only!
In order for users to be able to see their list of servers on the front-end, you need to add a short-code to a page and then provide a link to that page in one of your menus (or some other location on your site).
The short-code to use is:
wpcd_app_wpapp_wc_servers
Note: Prior to WPCD Versions 4.6, the shortcode was wpcd_app_wpapp_instances
It is not strictly necessary to setup a page with this short-code since all server management will be taking place inside wp-admin anyway. But it is a nice option. The short-code will render a screen that looks like this on the front-end:
Related Articles
What’s New In WPCD WooCommerce 3.0
Selling Recurring Server Subscriptions With WPCD WooCommerce V 1.4
More Topics In WooCommerce
- WooCommerce & WPCloudDeploy WordPress Sites
- WooCommerce Order Processing Notes
- Handling Multiple Sites on a Single Subscription
- Relink A Site To A WooCommerce Order And Subscription
- Use A Customer's SSH Key For Servers
- Technical Notes For How We Implement Templating Sites When Selling WP Sites With WooCommerce
