Backups With AWS S3
Introduction
Backups in WPCloudDeploy is a relatively simple process. We only offer one option in the UI – backup to Amazon S3 (and S3 compatible services). (But, you can use our command line scripts for many other backup options.)
In order to set up your backups, you will need the following:
- A bucket that has been created on S3 (or your S3 compatible service) to hold your backups and
- Amazon S3 credentials (or credentials from your S3 compatible service) that can read from and write to that bucket
- The S3 compatible endpoint URL if not using AWS S3
Once you have those two things in hand you can configure your backups in WPCloudDeploy.
Configuring Your Backups
You can set up a few different scenarios:
- You can configure a set of default credentials that you can then apply to each server.
- You can configure a set of unique credentials for each server – usually you would do this when you also have a different bucket for each server.
- You can configure a set of unique credentials for each site – usually you would do this when you also have a different bucket for each site.
- You can do a mix of all of the above.
Configure Default Credentials for Each Site
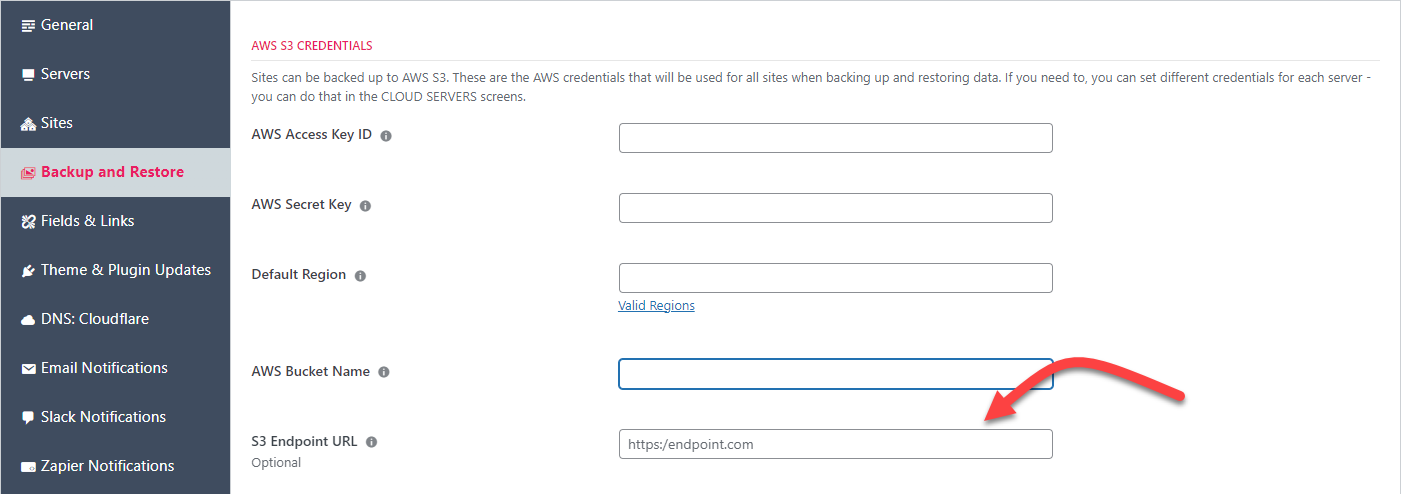
Install a set of default credentials under the settings screen:
- Go to WPCloudDeploy → Settings.
- Click on the APP:WordPress – Settings tab.
- Click on the Backup and Restore tab.
- Enter your S3 credentials and a bucket name.
Note that this procedure does not actually apply these credentials to your sites and servers. Instead, you need to go to each server (or site ) and configure backups there that will use these credentials.
Enable Backups for A Site Using The Default Credentials From Global Settings
To enable backups for a site.
- Go to WPCloudDeploy → WordPress sites.
- Click on the title of a site to pull up the site details.
- Click on the Backup & Restore tab
- Scroll down to Automatic Backups – This Site Only section.
- Fill in the retention days – we suggest something between 2 and 5 days to limit the amount of disk space that a backup uses.
- Click on the Schedule It toggle.
Enable Backups for A Site Using A Unique Set of Credentials For The Server
- Go to WPCloudDeploy → All Cloud Servers.
- Click on the title of a server to pull up the server details.
- Click on the Backup tab.
- Fill in the credentials and bucket name at the top of the page then click the Save Credentials button.
Now setup the site backups as follows:
- Go to WPCloudDeploy → WordPress sites.
- Click on the title of a site to pull up the site details.
- Scroll down to Automatic Backups – This Site Only section.
- Fill in the retention days – we suggest something between 3 and 5 days to limit the amount of disk space that a backup uses.
- Click on the Schedule It toggle.
Enable Backups for All Sites On A Server
To enable backups for all current and future sites on a server:
- Go to WPCloudDeploy → All Cloud Servers.
- Click on the title of a server to pull up the server details.
- Click on the Backup tab.
- Fill in the credentials and bucket name at the top of the page then click the Save Credentials button.
- Tip: You can leave this blank to use the credentials from the global settings screen.
- Scroll down to AUTOMATIC BACKUPS – ALL CURRENT AND FUTURE SITES ON THIS SERVER section.
- Click on the Schedule It toggle.
Retention Days
Backups have an automatic delete option that purges files after a certain number of days. On our settings screen this is called Retention Days.
Retention days can apply to the local versions of backups that we keep on the server or to both the local and remote backups. By default we don’t delete files that have been uploaded to S3.
We suggest you set retention days to somewhere between 3 and 5 and that you do NOT turn on the option to to delete the remote backups. This allows you to quickly restore a recent backup from files on the local disk while storing additional backups for the longer term in S3.
As of version 4.2.5, you can set the retention days to -1. This will cause the backup scripts to never store any backups on the local server disk. For users with lots of small sites on a server, this can help reduce server costs. However, it is not an option we recommend. If you do use it, please make sure that you also have a secondary backup for each of your sites – you can use backup plugins such as UPDRAFT PLUS on each of your sites.
Managing Your Backup Files On S3
When you look at your backups in your S3 buckets you should see three files for each backup.
- The largest file is likely a compressed version that has all your domain’s files.
- The other two files will be your database and your site’s nginx configuration file.
These are not proprietary formats. You can download them at any time and decompress them using a tool like WinRar on windows. They can also be decompressed natively on Linux.
Each site you backup to a bucket will be stored in a separate folder. The folder name will be the site’s domain name. With this structure it’s easy to use the same bucket for multiple sites without having to dig around for the backup from a particular site.
Backup Schedules
You cannot control backup schedules. We schedule backups to run SEQUENTIALLY in order to avoid over-taxing your server with multiple simultaneous backups. So we start the backup job at a specific time and then run through all the sites one at a time.
If you really really want to control the start time of the job you can edit its CRON manually from the command line. But you will not be able to control the start time for an individual site – unless you only have a single site on the server.
Deleting Local Backups
Most users just set a retention value and let the servers automatically delete old backups. However, sometimes you just want to lend a helping hand. On both the SITE DETAIL and the SERVER DETAIL screen you have two options.
- Delete all backups and
- Prune Backups

Changing Retention Days
If you would like to increase the retention days used for automatic backups:
- Navigate to the backup tab and scroll down to the AUTOMATIC BACKUPS – ALL CURRENT AND FUTURE SITES ON THIS SERVER section.
- Disable backups by clicking on the toggle switch labeled SCHEDULE IT.
- Enter the new value for retention days.
- Re-enable backups (click the toggle switch again) to push the new value to your server.
You only need to go through this four-step process if you would like to change the retention days for the nightly automatic backups.
A Multi-Pronged Approach To Backups
When it comes to backups, you can never have enough. So, just as with security, we strongly recommend that you have a multi-tier strategy.
- Start with enabling the backups that your cloud server providers offer. This adds a small monthly cost to each server and would be your last line of defense!
- Then, enable our backups.
- Finally, use a backup plugin such as UPDRAFT PLUS. This is your first line of defense. When something goes wrong, this usually is the easiest way to restore a backup.
If there was ever a single piece of advice you took from us as you read through this documentation, it’s this section, right here! Employ a multi-pronged, multi-layered approach to your backups and you’ll never regret it!
We know from personal experience that restores can fail for any number of reasons. The last thing you want to deal with is the realization that you only have one type of backup and those have been lost or are unusable for some reason. You’ll sleep better at night if you employ a multi-layered backup approach.
Server Level Backups
We do NOT image your servers – only sites and site-data are backed up. So, if you modify, change or otherwise add stuff to the server outside of the WPCD dashboard, you should definitely enable server level imaging at your cloud provider! Otherwise you will have no backups for the things you have added.
Local-Only Backups
There are some use-cases where you might want all of your backups to be stored only on the local drive and not sent to S3. A typical example is if you have an external service taking a snapshot of the server VM on a regular basis (one or more times per day).
While we don’t directly support this scenario, it’s relatively easy to simulate. All you have to do is enter fake S3 credentials. The backups will be stored on the local drive but not uploaded to S3. You will see S3 upload errors in the backup logs though.
Controlling Costs on Amazon S3
If you’re worried about the costs of backups on S3, we suggest doing the following to keep the costs as low as possible:
- Create a life cycle rule on the bucket
- Set up the life-cycle rule to apply to files that are older than, say, 45 days
- Configure the rule to move your files to amazon DEEP GLACIER.
Amazon has made creating life cycle rules on buckets very easy on their S3 console.
Deep Glacier fees are $0.00099 per gigabyte. Note: Deep Glacier and Glacier are two different storage types. Glacier charges are 0.004 per gigabyte.
After one year you can start purging your files if you like. But, given the costs it might not be worth the time. At $0.00099 per gigabyte, 10 terabytes of storage costs $10.00 per month.
Deep Glacier is appropriate for files you will not use on a regular basis. It is recommended for files that you will use once every six months or so. Retrieval times for data moved to this storage level is measured in HOURS. So you don’t want to move your recent backups there. But after you have accumulated a few weeks of backups you can probably move your older backups there.
What’s the downside? There are three that should be considered:
- Amazon expects that you keep your Deep Glacier files for at least six months. If you delete files before then you will still be charged for at least six months of storage for the deleted files.
- There is the issue of data retrieval times that we mentioned earlier – it is measured in HOURS – as long as 12 hours.
- There is a slightly higher chance of a single file being corrupted – hence you should make sure that you always have multiple backups in there.
One other consideration – there is a tiny portion of Deep Glacier cost that is billed at standard S3 rates – here’s the amazon fine-print about that:
** Amazon S3 Glacier and S3 Glacier Deep Archive require an additional 32KB of data per object for S3 Glacier’s index and metadata charged at the appropriate storage class rate. Amazon S3 requires 8KB per object to store and maintain the user-defined name and metadata for objects archived to S3 Glacier and S3 Glacier Deep Archive. This enables you to get a real-time list of all of your S3 objects using the S3 LIST API or the S3 Inventory report. Objects that are archived to S3 Glacier and S3 Glacier Deep Archive have a minimum 90 days and 180 days of storage, respectively. Objects deleted before 90 days and 180 days incur a pro-rated charge equal to the storage charge for the remaining days. Objects that are deleted, overwritten, or transitioned to a different storage class before the minimum storage duration will incur the normal storage usage charge plus a pro-rated request charge for the remainder of the minimum storage duration. Objects stored longer than the minimum storage duration will not incur a minimum request charge. For each object that is stored in S3 Glacier or S3 Glacier Deep Archive, Amazon S3 adds 40 KB of chargeable overhead for metadata, with 8KB charged at S3 Standard rates and 32 KB charged at S3 Glacier or S3 Deep Archive rates
Best Practices For S3 Credentials
If you use your S3 account for more than just backups, we strongly suggest that you create a unique set of IAM credentials just for WPCloudDeploy Backups.
For even better security, you can create a different set of IAM credentials for each site. Each credential set should have restricted access to just that site’s bucket or folder. If you do this, you will need to configure backups for each site individually instead of using the option to backup all sites. But it reduces the chances of a bad actor being able to access or corrupt all your backups simultaneously.
Finally, you might want to consider removing the DELETE permissions on the IAM credentials. If a bad actor obtains them they will not be able to delete your good backups. But that also means that WPCD cannot PRUNE them either so you will need to prune them yourself.
About AWS Credentials and Buckets
You can only use one set of AWS credentials for all sites on a server. BUT, you can still use different buckets for different sites if you like – as long as the credentials have authority to access the bucket.
Bucket Names and Folders
By default, backups will be sent to S3 and stored in their own folders inside the specified bucket – one folder per domain. But, you can specify a folder along with the bucket name if you’d like to group certain sites together – eg: wpbucket/my-dev-sites/.
Manual Backups For Sites With A Large Set Of Files
When taking an on-demand backup of a large site, it might seem as if the backup screen is “stuck”. This is because it is taking a very long time to zip up the files and, while that is happening, there is no output being sent to the console.
If you know that your site is large then you should be patient and let the backup run.
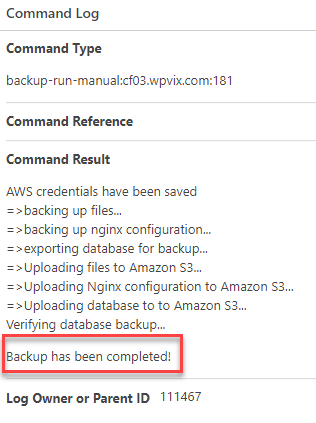
You can always check the COMMAND LOG screen to see if the backup is completed. Sometimes navigating away from the browser tab while the backup is running can cause the JS to pause and not check for the logs. When this happens the backup might be completed but you will never get the notice (you can thank the browsers for trying to optimize JS execution by pausing or slowing down JS that is in a background tab.)
If the backup is completed, you will see a notice in the command logs that say BACKUP HAS BEEN COMPLETED – see image below:
Advanced Backup Operations
Our backup scripts have some additional options that are not part of our UI/control panel. You can access these if you are willing to use the Linux command line.
When you log into your server as root (or “ubuntu” in the case of AWS servers), you should find a file whose name is 08-backup.sh in your home folder. If for some reason the file is not there, you can upload it as follows:
- Upload the 08-backup.sh file from the plugin using sFTP. It is located in the includes/core/apps/wordpress-app/scripts/v1/raw folder in the plugin.
- Once uploaded, prepare it for execution by running this command: sudo dos2unix ./08-backup.sh
Now, you can execute the file by running: sudo bash ./08-backup.sh
This should bring up the following screen:
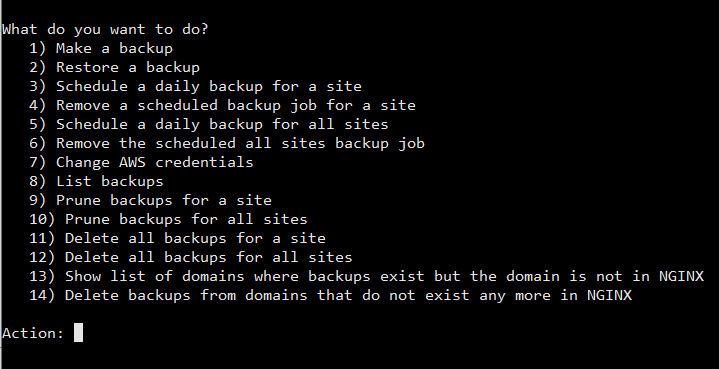
Options 13 – 14 are the advanced options. With these you can remove backups that are old or that remained behind after sites were deleted.
Notes
Security Caveat With Global Credentials
When you use the global credentials in the WPCLOUDDEPLOY → SETTINGS → APP:WORDPRESS SETTINGS → BACKUP AND RESTORE tab, those settings are ultimately stored on your servers. This means that IF you allow access to the servers to your end users, they can read those credentials.
This is especially important to consider if you use our Sell Server Subscriptions With WooCommerce feature.
In these cases you should keep your global credentials EMPTY and, instead, apply different credentials to each server directly.
Changing Credentials
Once credentials are applied to a server, they will continue to be used until you go back to the server or site screens and reapply the backup settings. There are some implications to this.
One of those is that if you change your default credentials in WPCLOUDDEPLOY → SETTINGS, they are NOT automatically applied to your servers and sites – even if those servers and sites are supposed to be using the default credentials. Instead, they will continue to use the old defaults until you go back to each server or site screen and re-save the backup settings there. At that point the new defaults will be read and transferred to the server.
Bucket Names
When you enter the name of the bucket, please enter just the name and not the ‘S3://’ prefix. So, ‘mybucket’ instead of ‘s3://mybucket’.
Refreshing Backups
If you use the REFRESH BACKUPS button to get the latest list of backups and you did not run at least one backup where your S3 credentials are used, the refresh operation will fail with an AJAX error. This is because the first thing that all the backup operations expect is AWS credentials. And if that does not exist the script will pause before it even gets to the point where the list of existing backups are read and printed.
Using S3 Compatible Services
Many cloud storage services offer an S3 compatible endpoint. WPCD will allow you to specify an alternative endpoint URL; however, we cannot guarantee that these endpoints will always work nor can we offer in-depth support for all of them for free.
When specifying an S3 compatible endpoint url, it must include the ‘https://’ portion. If you are using AWS, you do not need to enter an endpoint URL.
Some services that we know offer an S3 compatible endpoint are:
- DigitalOcean Spaces
- Backblaze
- Wasabi
- Minio
- Cloudflare R2
There are an additional 14+ services that we’re aware of such as IBM, SCALEWAY, SEAGATE, CEPH etc.
During development we tested both DigitalOcean Spaces & Backblaze.
More Topics In Admin
- Restoring From AWS S3 Into A New Site or Server
- Restoring From Backup
- 6G Firewall (Deprecated)
- 7G Firewall
- Native Linux Cron
- Disabling Sites
- Password Protect A Site (HTTP Authentication)
- One-click Login (AKA Passwordless Logins)
- Remove/Delete Site
- Manage PHP Options
- Add A WordPress Administrator
- Notifications and Alerts
- Managing WordPress DEBUG Flags
- Object Cache: MemCached
- Object Cache: Redis
- Monit / Healing
- DNS Integration: CloudFlare
- Site Packages
- Site Update Plans
- Site Expiration
- White Label Colors
- Adding Custom NGINX Configs
- Custom Servers (Bring Your Own Server)
- How To Change The IP Address For Your Server
- Virtual Cloud Providers
- Monitorix
- File Manager
- PHPMyAdmin - Database Operations
- Using Remote Databases
- SMTP Gateway
- Server Updates
- Theme & Plugin Updates
- Bulk Actions on Servers
- Bulk Actions on Sites
- SSH Key Overrides
- Webserver Types
- WPCD Cron Jobs
- Disk Quotas
- Custom Post Type Quotas
- Using Post-Processing Custom Bash Scripts
- Bulk Copy To Server
- Copy To Server (Automated Daily Process)
- Shortcodes
- Bootstrapping A WordPress Server With Our Scripts
- Bootstrapping A WordPress Server With Our Scripts - Archive Version 4.x
- Free Setup Requirements & Checklist
