DNS Integration: CloudFlare
WPCloudDeploy includesa simple integration with CloudFlare that enable the following features:
- Automatically create temporary domains and register them with the CloudFlare DNS service
- Automatically delete the temporary domain when the site is deleted
- Automatically issue SSL certificates with LetsEncrypt for temporary domains registered with CloudFlare
To set this up:
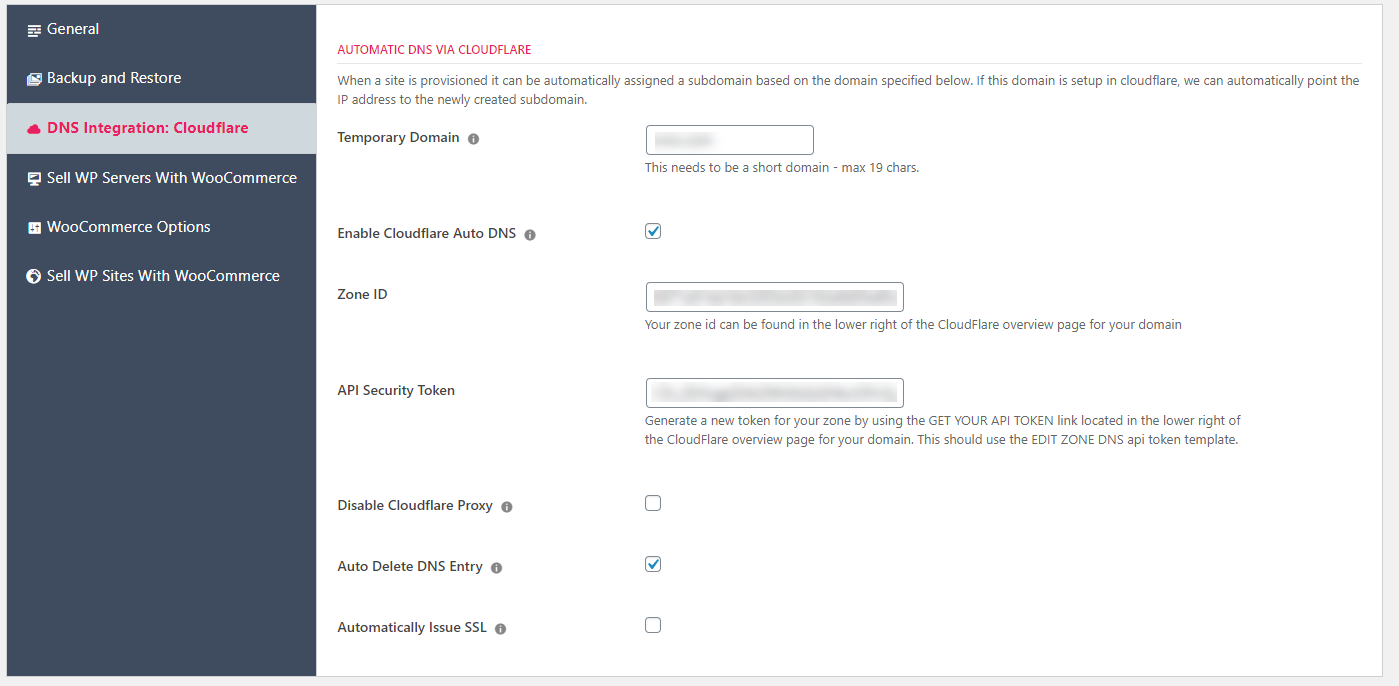
- Go to WPCloudDeploy → SETTINGS → APP: WordPress Settings → DNS INTEGRATION: CLOUDFLARE
- Enter the root of your temporary domain (eg: temp.com) – this MUST be registered on Cloudflare and can be a maximum of 19 characters including the extension. You cannot use a subdomain such as temp.mydomain.com.
- Click the ENABLE CLOUDFLARE AUTO DNS checkbox
- Obtain your Zone ID for the domain from your CloudFlare dashboard and enter it into the ZONE ID field. The Zone ID is usually on the bottom right of the summary screen for your domain.
- Get an API SECURITY TOKEN from your CloudFlare account and enter it into the API SECURITY TOKEN field – make sure this token has access to the domain! (See more detailed instructions in a later section if you need help with this.)
- Turn on the options for AUTO DELETE, AUTO SSL and CLOUDFLARE PROXY as needed.
- Click the SAVE SETTINGS button.
Now, when you create a new WordPress site, a temporary domain will automatically be entered into the DOMAIN field.
How To Get A CloudFlare Token
Navigate to the Cloudflare Token screen for your account – it’s generally located at this URL: https://dash.cloudflare.com/profile/api-tokens
- Click Create Token
- Use the template for Edit zone DNS
- Under Zone Resources, select your domain
- Click Continue to Summary
- Click Create Token
You should be shown your token. You should copy and save it into a password manager since CF will not show it to you again. Then copy it to the appropriate locations in WPCD.
Notes
- If you have a high volume of sites being created every week and you turn on AUTO SSL, you might run into SSL limits with LetsEncrypt – you can only issue 50 certificates for a domain in a 7 day period. Learn more on the LetsEncrypt Limits Page.
- Having problems with issuing SSL certificates? This might help: Resolving Common Issues With CloudFlare
- If you need to use a custom SSL certificate, read the command line Custom SSL Certificate documentation.
- You can use a separate CloudFlare domain for your WooCommerce integration – see the Setup Cloudflare DNS Integration section on the WooCommerce Integration pages for more information.
More Topics In Admin
- Restoring From AWS S3 Into A New Site or Server
- Backups With AWS S3
- Restoring From Backup
- 6G Firewall (Deprecated)
- 7G Firewall
- Native Linux Cron
- Disabling Sites
- Password Protect A Site (HTTP Authentication)
- One-click Login (AKA Passwordless Logins)
- Remove/Delete Site
- Manage PHP Options
- Add A WordPress Administrator
- Notifications and Alerts
- Managing WordPress DEBUG Flags
- Object Cache: MemCached
- Object Cache: Redis
- Monit / Healing
- Site Packages
- Site Update Plans
- Site Expiration
- White Label Colors
- Adding Custom NGINX Configs
- Custom Servers (Bring Your Own Server)
- How To Change The IP Address For Your Server
- Virtual Cloud Providers
- Monitorix
- File Manager
- PHPMyAdmin - Database Operations
- Using Remote Databases
- SMTP Gateway
- Server Updates
- Theme & Plugin Updates
- Bulk Actions on Servers
- Bulk Actions on Sites
- SSH Key Overrides
- Webserver Types
- WPCD Cron Jobs
- Disk Quotas
- Custom Post Type Quotas
- Using Post-Processing Custom Bash Scripts
- Bulk Copy To Server
- Copy To Server (Automated Daily Process)
- Shortcodes
- Bootstrapping A WordPress Server With Our Scripts
- Bootstrapping A WordPress Server With Our Scripts - Archive Version 4.x
- Free Setup Requirements & Checklist
Share:


Search