Object Cache: Redis
Introduction
An object cache can help speed up database queries by caching the results of those queries in memory. One of the most popular object cache is MemCached. Support for this is included as part of the core WPCloudDeploy plugin. An additional object cache option is REDIS which we also support in core (as of WPCD 5.6)
Install Redis On a Server
To enable Redis, the package first needs to be installed at the server level. If you’re running WPCloudDeploy 5.6 or later, all new servers will have it automatically installed. For older servers you can install it as follows:
- Go to WPCloudDeploy → All Cloud Servers
- Click on the server where you’ll be installing Redis
- Scroll down to the REDIS section
- Click the Install Redis button
A popup will appear that will offer periodic feedback as the process progresses. When the process is complete you will get a popup confirmation message and the black ‘terminal” window will show the actions that were taken while attempting to install the package.
Once it’s installed, you can then enable it on a site-by-site basis.
Activate Redis For A Site
Once Redis has been installed on a server you can activate it for any site on the server.
- Go to WPCloudDeploy → All Apps
- Click on the site where you need to turn on the object cache
- Click on the Cache tab
- Scroll down to the REDIS section
- Click on the toggle switch
After a while the screen will refresh – if the operation is successful. If the operation fails, you’ll get a popup confirmation message and the page will refresh.
You can view a full log of the operation under the SSH LOG screen.
Deactivate Redis For A Site
To deactivate Redis on a site:
- Go to WPCloudDeploy → All Apps
- Click on the site where you need to turn on the object cache
- Click on the Cache tab
- Scroll down to the REDIS section
- Click on the toggle switch if it’s enabled.
After a while the screen will refresh – if the operation is successful. If the operation fails, you’ll get a popup confirmation message and the page will refresh.
You can view a full log of the operation under the SSH LOG screen.
Removing Redis From a Server
Warning: Before removing Redis from the server, make sure you deactivate it from all sites on the server. Otherwise, you’ll see heavy delays when you access your site because WordPress will be attempting to connect to a non-existent Redis server.
To remove it:
- Go to WPCloudDeploy → All Cloud Servers
- Click on the affected server
- Scroll down to the REDIS section
- Click on the UNINSTALL REDIS button.
If this procedure does not work, you can remove it using the command line on the server.
REDIS vs MemCached
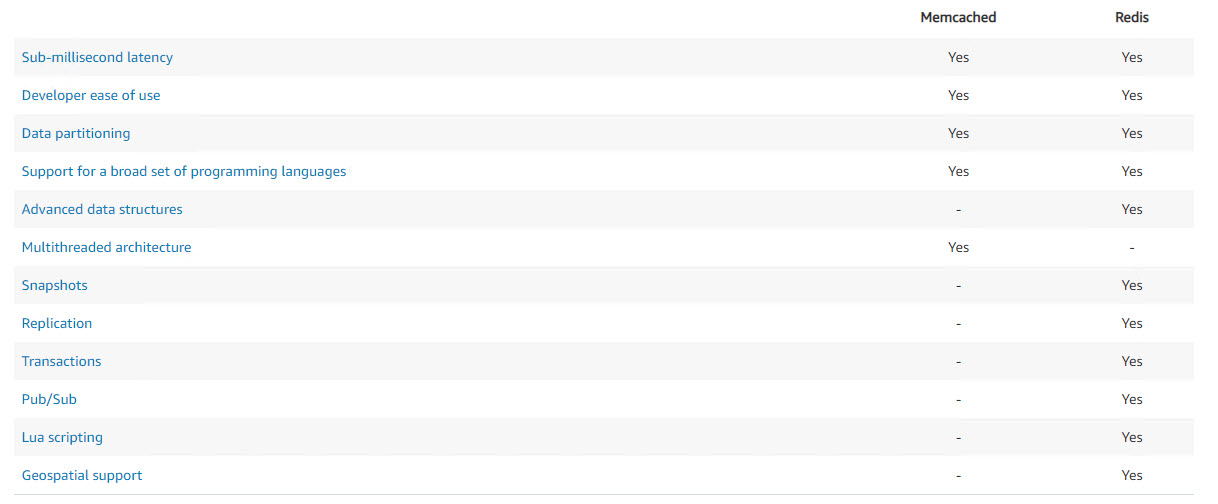
Amazon AWS has an article that outlines some of the differences between REDIS and MEMCACHED. Most of these differences do not matter in WordPress because the REDIS cache plugin doesn’t take advantage of them. MemCached uses a multi-threaded architecture which can be useful on a multi-core VM. But REDIS, in general, is more flexible.
In WordPress, MemCached can only use a max size of 1 MB for an object. Sometimes, WordPress objects in MemCached are larger than 1 MB because the options table is just HUGE. This will cause MemCached to actually SLOW DOWN or TIMEOUT your WP site. Redis is substantially better in theses situations.
Generally, given a choice between REDIS and MEMCACHED, we’ll choose REDIS.
Disable Redis For All New Sites
If you do not want REDIS to be automatically enabled for all your new sites there is an option to make that happen:
- Go to WPCloudDeploy → SETTINGS → APP: WORDPRESS – SETTINGS
- Click on the SITES tab on the left side
- Under the SITE SETUP OPTIONS section, enable the DISABLE THE REDIS OBJECT CACHE checkbox
- Scroll down and click the SAVE SETTINGS button.
Visual Tweaks
You can apply a label next to the titles on the SERVER and SITES list that show which object cache (Redis or Memcached) is enabled. To turn this on:
- Go to WPCloudDeploy → SETTINGS → APP: WORDPRESS – SETTINGS
- Click on the GENERAL tab on the left side
- Scroll down to the LABELS section
- Enable the SHOW THE OBJECT SERVER label checkbox
- Scroll down and click the SAVE SETTINGS button.
More Topics In Admin
- Restoring From AWS S3 Into A New Site or Server
- Backups With AWS S3
- Restoring From Backup
- 6G Firewall (Deprecated)
- 7G Firewall
- Native Linux Cron
- Disabling Sites
- Password Protect A Site (HTTP Authentication)
- One-click Login (AKA Passwordless Logins)
- Remove/Delete Site
- Manage PHP Options
- Add A WordPress Administrator
- Notifications and Alerts
- Managing WordPress DEBUG Flags
- Object Cache: MemCached
- Monit / Healing
- DNS Integration: CloudFlare
- Site Packages
- Site Update Plans
- Site Expiration
- White Label Colors
- Adding Custom NGINX Configs
- Custom Servers (Bring Your Own Server)
- How To Change The IP Address For Your Server
- Virtual Cloud Providers
- Monitorix
- File Manager
- PHPMyAdmin - Database Operations
- Using Remote Databases
- SMTP Gateway
- Server Updates
- Theme & Plugin Updates
- Bulk Actions on Servers
- Bulk Actions on Sites
- SSH Key Overrides
- Webserver Types
- WPCD Cron Jobs
- Disk Quotas
- Custom Post Type Quotas
- Using Post-Processing Custom Bash Scripts
- Bulk Copy To Server
- Copy To Server (Automated Daily Process)
- Shortcodes
- Bootstrapping A WordPress Server With Our Scripts
- Bootstrapping A WordPress Server With Our Scripts - Archive Version 4.x
- Free Setup Requirements & Checklist


