This is the third article in a series of tutorials that demonstrate how you can expand WPCD to add custom functionality unique to your business. By utilizing these extension options, developers and agencies can create custom solutions that differentiate their offerings and reduce the amount of time spent deploying and managing servers.
You can find the rest of the articles in this series here.
In the first two articles we focused on modifying the application UI to add buttons connected to new commands sent to the server and site(s). In this article we’ll cover how to override the existing scripts that we use to deploy and manage WordPress sites.
The method used for customization in the first two articles required that someone push a button to initiate the action. This is, of course, appropriate for certain situations. The methods described in this article run commands automatically after a site is provisioned.
The Sample Plugin
As with the first two articles in the series, we’re going to use our Sample Add-on plugin from github – you can download it here.
Tutorial Project
For this tutorial we’re going to do something relatively simple – run a server level command automatically after a new WordPress site has been created. The new command will automatically install a plugin from the WordPress repo.
The Easiest (But Not Best) Method To Add Post-Install Script Commands
The easiest way to automatically run a server level command after creating a site is to modify the WPCD scripts in-place. All control level BASH scripts for the WPCD plugin are stored in includes/core/apps/wordpress-app/scripts/v1 and the BASH scripts that do the real work are stored in includes/core/apps/wordpress-app/scripts/v1/raw.
Most of the time you only need to modify or override the control level scripts. These are the scripts that set things up and call other scripts that do the heavy duty work. The control level scripts are pretty lightweight and you’ve seen examples of them before in the prior articles.
The name of the control script that installs a new WordPress site is install_wordpress_site.txt. So, of course, the easiest way to add a few commands after a site is installed is to modify that script directly in place.
BUT, the problem with this approach is that your changes will be overwritten on the next plugin update. So, instead, we’ll show you how to modify the sample plugin to make use of a filter to point WPCD towards a new control script.
Prepare Your New Script
Assuming that you have already downloaded our sample add-on, copy the includes/core/apps/wordpress-app/scripts/v1/install_wordpress_site.txt file from the main WPCD plugin into the scripts folder of the add-on.
Modify the copied script to:
- Run the wp-cli command to install a plugin from the wp repo and
- Activate the new plugin.
In this example we use a plugin called SimplePress (it’s a forum plugin).

The above image shows the new commands added to the control script (the added bash / wp-cli commands are in the red box). These new commands do the following:
- Switches to a user whose name is the same as the domain (the domain name is represented by the ##DOMAIN## placeholder)
- Calls the wp plugin install command
- Tells the wp command to install the simplepress plugin from the repo and activate it.
- Tells the wp command the path to the root of the new site
- Sends output to our log file (which will ultimately be displayed to the admin and stored in our command logs.)
Yup – that single line of code does all that! That’s BASH for you!
Modify The PHP Code
In order to use your new version of the script, we need to hook into a WordPress filter that the main WPCD plugin provides. Fortunately, the sample add-on plugin we’re working with has already done all the legwork setup for us. So, we just need to modify the function to add our logic to reference our new file.
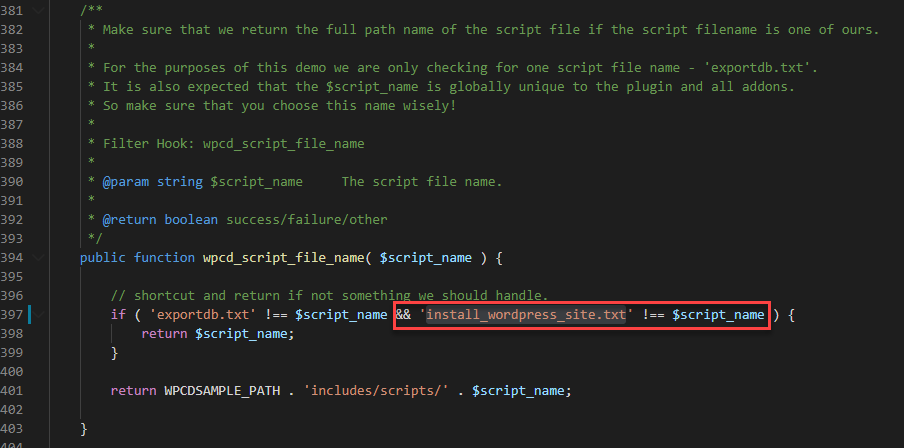
You will find the required filter function in the includes/wpapp-tabs-sample.php file. The function is wpcd_script_file_name. We need to modify it to redirect the install_wordpress_site.txt script file to a different path – our path.
The new code looks like this:
And, that’s it – you’re done. Now, when you install a new WordPress site you’ll see some additional output in the “terminal” window related to installing the new plugin. The additional output will also appear in the command logs.
Wrapup
Using this technique you can automatically install any number of packages and files as long as you can reach out to their locations via a bash command. While it does require some code it makes it far more customizable than anything you’ll get from a standard WordPress host!
Additionally, you can modify any of the other control scripts using the same method.
Finally, a not-so-obvious thing that you can do is replace the main script files completely. We mentioned earlier that the real work is done in a different set of script files located in a folder called raw. These files are referenced in the control scripts using the ##SCRIPT_URL## template tag. You can remove the ##SCRIPT_URL## from the control script and hard-code in a url to your primary bash file – completely overriding our logic if you wish. Or, more likely, using a copy of our raw script as a template and just tweaking it to add your own extensions.
Was This Article Useful? Or do you have questions or comments about it (or our products & services)? We'd love to hear from you!
Automatic Notification Of New Articles
Sign up to get automatic notifications of new articles. This is a different list than our standard list - you only get new articles once a week (usually on Mondays). No other emails will be sent unless you sign up for our general list as well.
Follow us on Twitter! We post a lot of cool things there first. To keep up, click the "X" below!