This is the fourth article in a series of tutorials that demonstrate how you can expand WPCD to add custom functionality unique to your business. By utilizing these extension options, you can create custom solutions that differentiate your offerings and reduce the amount of time spent deploying and managing servers.
In this tutorial we’ll be going into some really advanced stuff. In particular, we’ll show you how to expand the UI during the site provisioning process and use the additional options to control how a site is created.
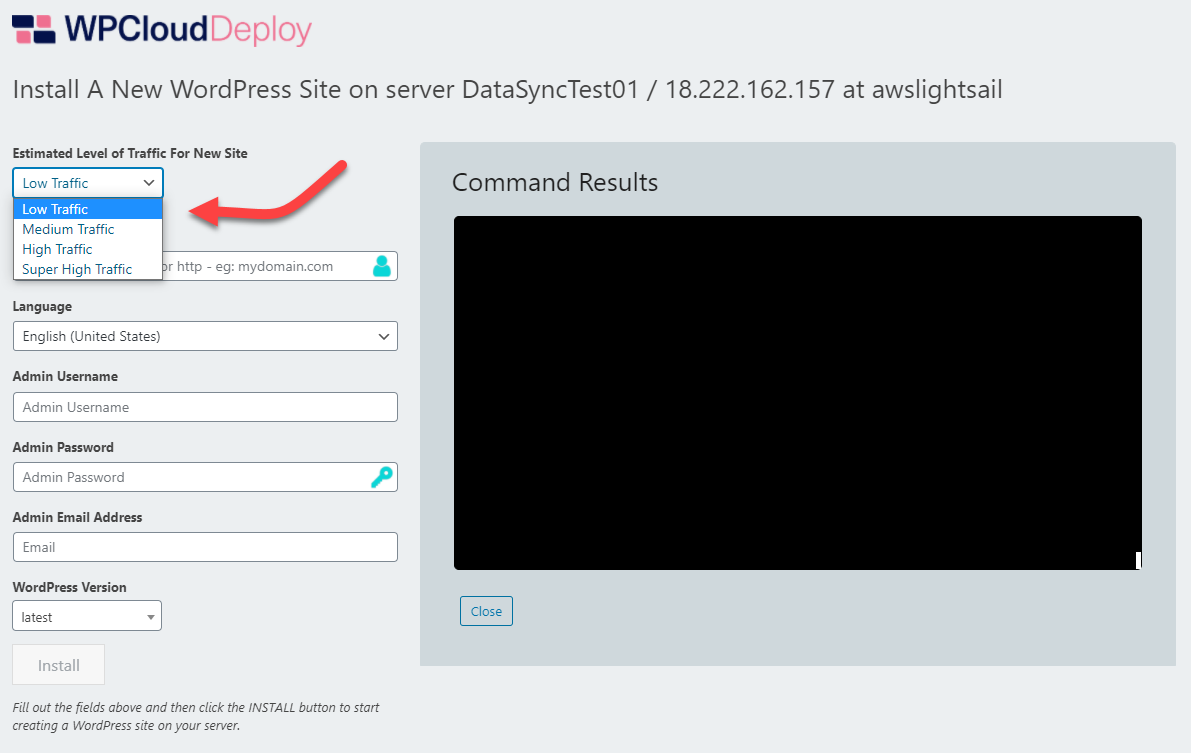
In particular we want to offer the admin the choice of optimizing new WordPress sites for three different traffic scenarios – low traffic, medium traffic and high traffic.
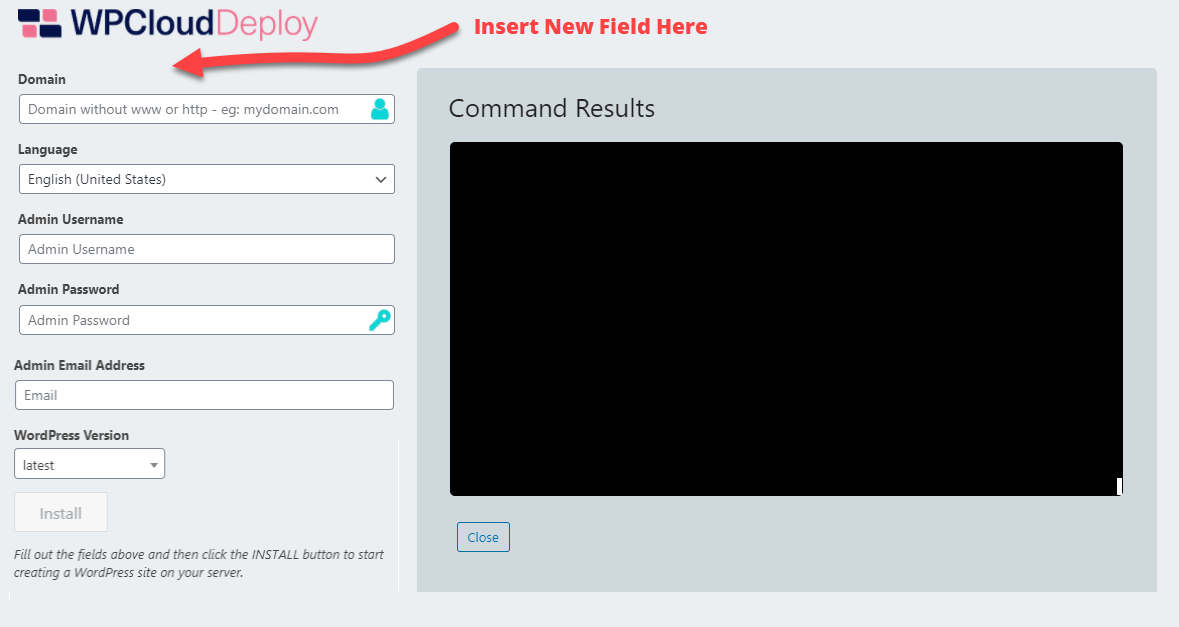
So, on the new WordPress site popup we’ll just add a new drop-down that shows those options. Then we’ll need to connect the admin’s choice to actual scripting actions occurring on the server.
General Steps
There are a lot of moving parts to be considered here. But, they can be broken down into the following four major steps:
- Modify the popup that shows up when the admin chooses to create a new site.
- Make sure that the new field gets added to the appropriate arrays that are passed around during the site provisioning process.
- Connect the array data to the script that bridges WordPress to the server scripts.
- Modify the server scripts to actually do the work that respects choices in the new field.
- Point the plugin to our customized script from the prior step so that it is the one that gets used instead of the default.
Step 1: Modify The Create Site Popup
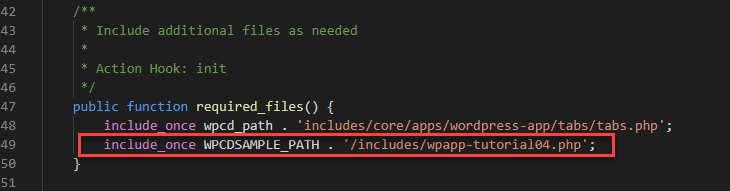
Starting from our code in part 3 of this series, we’ll create a new file to hold our hook and filter declarations and include it in the main sample plugin file.
- Create a new file in the includes folder of our sample plugin: wpapp-tutorial04.php
- Include it in the main sample plugin file in the function required_files()
The wpapp-tutorial04 file will be relatively simple for now – just a class file with one hook declared in the constructor:
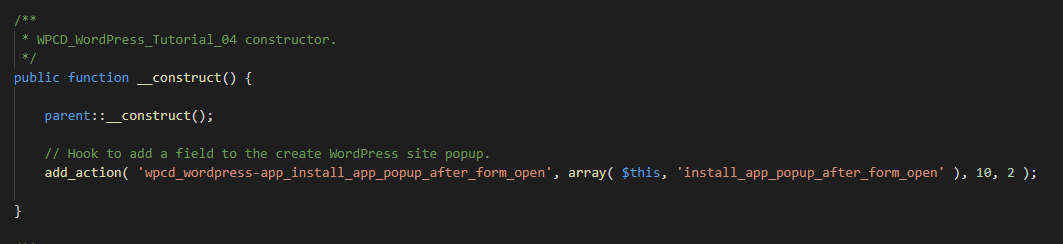
This hook allows us to insert a field at the top of the site creation form:
The code for the hooked function is shown in the image below:

All we’re doing is simply outputting some basic HTML to paint the SELECT drop-down onto the screen.
Step 2: Populate Transfer Arrays
Now that we are collecting data from the user, we need make sure it gets into the array that transfers data from WordPress to the bash scripts.
The way this is done is via the use of custom fields – a new internal feature in WPCD Version 4.2.5 to make it easy to hook up data from the UI to the server bash scripts.
As of WPCD V 4.2.5, custom fields is a very basic & limited implementation of the concept. It’s just an array that allows you to take the fields you added to the popup screen above and use it in later parts of the plugin.
Future versions of WPCD will likely use custom fields to automatically generate the UI that we manually had to add in step 1.
Anyway, to add a custom field today, we just need to use the WordPress ‘init’ hook:
add_action( 'init', array( $this, 'add_custom_fields' ), 10 );
The add_custom_fields function itself is relatively simple and looks like this:
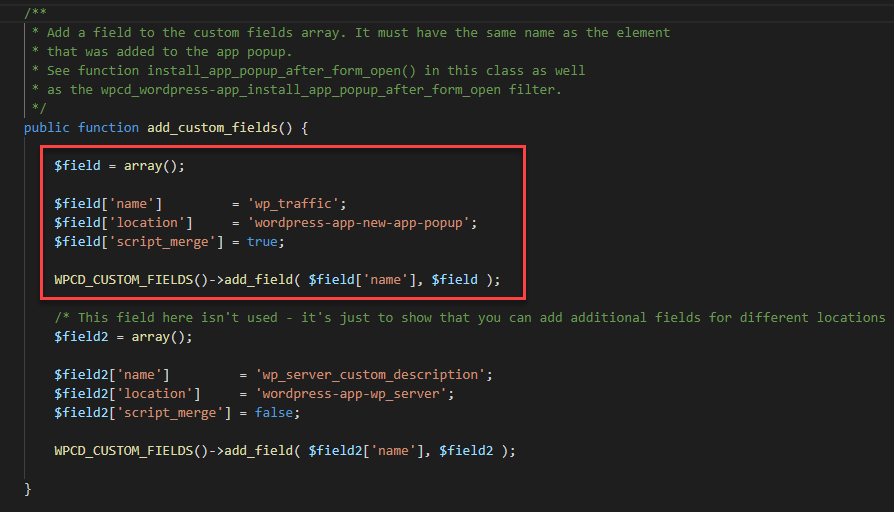
The key here is that the name of the field has to be the same name we used in step one above – ‘wp_traffic‘.
With this step, the data that is entered on the popup for wp_traffic will automatically be stored in a meta field for the app and can therefore be used later when we need to transfer its value to a BASH script.
Step 3: The Bridge
The bridge is all about setting server environment variables that will be used in the main BASH script. You saw an example of a bridge script in part 3 of this tutorial. It looks like this:

In part 3 of our series, we made our modifications in a copy of this script and used a filter to point the plugin to our custom script.
However, because we are using custom fields in this part 4 tutorial we do not have to do anything in order to have the data from our custom field included:

When our add-on is used, the custom field is automatically added as a new token for the environment variables and the data from the field will be set in the BASH environment on the server.
Basically, what we’re saying here is that you do not have to do anything in this part to get the data from the custom field you set up in part 1 and part 2 above into the environment of the server.
We’re just including this explanation so that you know what’s happening internally – i.e.: a ton of complex work is being done for you.
Step 4: Modify The Core Script To Use New Field
So far we have:
- Added a field to the screen to collect the size of the WordPress site we would like to install
- Connected that field to a “custom field” definition that enables a lot of internal machinations involved with passing data between the UI and a script
Now, we need to actually make a copy of the script that installs WordPress and add in our logic that uses our new field.
So, first lets make a copy of the script – copy this file from the WPCD plugin folder to the SCRIPTS folder inside our sample plugin:
includes\core\apps\wordpress-app\scripts\v1\raw\02-install_wordpress_site.txt
Once it’s in there, rename it to:
my_custom_install_wp_site.txt
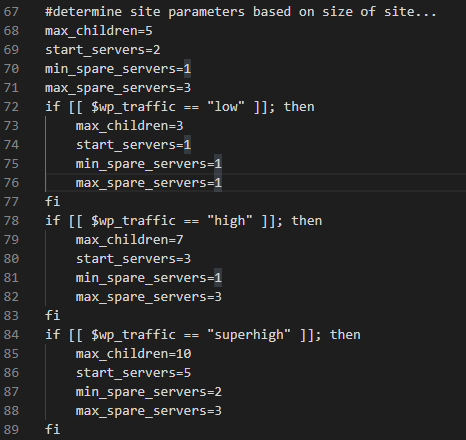
Next we need to modify it to add in some logic using our custom wp_traffic variable. For the purposes of this tutorial we have added in this code that sets up a few internal bash variables based on the size specified in our wp_traffic variable:
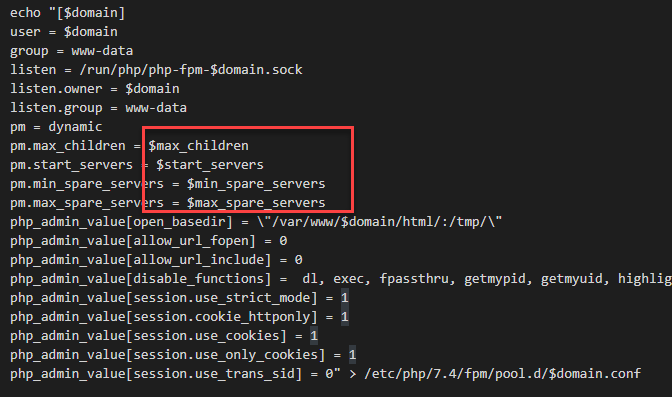
We then modify the PHP parameters for the site using the new vars:
The only thing left is to point our sample plugin to this new file. To do that we need to bring in a hook that we’ve used in the third part of this series:
add_filter( 'wpcd_wpapp_replace_script_tokens', array( $this, 'wpcd_wpapp_replace_script' ), 10, 7 );
And, here is our function that implements it:

All we’re doing here is replacing the source of our script to point to the scripts folder in our sample plugin.
Now, when you install a new site and select a size for the size, the number of worker threads will be changed based on the size that the user chooses.
Wrapup
If you’ve been following this series from the beginning, the steps involved here probably don’t feel like a lot of work. However, if you’re jumping in without the background from the prior articles it probably seems overwhelming.
Regardless, with this article you should see how WPCD is extensible in a way that just isn’t possible with SaaS systems. When you have control of the entire stack you can do some amazing things for your customers!
Was This Article Useful? Or do you have questions or comments about it (or our products & services)? We'd love to hear from you!
Automatic Notification Of New Articles
Sign up to get automatic notifications of new articles. This is a different list than our standard list - you only get new articles once a week (usually on Mondays). No other emails will be sent unless you sign up for our general list as well.
Follow us on Twitter! We post a lot of cool things there first. To keep up, click the "X" below!