Caching is an important element in wringing the best performance out of a WordPress site. In fact, for many sites, caching is the number one driver of performance.
Many sites improve caching by placing css, js and media files such as images and pdfs on CDNs. By doing so these files can be served faster and without impacting the WordPress server.
But there is another level of caching that is possible with CloudFlare – you can cache the entire contents of a page – including the rendered HTML.
By doing this, a request for a cached page will render the page even faster and result in even less load on the WordPress server. In fact, it’s unlikely that a page can be rendered faster than when it’s cached on edge servers.
Limitations
As you might expect, there are some limitations – you don’t want to cache pages that change regularly or that contain private data.
And, of course, when you change or update a cached page on your WordPress site you must remember to clear the CloudFlare cache so that the page can be updated there.
Examples of pages you do not want to cache include account pages, login pages and product pages that show the current stock or inventory level.
Still, for many sites, there are many pages that do not contain server-rendered dynamic data or that use AJAX (js scripts) to render dynamic data. These pages can all be cached at the CloudFlare edge.
Another limitation is if you have separate pages for different device sizes – in this case only one device size will be cached and shown on all devices. For modern websites where the page elements are sized dynamically with CSS, this is usually not an issue. But you should test on multiple device types after you enable full page caching just to make sure that things render the way you expect.
CloudFlare Full Page Caching Options
There are two ways you can cache full pages at the CloudFlare edge:
- CloudFlare Pages – this requires that you render your entire site as a static site and upload the files to CloudFlare. You can do this with a plugin such as Simply Static. Both Simply Static and CloudFlare have instructions on how to make this happen.
- CloudFlare Page Rules – you can configure page rules to control caching levels for one or more of your URLs.
In this article we’ll cover the second method – using Page Rules.
The reason we prefer page rules is because it allows you to be more nimble and have more flexibility. With a full static site, you have less control over dynamic pages and very often you need to re-create and re-upload the entire site after small changes.
The drawback with CloudFlare Page Rules is that, for larger sites, you might need more page rules than are allowed on your free CloudFlare plan.
CloudFlare Page Rules
A free CloudFlare plan includes three page rules (limit at the time this article was published). If more rules are needed, you can purchase five more for $5.00. Or you can subscribe to the CloudFlare Pro plan ($25 / months) which includes 20 rules.
For most smaller brochure sites you can cache your pages within the 3 page rule limit.
Setup Page Rules
To access the page rules screen on CloudFlare, your DNS must be managed by CloudFlare. If you have not already set this up, now is the time to do it – just sign up for a CloudFlare account, navigate to the WEBSITES screen and click the ADD A SITE button. Follow the instructions to point your Name Servers to CloudFlare.
To configure page rules:
- Navigate to the CloudFlare WEBSITES screen and click on your website domain
- Next, click on the RULES menu option on left and then click on PAGE RULES
Click on the CREATE PAGE RULE button to create the first rule.
- The URL field should set to yourdomain.com/*
- The SETTING dropdown should be set to CACHE LEVEL
- The value for the CACHE LEVEL should be set to CACHE EVERYTHING
- Click on the SAVE PAGE RULE button at the bottom of the page
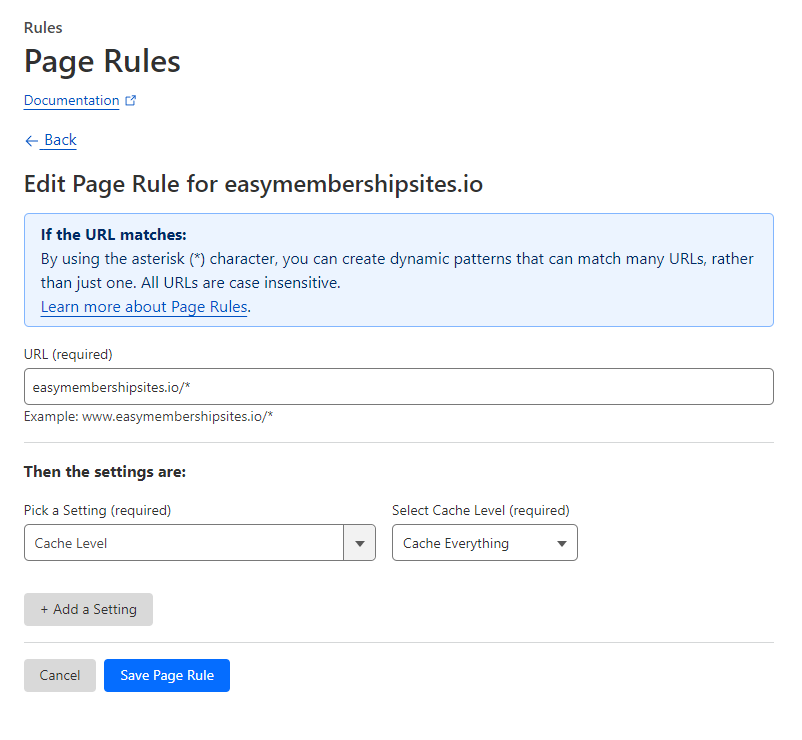
This caches the entire site. By default, any URL with a query parameter will not be cached. This means that many wp-admin pages will not be cached – which is what you want.
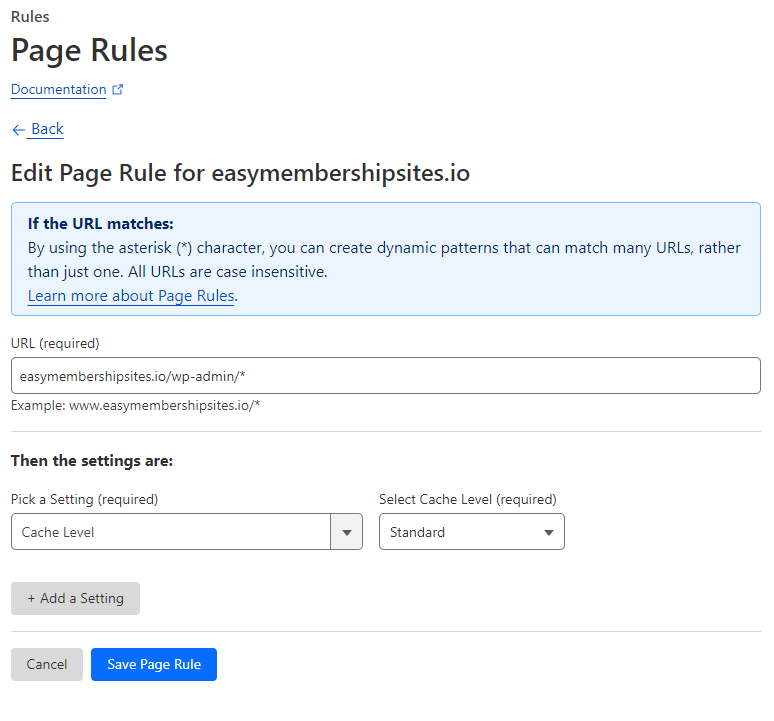
However, there are many other wp-admin pages that do not use query parameters and they will be cached – this is NOT what you want. So you’ll need to setup a new rule to prevent CloudFlare from caching these pages.
Click on the CREATE PAGE RULE button again to create another rule.
- The URL field should set to yourdomain.com/wp-admin/*
- The SETTING dropdown should be set to CACHE LEVEL
- The value for the CACHE LEVEL should be set to STANDARD
- Click on the SAVE PAGE RULE button at the bottom of the page
When you save this rule, it might be saved below the first rule. This is NOT what you would want since CloudFlare will see the first rule for caching the entire site, invoke it and stop evaluating the rest of the rules.
So, you should use the sorting arrows to move the wp-admin rule to the top of the list.

Generally speaking, you want your more specific rules at the top of the list and the more generalized or broader rules at the bottom. In this way the more specific rules get evaluated first.
Excluding Additional Pages
Of course, for larger sites, you might have other pages and posts you want to exclude from caching. One way to be efficient in the use of your page rules would be to gather these pages under a parent page. So the URL excluded in your page rule would be something like this:
yourdomain.com/non-cache/*
‘non-cache’ is the slug of the parent page under which you group the pages you do not want cached (though, of course, that slug can be whatever you want for the parent page.)
If you’re running an eCommerce store such as WooCommerce or Easy Digital Downloads, you might be able to cache product pages where you do not track inventory – eg: those for digital downloads or services. Setting these up will require more than three page rules though so you’ll need to purchase additional rules or subscribe to the CloudFlare PRO plan.
Miscellaneous Notes
It might not be obvious but any JS script that is present on a cached page will still execute when it hits the users browser. This means that, even though the page is theoretically STATIC, the JS code can still render dynamic real-time elements.
For example, code such as Google Analytics, Captchas, sliders etc. will still run.
It also means that you can continue to use third party form, calendar and other similar tools where you embed a JS snippet on a page because these scripts will render the elements dynamically as it pulls data from those third party servers.
You might even be able to cache your e-commerce product pages and show the correct stock level if you have a custom JS script that dynamically pulls and displays the correct stock level after the page is rendered.
Wrapup
If you were to measure the performance of a page that is cached at the edge, it should scream. The only reason that it would even begin to fail any kind of performance test would be if the page contained a lot of large images or contained JS scripts that execute slowly.
Otherwise, for your static pages, your site should scream while reducing load on your WordPress servers. Just remember to clear your CloudFlare cache when you make changes to the site!
Was This Article Useful? Or do you have questions or comments about it (or our products & services)? We'd love to hear from you!
Automatic Notification Of New Articles
Sign up to get automatic notifications of new articles. This is a different list than our standard list - you only get new articles once a week (usually on Mondays). No other emails will be sent unless you sign up for our general list as well.
Follow us on Twitter! We post a lot of cool things there first. To keep up, click the "X" below!