VS Code is, quite possibly, the world’s most popular code editor. Microsoft has done a phenomenal job of balancing features, performance and usability.
This article will demonstrate how to use it to easily edit files on one or more WPCloudDeploy WordPress sites. Once you get it configured and understand how it works, you’ll be able to quickly connect to any WPCD site and manage its files.
Install VS CODE
If you don’t already have VS Code installed, use the button below to quickly navigate to the download page.
With VS Code installed and working, follow the steps below to connect it to your first WPCloudDeploy WordPress site.
1. Setup sFTP Users For Your WordPress Sites
To allow VS Code to access files on your sites, you will need to create at least one sFTP user for each site you’re going to use with VS CODE.
- Navigate To WPCLOUDDEPLOY → ALL APPS
- Click on the TITLE of a site you want to access with VS CODE
- Click on the sFTP tab (left menu)
- In the ADD AN SFTP USER section, enter a User Name and Password – make sure you keep a note of these since you’ll need them later. The user name can be up to 32 alpha-numeric characters. And we suggest that you make the password a very long alpha-numeric string.
- Click the ADD USER button.
Repeat for each WordPress site you would like to access with VS CODE. Each user name will need to be unique to on a server but you can reuse user names across servers (not recommended).
2. Setup the sFTP Extension in VS Code
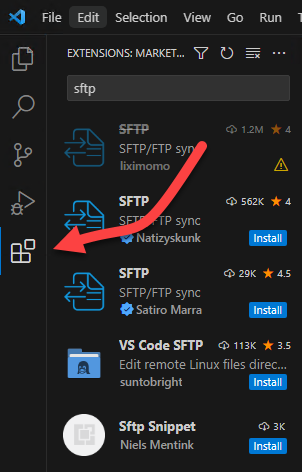
In VS Code click on the EXTENSIONS icon – in a default VS CODE installation it will be the very last icon on the left-most bar. If you’ve been using VS CODE for a while it might be in a different location if you’ve customized your environment.
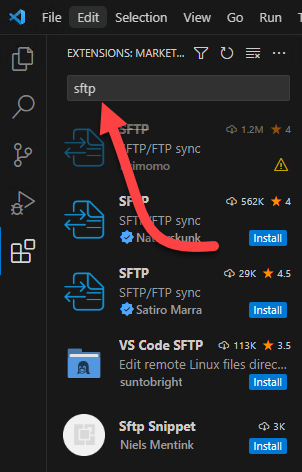
In the search bar at the top, type in the search term ‘sftp’ and hit the ENTER key.
Click on the SFTP extension published by Natisyzkunk – it will be the only one with more than 500,000 installations.
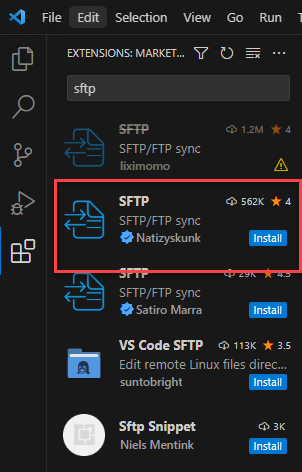
After a minute or so, it will be installed.
3. Create A Working Folder in Your Local File System
VS CODE is going to need a place to store files while it’s editing them. For the purposes of this article, create a new empty folder.
4. Open The Folder In VS CODE
In VS CODE click on the EXPLORER icon – in a default VS CODE installation it will be the very first icon on the left-most bar.

Click on the OPEN FOLDER button and point the dialog box to the folder you created in the prior step. If you see a question about trusting the authors of the files in that folder click YES.
5. Add the WordPress SFTP Credentials to VS CODE
Click Ctrl+Shift+P on Windows/Linux or Cmd+Shift+P on Mac to open command palette.
Type ‘sftp; and select the SFTP: config command.
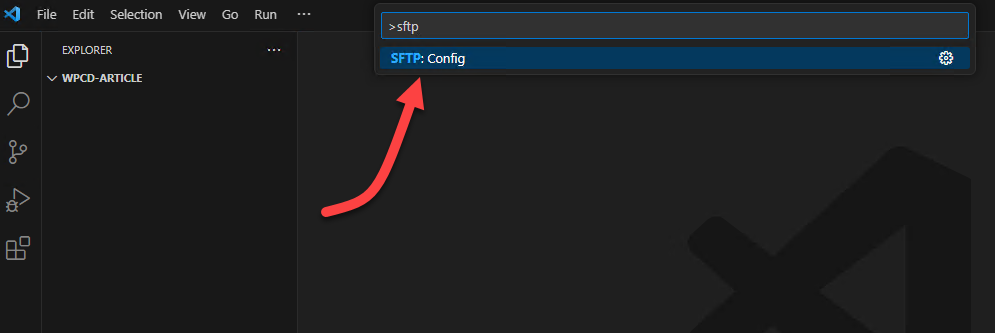
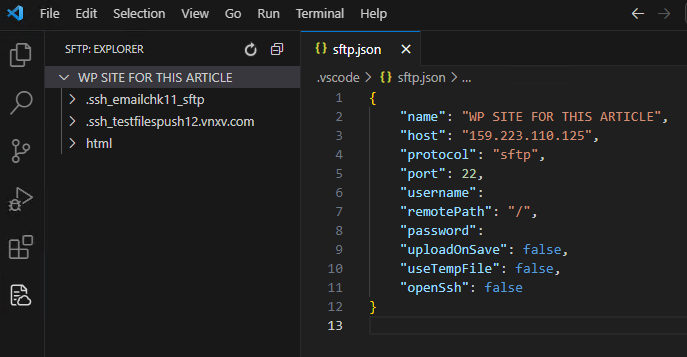
This should bring up a text editor with minimal contents that look similar to this:
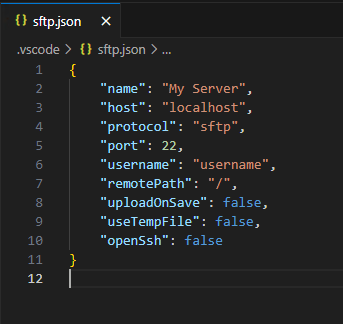
Modify the contents of this file as follows:
- For the NAME, set it to anything, usually the domain of the site or the name of the site – it is just a string for your reference so you know what this connection is for.
- For HOST, set it to the IP address of the WPCloudDeploy server where the WordPress site resides.
- For USERNAME, that should be set to the user name that was set for your sFTP user (step 1 earlier.)
- You’ll notice that there is no PASSWORD entry. You have to add that yourself if you want it stored. Keep in mind that it is stored in plain text (without encryption) on your file system. If you do not configure a password field here, you will be prompted for it when you attempt to connect to the site later.
Here is an image of what a completed configuration file might look like:
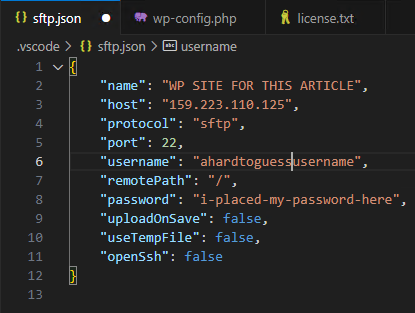
Notice that I added in a line for the password.
This file gets stored in a .vscode subfolder underneath the folder you opened earlier. If you create a new working folder and open it in VS CODE you can use the same steps to create a connection to a different WordPress site.
6. Connect VS CODE To Your WordPress Site
At this point you have the two critical things that VS CODE needs to work with your WPCloudDeploy WordPress Site:
- A working folder for your files and
- Information on how to connect to the site
You’ll notice that the left bar in VS CODE has a new icon below the EXTENSIONS icon – this is your sFTP icon.
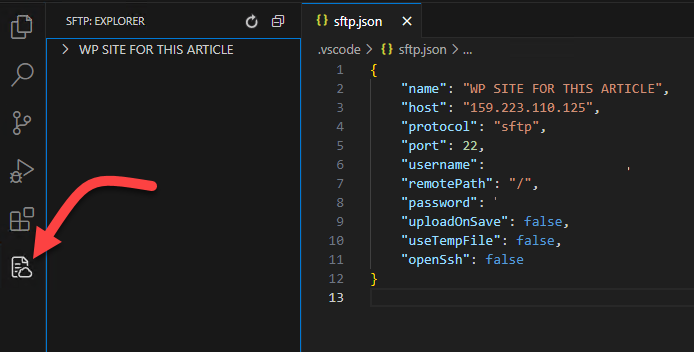
When you click on it you’ll see that the folders pane is empty with just the connection NAME
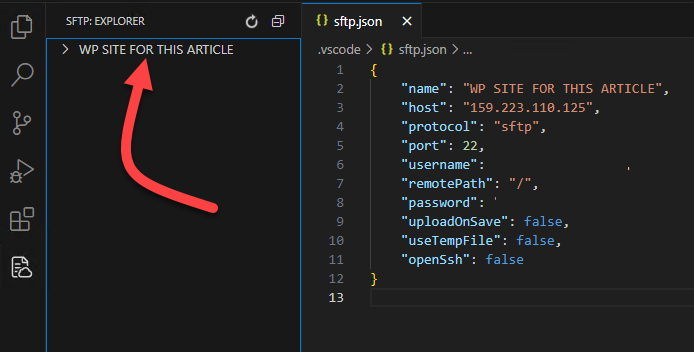
Double click on that title to connect to the site and then click the tiny left arrow next to it to open the file tree.
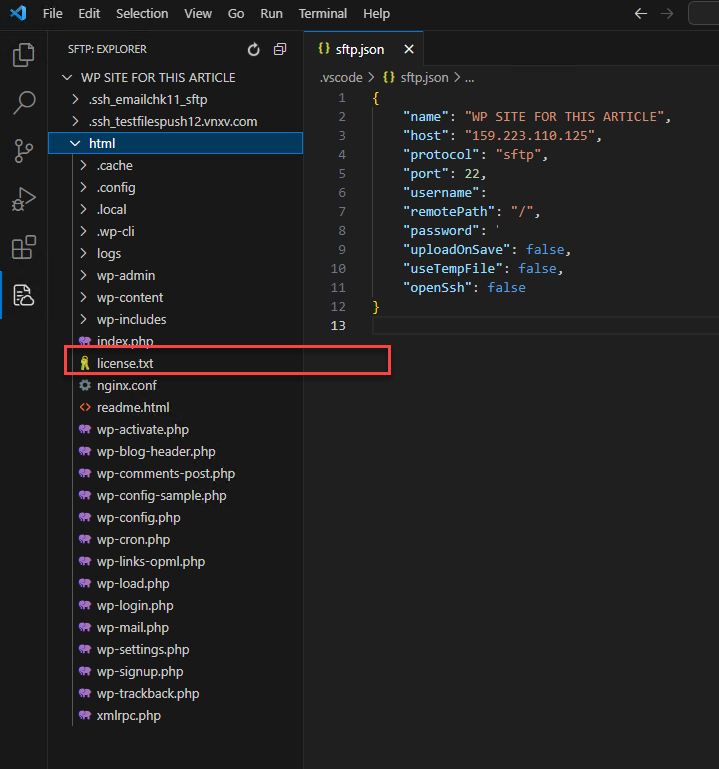
Click on the HTML node and keep drilling down until you find the files you want to edit:
For the purposes of this article, I’m going to edit the LICENSE.TXT file.
To edit the file in VS CODE you must RIGHT CLICK on it and choose the EDIT IN LOCAL option:
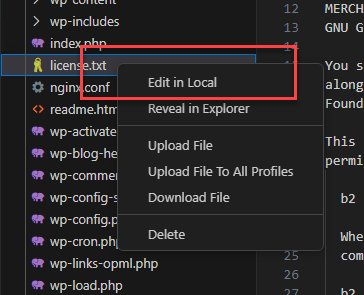
Note: If you double-click on the file to try to edit it that you, you’ll end up with a read-only version.
7. Save Changes Back To The Site
After you have finished editing the file, you can save it locally or you can save it back to the server.
To save it back to the server, RIGHT MOUSE CLICK in the editor and choose the UPLOAD FILE option:
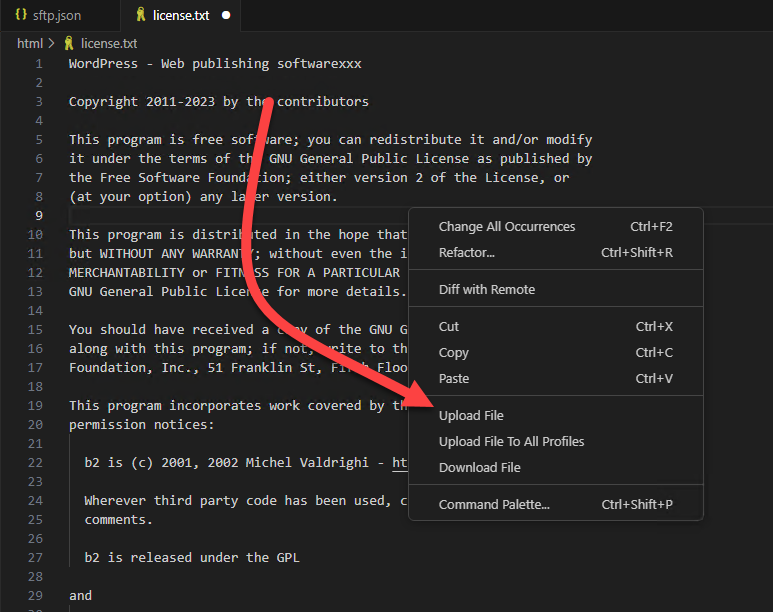
You can edit any file this way and save it back to the server, including WP-CONFIG.PHP.
If you get a permissions error when trying to upload a file, go to the WPCloudDeploy TOOLS tab for the site and use the RESET FILE PERMISSIONS option. Then, try the save/upload operation again.
Note: You cannot use this method to edit plugin and theme files for multi-tenant sites since those folders are read-only and can only be updated via the WPCloudDeploy versioning process. But you can use it to edit the files in the TEMPLATE site for a multi-tenant deployment.
How To Edit Files In Additional Sites
For each site you want to connect to and edit, you should create a new folder on your file system. Then, create a new instance of VS CODE, Open the new folder and follow the steps above to create a new sFTP configuration for the folder.
In our internal operations we use a vs-code-work folder and underneath it have a set of folders corresponding to each site we’re connecting to.
Editing An Entire Site of Files
If you have a lot of changes to make or the site is an active development site you can download all files to your local system, make changes and sync them back up.
To get all files down to your local file system:
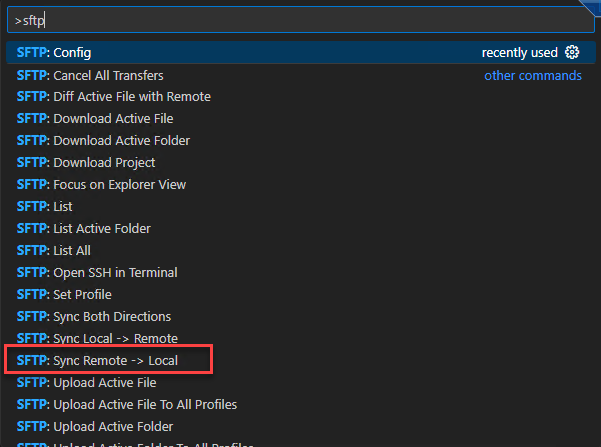
- Click Ctrl+Shift+P on Windows/Linux or Cmd+Shift+P on Mac to open command palette.
- Type ‘sftp; and select the SFTP: Sync Remote -> Local command.
- The default working folder will show up under the command palette – just select that and files will be downloaded into it.
Once the files are downloaded you can switch to editing on the local file system – use the EXPLORER icon to see the local file tree.
After you’ve added or edited your files, you can use the same command palette to send all edited files back up to the server:
- Switch back to the sFTP view (the last icon on the left side of the VS CODE editor)
- Click Ctrl+Shift+P on Windows/Linux or Cmd+Shift+P on Mac to open command palette.
- Type ‘sftp; and select the SFTP: Sync Local -> Remote command.
- The default working folder will show up under the command palette – just select that and files will be uploaded from it to the WordPress site.
If you’ve added local folders that need to be synced to the remove site, you might need to reset permissions using the WPCD RESET PERMISSIONS tool so that the new files can be uploaded.
Multiple WordPress Sites, Single Local Working Folder
So far we’ve set things up in VS CODE so that:
- Each WordPress site maps to a different local folder.
- Each project opens up a different instance of VS Code
The local folder is used for storing the files to be edited. So it’s very important that each remote WordPress site has it’s own unique working files space to prevent files from different WordPress sites from stepping on each other.
There is a way to have the following configuration:
- A single VS CODE instance
- A single working folder
- Multiple subfolders configured within a single VS CODE sFTP configuration file (sftp.json) that map to multiple remote WordPress sites.
This can allow you to be more efficient when constantly switching between multiple sites.
Let’s assume you want to do this for two remote working sites. Here is how you would accomplish this:
- Create a new empty folder on your file system
- In VS CODE click on the EXPLORER icon (in a default VS CODE installation it will be the very first icon on the left-most bar.)
- Click on the OPEN FOLDER button and point the dialog box to the folder you created in the prior step. If you see a question about trusting the authors of the files in that folder click YES.
- Click Ctrl+Shift+P on Windows/Linux or Cmd+Shift+P on Mac to open command palette.
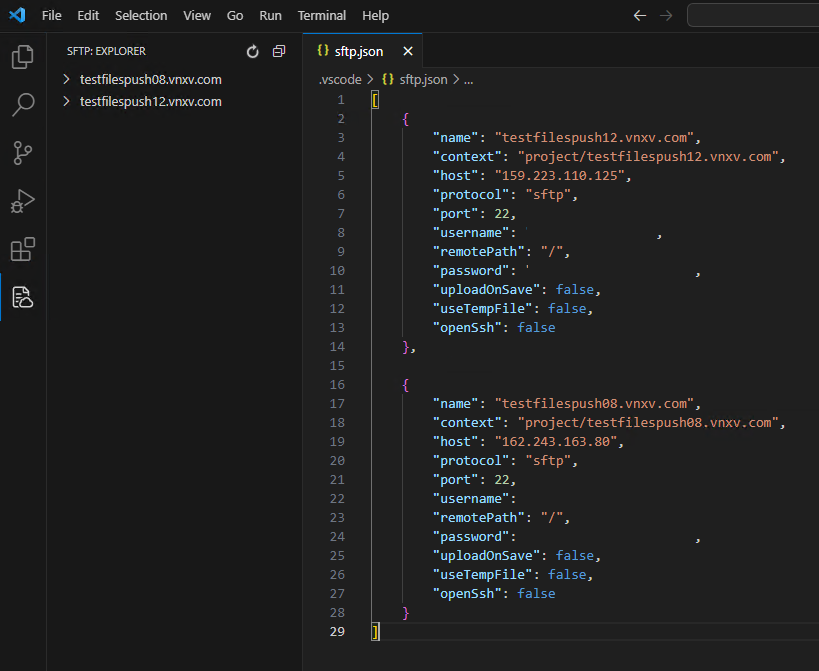
- Type ‘sftp; and select the SFTP: config command. This will open a simple JSON configuration file for the sFTP connection. Replace the entire contents with this:
[
    {
        "name": "your-wpsite-domain-here.com",
        "context": "project/your-wpsite-domain-her.com",
        "host": "159.223.110.125",
        "protocol": "sftp",
        "port": 22,
        "username": "your-wpcd-sftp-username-site-1",
        "remotePath": "/",
        "password": "your-wpcd-sftp-password-site-21",
        "uploadOnSave": false,
        "useTempFile": false,
        "openSsh": false
    },

    {
        "name": "your-wpsite-domain-here-2.com",
        "context": "your-wpsite-domain-here-2.com",
        "host": "162.243.163.80",
        "protocol": "sftp",
        "port": 22,
        "username": "your-wpcd-sftp-username-site-2",
        "remotePath": "/",
        "password": "your-wpcd-sftp-password-site-21",
        "uploadOnSave": false,
        "useTempFile": false,
        "openSsh": false
    }
]
Compared to the simple configuration we used at the start of this tutorial, this is more complex – but not overly so. Here are the chief differences:
- You have two configurations embedded in an array – the array starts with the ‘[‘ at the top and ends with ‘]’ at the bottom.
- The site configurations are separate by a comma after the “}”. If you add a third configuration you’ll need to add that comma in after the second configuration.
- There is a new line in each configuration – the ‘context’. This is simply the local working folder for the site. You need separate local working folders to prevent site clashes – for example, you would not want your wp-config.php file from site 1 being stepped on by the one from site 2 or vice-versa.
To open the two sites in a single instance of VS CODE:
- Click on the VS CODE sFTP icon (it’s likely the very last icon and below the EXTENSIONS icon)
You can use the same techniques you learned earlier to expand the tree, download and edit files or even download all files in the site.
Wrapup
Connecting you local VS CODE editor to a WPCloudDeploy site is very easy. If you work with the code in a lot of customer sites, you’ll love how easy it is to centralize all your file operations and editing in a single editor!
Notes
We have toyed in the past with automatically adding an sFTP user for each new site created with WPCloudDeploy. If we do this it would eliminate the first step in the instructions above. If you believe we should do this, please vote for it on our roadmap or send us a comment in the form below.
Resources
The sFTP extension for VS CODE is very powerful. You can read all about how to get it configured for various use cases in the offical GITHUB repo: https://github.com/Natizyskunk/vscode-sftp
Was This Article Useful? Or do you have questions or comments about it (or our products & services)? We'd love to hear from you!
Automatic Notification Of New Articles
Sign up to get automatic notifications of new articles. This is a different list than our standard list - you only get new articles once a week (usually on Mondays). No other emails will be sent unless you sign up for our general list as well.
Follow us on Twitter! We post a lot of cool things there first. To keep up, click the "X" below!