If you’re a software developer using Windows, you probably use WSL (Windows Subsystem for Linux) for some development things, if not most development things. Whether it’s running DOCKER, NGINX, NPM etc. you’re likely using WSL in some form.
But, as you might have encountered time and again, if you’re developing for multiple stacks, conflicts invariably arise – some packages don’t work well with others. Or some versions of packages are needed that are incompatible with others.
It all quickly becomes a mess.
Wouldn’t it be great if you could have a separate WSL environment for each project (or similar groups of projects)?
While it’s probably not a common configuration you can have exactly that and this article will show you how!
Prerequisites
To use WSL, You must be running Windows 10 PRO (or better) version 2004 and higher (Build 19041 and higher) or Windows 11 (PRO or better)
Additionally, you must have Windows Terminal installed (which you can get from the Windows Store if you’re on Windows 10).
1. Prepare Your Local File System
You need to create a folder that will hold all the different instances. For the purposes of this article lets call that folder c:\mywsl.
Under that folder you should create one for exports – c:\mywsl\exports and one for c:\mywsl\instances.
The folder c:\mywsl\exports will contain exports of instances or Linux images. When this article is complete it will have at least one image (two if you currently have WSL installed.)
The folder c:\mywsl\instances will contain the file system for the current live instances.
2. Export Your Current WSL Instance
If you have WSL installed and have been using it for a while, we need to reset it so you have a clean base to start from. But you probably want to save your current instance.
First, lets get the name of your current instances. Open a WINDOWS COMMAND prompt (not a Linux prompt) and type this:
wsl --list
You might see a single instance listed such as ‘Ubuntu-22.04’ or ‘Ubuntu-20.04’. This is the name we’ll use for the next set of commands.
Lets export a copy of the current instance to c:\mywsl\exports. If your instance is named Ubuntu-22.04:
wsl --export Ubuntu-22.04 c:\mywsl\exports\wsl-original-instance
Your current WSL data will be snapshotted to the c:\mywsl\exports\wsl-original-instance file.
3. Delete Your Current WSL Instance
If you have WSL installed and have completed step 2 above, it’s time to delete it. Assuming the instance is named Ubuntu-22.04:
wsl --unregister Ubuntu-22.044. Install a Clean WSL Instance
To install a new clean instance of Ubuntu 22.04, use the command command:
wsl --install Ubuntu-22.04You can replace ‘Ubuntu-22.04’ with any other version of Linux. To see possible versions, run:
wsl --list --onlineWhen you attempt to log in to the new WSL instance. you will be asked to setup a user name and password.
Once you are logged in, you should run the following two commands at the Linux prompt:
- sudo apt-get update -y
- sudo apt-get upgrade -y
This will make sure your instance has the latest OS updates.
5. Export Your New Clean Instance
At this point you have a clean instance that you can save and use as a starting point for any project. So lets export it:
wsl --export Ubuntu-22.04 c:\mywsl\exports\wsl-clean-instance-ubuntu2204
This assumes that your new instance name is ‘Ubuntu-22.04’ and that you’re saving the exported instance data to c:\mywsl\exports\wsl-clean-instance-ubuntu2204
6. Create A New Development Instance
Lets create a couple of new WSL instances called PROJECT01 and PROJECT02 so you can see how this is done.
To create a PROJECT01 instance:
wsl --import project01 c:\mywsl\instances\project01 c:\mywsl\exports\wsl-clean-instance-ubuntu2204
This command imports the clean instance you exported in step 5 and gives it the name ‘project01’. It stores the data for the new running instance in the c:\mywsl\instances\project01 folder.
Repeat to create the PROJECT02 instance:
wsl --import project02 c:\mywsl\instances\project02 c:\mywsl\exports\wsl-clean-instance-ubuntu2204
At this point you should have TWO running instances plus your original instance for a total of three instances.
7. Login To An Instance
So, the question on your mind is probably something along the lines of how to access each instance.
To do that, you MUST launch a new instance of Windows Terminal – if you try to use an existing Windows Terminal instance you will not be able to login to the new WSL instances. You’ll find your instances located as shown in the image below:
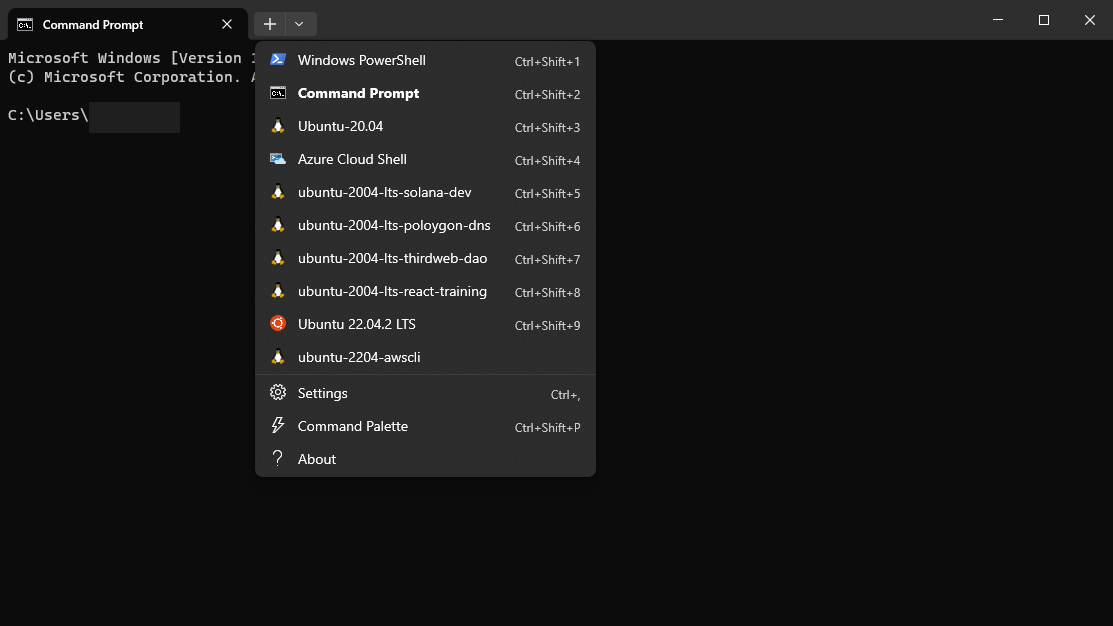
Each instance you choose will be opened in a separate tab.
Using the examples in this article, you would open both PROJECT01 and PROJECT02, they would appear in separate tabs and you can start installing different packages and configuration into each.
Linking To Visual Studio Code
In each tab, you can run the following to open up a linked instance of VS Code:
code .
Notice the period at the end of the command – this tells VS CODE to open and link to the current folder.
Tips
The technique in step 5 and 6 above can be used to export an instance at any point in time and use that as the starting point for new WSL instances.
For example, you can create a WSL instance with PHP, COMPOSER etc. pre-installed and export that as a saved instance. Then, when it’s time to start a new PHP project, simply import that saved instance as a new live WSL instance and you’re ready to go!
Notes
- This method of development requires a lot more diskspace of course since you’ll have a WSL instance for each project.
- If you run a lot of projects simultaneously, keeping all the instances up to date might become a PITA.
- When installing WLS instances we recommend using the latest long term versions (eg: Ubuntu 22.04 instead of Ubuntu 23.x).
References
Basic WSL Commands: https://learn.microsoft.com/en-us/windows/wsl/basic-commands
How To Install WSL: https://learn.microsoft.com/en-us/windows/wsl/install
Was This Article Useful? Or do you have questions or comments about it (or our products & services)? We'd love to hear from you!
Automatic Notification Of New Articles
Sign up to get automatic notifications of new articles. This is a different list than our standard list - you only get new articles once a week (usually on Mondays). No other emails will be sent unless you sign up for our general list as well.
Follow us on Twitter! We post a lot of cool things there first. To keep up, click the "X" below!