Installation and Configuration
Introduction
The WPCloudDeploy WordPress fault-tolerant load-balancing scripts are designed exclusively for the AWS service. It is a combination of BASH scripts and a CLOUDFORMATION template. It does NOT require the use of Terraform!
The scripts does the following straight out of the box:
- Setup TWO servers in two availability zones inside the same region (eg: us-west-1a and us-west-1c).
- Setup a shared EFS (elastic file system) shared by the two servers
- Ensures WordPress uses EFS for files and that PHP and NGINX uses it for basic configurations so that everything is shared among all the servers
- Allows for the creation of additional server instances by cloning existing ones
- Creates SSL certificates for use on the EC2 Loadbalancer
- Automatically creates and downloads SSH key files for servers created
These scripts do NOT handle the following:
- Page caching. This is because caching cannot be done on the individual servers since you risk each server having a different version of the cached files. Instead, you need to setup CLOUDFRONT, CLOUDFLARE or other similar proxy service caches.
- You will need to handle backups – do NOT install a backup plugin otherwise each server will attempt to run the backup plugin processes at the same time.
Additionally, these scripts do NOT use the AUTO SCALING GROUPS feature of AWS EC2. You can, of course, add it to the scripts but it’s not there out of the box.
Pre-requisites
Please ensure that these items are in place before proceeding with installing and using the scripts.
- The scripts need to be run on a LINUX Ubuntu system so if you’re on Windows, you need to copy them to an Ubuntu 20.04 or 22.04 server (or WSL running Ubuntu.) They are not suitable for a MAC. If you only have access to a MAC we recommend you launch an EC2 Ubuntu 22.04 LTS instance and run the scripts from there.
- AWS CLI has been installed on the machine where you’ll be executing the scripts (or in your WSL container if you’re on Windows)
- You have obtained IAM Access keys that have full admin access to the account. While you can create restricted keys if you like, you will be granting a ton of access rights for EC2 and other AWS services – full admin makes it easy to get started. You can use scoped keys later if you wish of course.
- Domain DNS located at a provider that quickly propagates (eg: CloudFlare)
- Strongly Recommended: Create a NEW account under your organization – this allows you to easily see all the assets created by the scripts and to easily see that they’ve been destroyed when you execute the cleanup script.
- If you have not modified the scripts, ensure that m5.large servers are available in the two availability zones that you’ll be using. m5.large are the default sizes for the servers.
Prepare the Scripts
Copy all files (including all subfolders) to your Linux system (or, if on Windows, WSL). For the purposes of this document, we’ll assume the files are located in a folder called cfscripts. (If you’re wondering about the folder name, ‘cf’ is short for ‘CloudFormation’ – so the folder name just means ‘cloudformation scripts’.)
Make sure you have the dos2unix utility installed. if not, install it:
sudo apt-get dos2unix -y
If you get an error during installation, make sure you update your repos first:
sudo apt-get update -y
Then retry the sudo apt-get dos2unix -y command.
Once it’s installed, run the following inside the cfscripts folder – this will make sure the .sh scripts have the correct line endings and also make them directly executable.
sudo dos2unix *.sh && dos2unix install/*.sh && dos2unix scripts/*.sh && chmod +x *.sh && chmod +x scripts/*.sh && chmod +x install/*.sh
Install Your High-Availability WordPress Cluster
Now that the scripts have been prepared, all you have to do is run the following command inside the cfscripts folder.
sudo ./install.sh
You will be sequentially prompted for the following information:
- Domain name (without http/https:)
- AWS Access Key
- AWS Access ID
- Default Region
- Availability Zone 1
- Availability Zone 2
- WordPress Admin User Name
- WordPress Admin Password
- WordPress Admin Email Address
- WordPress Version
You will then see the following message: Waiting for stack to be created.
Note: the stack name will be the domain name stripped of all periods, dashes and other non-alpha-numeric chars.
You MUST wait at your screen for at least 5 minutes until you see the prompt to create the CNAME record. If you miss that prompt and do not setup the CNAME record within the allotted time, you will not be able access the stack after it’s been created. If the domain has been used at least once before, you will not see this prompt.
Here is what the prompt looks like:
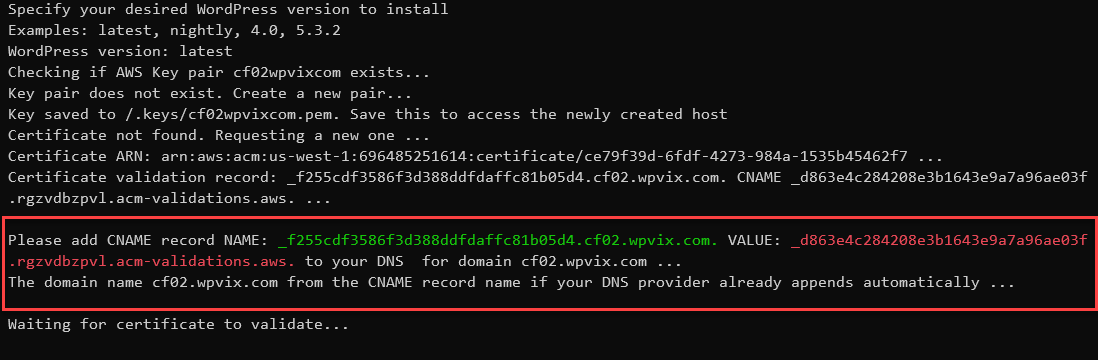
It should not take more than 5 minutes for this prompt to appear.
If you do not see it, then it means you’ve probably run the script at least once with the same domain name and so the SSL certificates already exist. It’s probably safe to walk away – it can take 30 mins or more for CloudFormation to do its thing.
After Stack Is Created
- Update DNS – you’ll get a message with the CNAME to add to your DNS

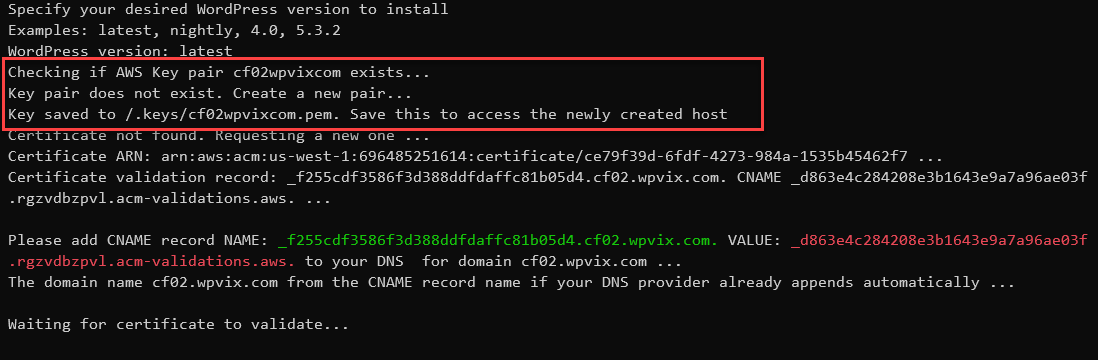
SSH Key Files
If your stack is new, SSH keys for the new instances will be downloaded into the /.keys folder. The name of the file will be <stackname>.pem. i.e.: if your domain name is my.domain.com, the pem file will be /.keys/mydomaincom.pem
You will see a notation of this file and location just after you have answered all the prompts. But if the domain has been run once before, it is possible the key already exists in which case you will NOT see this notation again!
How To Add Servers
To add new servers to the cluster to increase capacity, run the ADD INSTANCE script inside the cfscripts folder.
sudo ./add_instance.sh
You will be prompted for the following:
- Domain Name (it asks for this is because you can have multiple stacks in your account so it needs to know which one to work with)
- AWS Access Key
- AWS Access ID
- Default Region
- Availability Zone (it asks to choose from the two you set up initially – you cannot add a third availability zone without modifying the scripts)
- Instance name – this is just a name you can use to identify the server instance later
- Instance to clone – it will show you a list of existing instances and ask you to choose one as the basis for the new instance
When the process is complete, you should see the additional server instance in your account and the CloudFormation instance should be updated to include references to the new server. If the cleanup script is run, the new servers should be destroyed along with the others.
Remove Servers
You can remove servers from the cluster by running the REMOVE INSTANCE script inside the cfscripts folder.
sudo ./remove_instance.sh
- Domain Name (it asks for this is because you can have multiple stacks in your account so it needs to know which one to work with)
- AWS Access Key
- AWS Access ID
- Default Region
You will then be asked to choose from the list of instances.
When the process is complete, you should see that the server instance has been removed from your account and the CloudFormation instance should be updated to remove any references to the server.
Delete The Cluster
To delete the cluster, run the CLEANUP script inside the cfscripts folder.
sudo ./cleanup.sh
You will be asked for the domain name after which ALL resources associated with the domain will be destroyed INCLUDING THE DATABASE and EFS volumes. Anything that was created outside of the scripts and moved to different buckets (eg: snapshots, backups etc.) will likely be retained.
Deleting the cluster can take 15 minutes or more. When it’s complete, you should check your account to make sure all major resources have been removed – you don’t want any surprise charges!
Misc Notes
- Each server is provisioned with 8 GB volumes. Since wp-content is stored on the EFS volume, this should be plenty to store the OS, NGINX, PHP and other configuration files.
- After the stack has been created, you might consider enabling the option for termination protection to prevent the entire cluster from being accidentally deleted.
- Certain regions do not have all the default resources used in the scripts. We have tested with US-EAST-1 & US-WEST-2. Some other regions should work but regions such as US-EAST-2 does not have all the default resources and sizes so you’ll need to modify the scripts first if you’d like to use those regions.
More Topics In Fault Tolerant WP For AWS
