Tweaking The Malware Scanner
If you install the Malware scanner you might want to tweak the settings a bit if you start to get false positives.
But, first, you might want to view the list of files that are being reported as potential malware. To do this, you first have to log into your server with ssh.
Once logged in you can run this command to view the list of malware reports:
maldet -e list
Usually the reports are ordered by date and the list would look something like this:

In the above image the first report shows that there has been 1 item identified as malware (column 5 shows 1 hit). To get more information about this item you’ll need the SCANID which is shown in the second column.
With the scan id you can run the following command:
maldet --report <reportid>
For example, running maldet –report 230209-0200.3700127 will display a detailed report that looks similar to this:
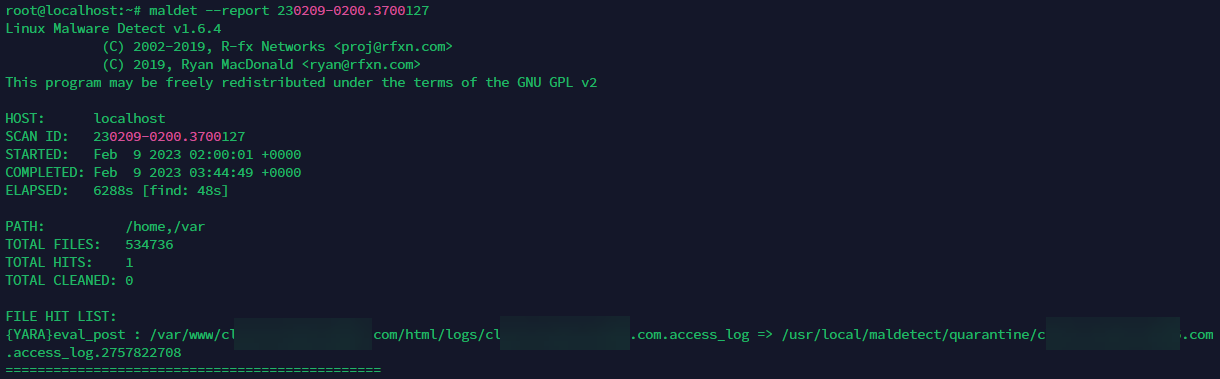
In the above report it looks like it’s identifying a log file. Since most log files are text files that are not executable you might want to remove all log files or all folders containing log files from your scans.
To exclude an entire folder, edit the following file and add the folder path:
/usr/local/maldetect/ignore_paths
To exclude files with a particular extension, edit the following file and add the extension (eg: .log)
/usr/local/maldetect/ignore_file_ext
Note that when you first open this file it will likely be blank. When you add extensions to be excluded from scanning, there should be one extension per line.
Finally, if you want to tweak the other parameters for the scanner you can edit the following file:
/usr/local/maldetect/conf.maldet
By editing this file you can control automatic quarantine behavior, notifications and more.
Further Reading
Learn more about MALDET in the Maldet official documentation.
More Topics In Tips, Techniques & Education.
- Increase WordPress Upload Size
- How To Access The Entire Server via sFTP
- How Do I Limit PHP Workers For Each Subdomain On A Multisite?
- How To Generate an SSH Key Pair
- Considerations For A Large Number Of Sites On A Single Server
- All The Possible WP-CONFIG.PHP Constants For Core WordPress
- Using MIGRATE GURU To Import Sites
- Force The Use of WWW On A Website
- Local & Remote Statuses On Servers
- CORS Example: Allow Access to Resources Between www and non-www Domains
- Import Sites
- Transferring Sites Between Servers
- Monit vs Netdata vs Monitorix vs GoAccess
- Resolving Common Issues With CloudFlare
- View Used Disk Space For A Site
- Customizing Front-end Styles
- How To Generate An SSH Key-Pair With Termius
- How To Change Your DNS Server
- Restoring From AWS S3 Into A New Site or Server
- Handling Low Disk Space Conditions
- Useful OpenLiteSpeed Commands
- Alias Domains
- Custom SSL Certificates

See Also