Site Expiration
An admin can set an expiration date on a site or one can be set automatically when the site is created.
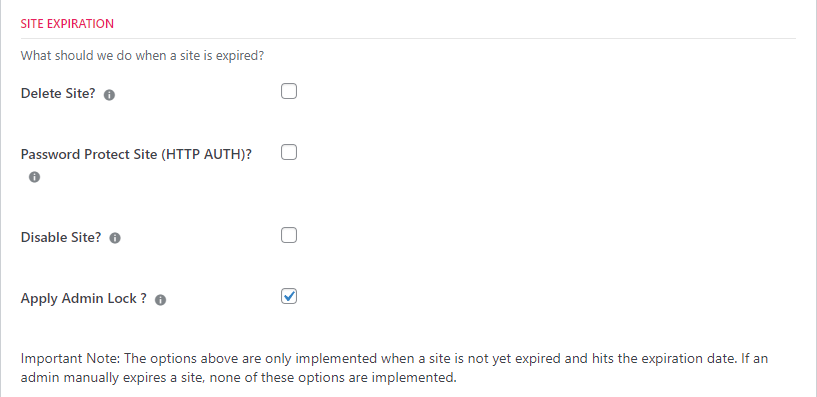
Admins can set what will happen to expired sites – there are four choices:
- Automatically delete the site
- Password protect the site
- Apply an admin lock to the site
- Disable the site
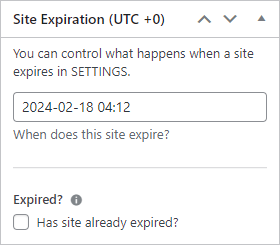
Manually Set an Expiration Date
To set an expiration date:
- Navigate to WPCloudDeploy → ALL APPS (or WPCloudDeploy → ALL WORDPRESS SITES)
- Scroll down to the site you want to work with and click on the title – this will bring up the site details screen
- Locate the SITE EXPIRATION metabox on the right hand side of the screen
- Set the date and time for the expiration
- Scroll up and click the UPDATE button.
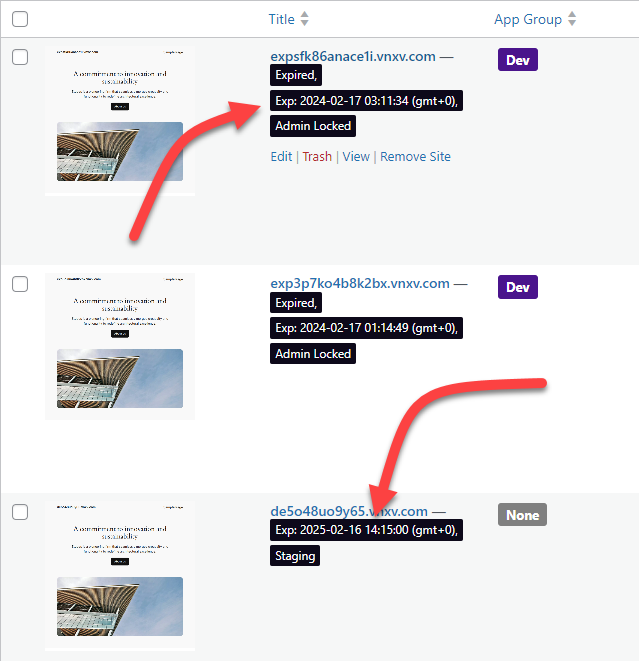
View Expired Sites
Sites that are expired but not deleted will have labels automatically applied to them in the site list:
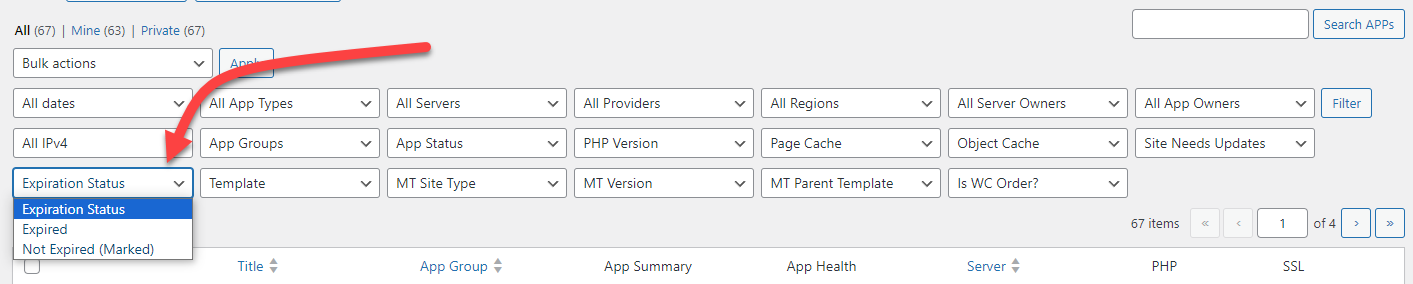
Additionally, you can quickly filter the site list to view expired sites:
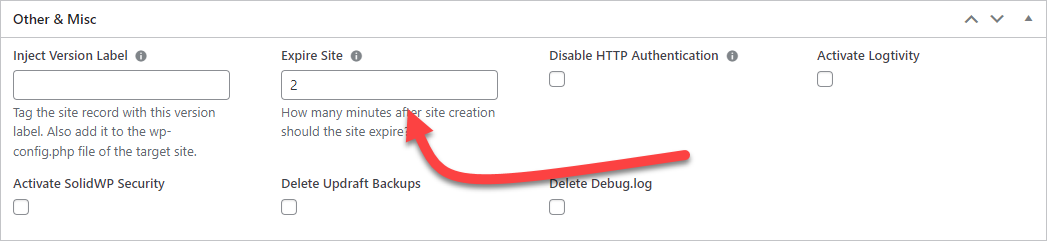
Configure Site Expiration Behavior
As mentioned earlier there are four options that can apply to a site when it expires. You can set these in the SETTINGS area.
- Navigate to WPCloudDeploy → ALL APPS (or WPCloudDeploy → ALL WORDPRESS SITES)
- Scroll down to the SITE EXPIRATION section
- Check the boxes for the actions that will apply when a site expires
- Scroll down and click the SAVE SETTINGS button.
Automatically Set Expiration Dates for New Sites
When you create a new site you can automatically set an expiration date for it.
To do this you use SITE PACKAGES.
Site packages have an EXPIRE SITE option. If this is set and the site package is used when creating a site, the new site will automatically have an expiration date calculated and applied to it.
Unexpire a Site
If a site is expired (and not deleted of course), you can un-expire it:
- Navigate to WPCloudDeploy → ALL APPS (or WPCloudDeploy → ALL WORDPRESS SITES)
- Scroll down to the site you want to unexpire and click on the title – this will bring up the site details screen
- Locate the SITE EXPIRATION metabox on the right hand side of the screen
- Unset the HAS SITE ALREDY EXPIRED checkbox
- Change the expiration date to something far into the future (otherwise our background process will evaluate the existing date and expire the site again)
- Scroll up and click the UPDATE button.
Force a Site To Expired Status
You can force a site to be tagged as ‘expired’. However, the rules for an expired site (such as applying an admin lock or password protecting the site) will not be executed. The only effect this action will have is to tag the site as expired – it will also show up in the site list as expired with the associated labels.
To force a site to expired status:
- Navigate to WPCloudDeploy → ALL APPS (or WPCloudDeploy → ALL WORDPRESS SITES)
- Scroll down to the site you want to unexpire and click on the title – this will bring up the site details screen
- Locate the SITE EXPIRATION metabox on the right hand side of the screen
- Set the HAS SITE ALREDY EXPIRED checkbox
- Scroll up and click the UPDATE button.
Site Expiration & Quotas
You can combine Site Expirations with Disk Quotas and Custom Post Type Quotas in an interesting way.
You can set a site expiration when a quota is exceeded – example, 30 days. This allows the site to stay up for a period of time after the quota is exceeded. Then, when the expiration date arrives, stricter expiration rules can apply (such as deleting the site or locking it.)
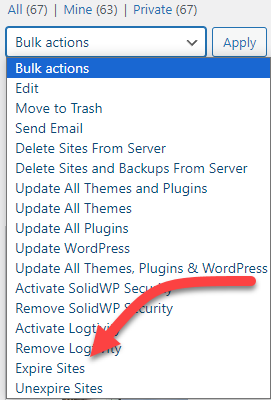
Bulk Actions
Two bulk actions are optionally available in the site list.
To use these actions you must first enable them in SETTINGS:
- Navigate to WPCloudDeploy → ALL APPS (or WPCloudDeploy → ALL WORDPRESS SITES)
- Scroll down to the SITE EXPIRATION section
- Enable the BULK ACTION checkbox
- Scroll down and click the SAVE SETTINGS button.
Now you should see two new items in the BULK ACTIONS menu in your site list:
WooCommerce Integration
You can set a site package for a WooCommerce product. This means that IF the site package has an EXPIRE SITE value, it will apply to new sites when the product is purchased and the new sites will have an expiration date.

One thing to keep in mind is your setting for what happens when a site is expired. If you set the option to delete the site, it is possible the site will be deleted but your customer’s subscription will still be in effect.
Thus, it is better to create subscription products with one time payments if you intend to delete the site when it expires. You can do this by setting the subscription payment to zero but using a one time fee and automatically cancelling the subscription after 1 month:
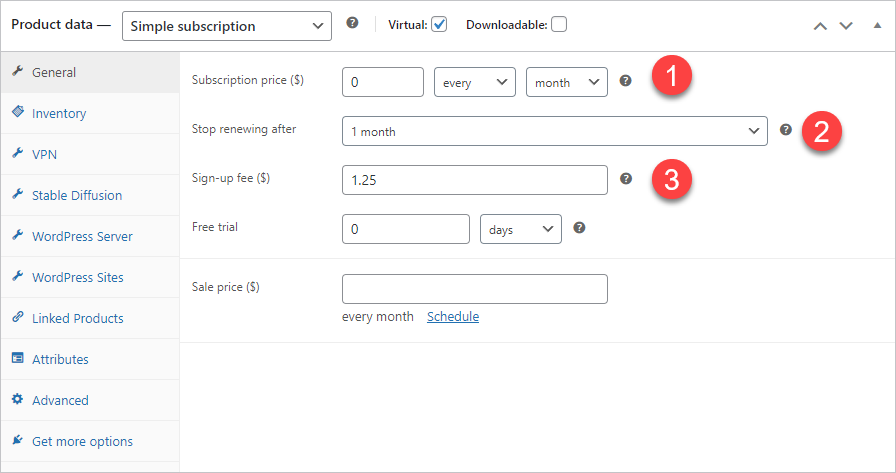
You can, of course include this product in a GROUPED product so that the customer can have the option to upgrade to a real subscription before the site expires.
Integration With Cancellation
When a site is cancelled, you can specify that it is set to ‘expired’ after X days instead of being deleted right away. Then, for your ‘expiration’ options, you can specify that the site is to be deleted.
This allows you to give your customers a grace period to change their minds about the cancellation.
Availability: Requires WPCloudDeploy 5.7 or later.
More Topics In Admin
- Restoring From AWS S3 Into A New Site or Server
- Backups With AWS S3
- Restoring From Backup
- 6G Firewall (Deprecated)
- 7G Firewall
- Native Linux Cron
- Disabling Sites
- Password Protect A Site (HTTP Authentication)
- One-click Login (AKA Passwordless Logins)
- Remove/Delete Site
- Manage PHP Options
- Add A WordPress Administrator
- Notifications and Alerts
- Managing WordPress DEBUG Flags
- Object Cache: MemCached
- Object Cache: Redis
- Monit / Healing
- DNS Integration: CloudFlare
- Site Packages
- Site Update Plans
- White Label Colors
- Adding Custom NGINX Configs
- Custom Servers (Bring Your Own Server)
- How To Change The IP Address For Your Server
- Virtual Cloud Providers
- Monitorix
- File Manager
- PHPMyAdmin - Database Operations
- Using Remote Databases
- SMTP Gateway
- Server Updates
- Theme & Plugin Updates
- Bulk Actions on Servers
- Bulk Actions on Sites
- SSH Key Overrides
- Webserver Types
- WPCD Cron Jobs
- Disk Quotas
- Custom Post Type Quotas
- Using Post-Processing Custom Bash Scripts
- Bulk Copy To Server
- Copy To Server (Automated Daily Process)
- Shortcodes
- Bootstrapping A WordPress Server With Our Scripts
- Bootstrapping A WordPress Server With Our Scripts - Archive Version 4.x
- Free Setup Requirements & Checklist
