Logtivity
Logtivity is a SaaS that is focused on WordPress logs. Errors, and other events such as user and admin logins, plugin actions and more are automatically sent to the SaaS service.
Unlike other logging services, Logtivity is 100% focused on events that occur at the APPLICATION level, not the server level.
In addition, the service is relatively simple and does not try to be all things to all folks. At its heart, it collects logs of events from WordPress sites and, for certain events, sends out alerts.
It’s a reasonable cost at just $1.99 per month per site with significant discounts available for 25+ sites.
There are two key features in Logtivity that are very very useful:
- Logs are stored off-site. Even if an attacker successfully breaches a site, they do not have the rights to delete historical logs
- Logtivity makes it very very easy to register a site using code instead of the admin having to manually add the site to a central dashboard and/or enter license key into the site.
Using the Logtivity-WPCloudDeploy Integration
Before you can use Logtivity with WPCloudDeploy, you need to obtain your TEAMS API key from Logtivity. You can find this under the TEAM SETTINGS link on the upper right or your screen when you’re logged in.
When you’ve copied that, use the following procedure to add it to WPCloudDeploy:
- Navigate to the WPCLOUDDEPLOY → SETTINGS → APP: WORDPRESS – SETTINGS → INTEGRATIONS tab
- Scroll down to the LOGTIVITY CONNECTION section
- Enter the key in the TEAMS API KEY field
- Optionally check the ENABLE BULK ACTIONS checkbox – this will allow you to easily add Logtivity to your existing sites using the WordPress BULK ACTIONS menu in the sites list
- Scroll down to the bottom and click the SAVE SETTINGS button
Add Logtivity To An Existing Site
To add Logtivity to an existing site:
- Navigate to the WPCloudDeploy → ALL APPS list
- Scroll down to the site you want to work with and click on the TITLE link to bring up the site details screen
- Click on the LOGS tab
- Under the LOGTIVITY CONNECTION section click the switch
After a while you should get a success message.
Add Logtivity To All New Sites
You can automatically add Logtivity to all new sites as follows:
- Navigate to the WPCLOUDDEPLOY → SETTINGS → APP: WORDPRESS – SETTINGS → SITES tab
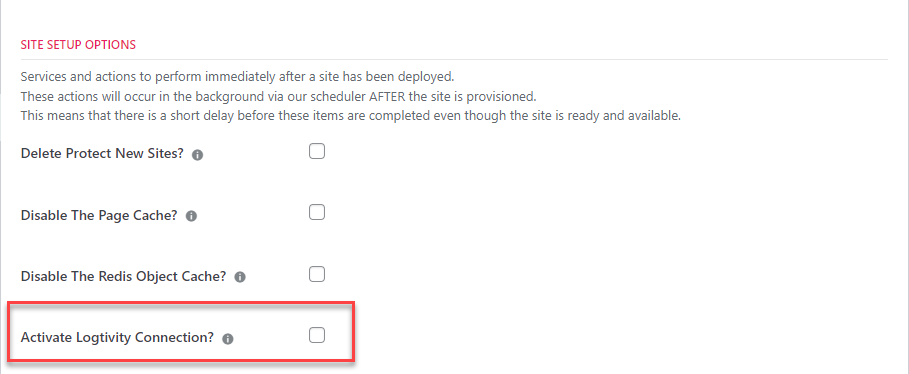
- In the SITE SETUP OPTIONS section, enable the ACTIVATE LOGTIVITY CONNECTION checkbox
- Scroll down to the bottom and click the SAVE SETTINGS button
Now, every time you create a new site Logtivity will automatically be connected to it.
A few things to keep in mind:
- If you create a new site and then import a site over it, the Logtivity connection will disappear because the Logtivity plugin and data will no longer be there. You will need to follow the steps listed in the Add Logtivity To An Existing Site above to re-connect the site.
- Deleting a site from WPCloudDeploy does NOT delete the site from Logtivity. To prevent charges for non-existent sites you should delete the site directly from the Logtivity dashboard if you no longer have any use for the logs there.
Using Logtivity With Site & Product Packages
You can enable Logtivity for any site that uses a site package. Just go to the Site Package (or Product Package) screen and enable the Logtivity Option.
Using Logtivity With Site Update Packages
If you have a lot of existing sites that are part of a SaaS, you can push out an update to them that automatically enables Logtivity.
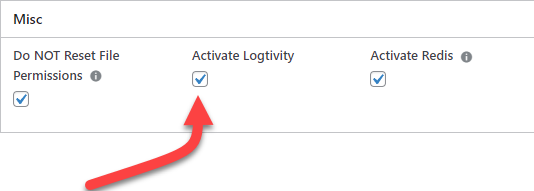
Just go to the Site Update Packages screen and enable the Logtivity option there:
Logtivity On The Primary WPCD Site (Control Plane Site)
All of the items discussed above relate to Logtivity being installed on sites managed by WPCD.
However, Logtivity can also be installed on the site where WPCD itself is installed.
In that instance we suppress a lot of the WPCD-specific Custom Post Type update information that would normally be sent to Logtivity. This prevents the Logtivity logs from being flooded with extraneous information. Instead, we only send data related to the WPCD_APP, WPCD_APP_SERVER and WPCD_ERROR_LOG post types.
We do not suppress the default WordPress post types and activity that the Logtivity plugin chooses to send.
Notes
- When you disable LOGTIVITY inside the WPCD panel, we attempt to delete it from the Logtivity service dashboard. However, for this to work you also need to be running the Logtivity plugin on the same site that WPCD is installed on (aka the Primary WPCD Site / Control Plane).


