OpenStack Private Cloud Provider: Introduction, Configuration & Installation Guide
Introduction
Our OpenStack Private Cloud provider allow you to create WordPress servers on your OpenStack cluster from inside the WPCD dashboard. With it, you do not need to manually configure your servers and then treat them as custom servers.
Once setup, the integration with the WPCD UI is as seamless as other public cloud services such as DigitalOcean, AWS etc.
However, to make this work requires a lot of setup inside OpenStack itself. Private clouds are complex to setup and configure so this should not be a surprise.
Availability
OpenStack is a complex beast to properly setup and run and usually used in larger deployments, companies and enterprises. A production level cluster will likely start at $1000 per month at a hosting provider.
Our provider includes a basic codebase and deploys WP servers properly using most implementations of the default OpenStack software. But it is fully expected that, based on how you configure your networking, server groups, firewalls etc., you will need some customization.
Because of this expectation, the provider is not available without a services contract and we do not offer free support for it.
OpenStack Prerequisites
Before attempting to install the WPCD OpenStack Private Cloud provider, please check the following items on your OpenStack installation. (Of course, this only applies if you’re running the provider without any customization. Customized providers will likely have many of the items below modified or enhanced.)
1. Default Security Group
The DEFAULT security group must be modified to allow SSH, HTTP and HTTPS traffic.
2. SSH Keys
You must upload at least one SSH key-pair (generally done under <your project> → COMPUTE → KEYPAIRS in the OpenStack Horizon dashboard).
3. Images
You must have the following three images installed (generally done under ADMIN →COMPUTER →IMAGES in the OpenStack Horizon dashboard).
- Ubuntu 18.04 LTS
- Ubuntu 20.04 LTS
- Ubuntu 22.04 LTS
Need help with this? Check out the OpenStack documentation for instructions on how to obtain or create images.
4. Flavors
You must have at least one flavor (server size) configured.
Installing the OpenStack Private Cloud Provider
Once you’ve taken care of ALL the prerequisites on the OpenStack cluster mentioned above, you can install the provider for WPCD.
The provider is just a regular WordPress plugin – upload and activate it from the WordPress PLUGINS screen.
Configuring the OpenStack Private Cloud Provider
Unlike all the other providers, there is a lot more to configure here. You will see the following sections on the settings screen for the provider:
- API Keys
- OS Templates
- Root User
- SSH Keys
Below is an explanation of how to proceed with configuring each section.
Start by navigating to the WPCLOUDDEPLOY->SETTINGS->CLOUD PROVIDERS tab and click on the OpenStack sub-tab.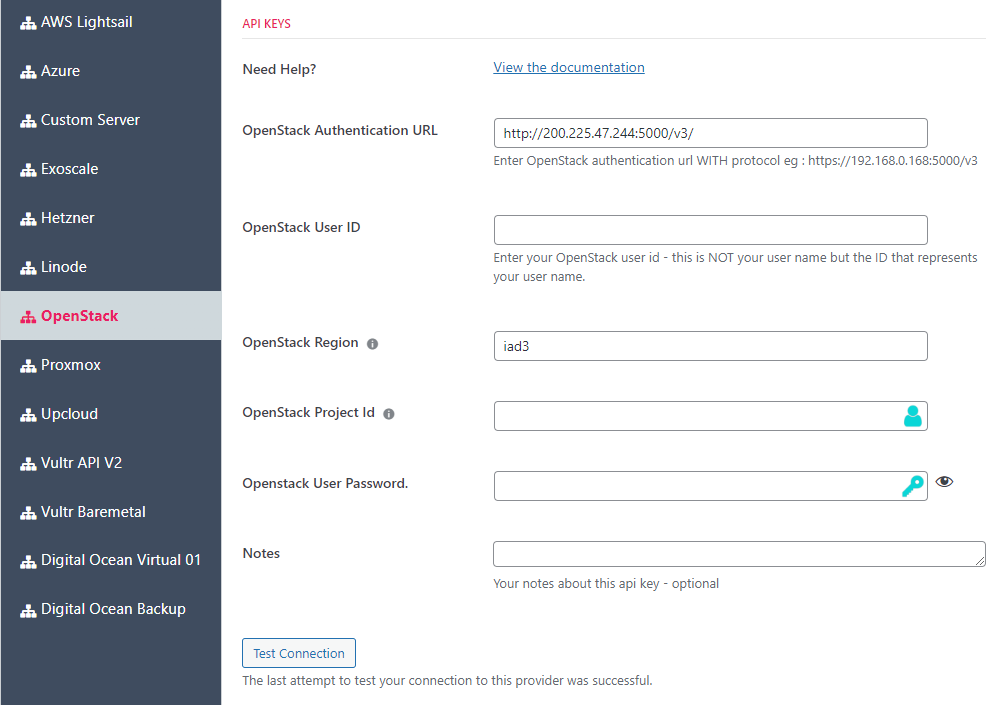
Fill out the following fields in the API KEYS section:
- OpenStack Authentication URL: You can usually get this from your OpenStack Horizon dashboard.
- OpenStack User Id: This has to be the ID of your admin user (not the user name). This is usually available in a popup in your OpenStack Horizon dashboard for the project under the API ACCESS tab.
- OpenStack Region: This is not regions the way you think of it in other providers. Suffice to say that this is associated with your admin user.
- OpenStack Project ID: The project id (formerly known as the tenant id in earlier versions of OpenStack). This can also be collected from a popup in your OpenStack Horizon dashboard under the API tab for the project.
- OpenStack User Password: The password for the admin user whose ID you entered in the OpenStack User Id field above.
Use the SAVE SETTINGS button at the bottom of the screen to save this information.
Then, use the TEST CONNECTION button to validate your information.
The TEST CONNECTION button will use the data you provided to reach out and see if it can obtain a list of flavors (server sizes in public cloud parlance). If it can do so it will assume the connection has succeeded and other fields will open up below it. For this test connection to work properly you must have at least one flavor configured and available for use (as mentioned in the prerequisites above).
OS Images
Next, you need to choose images for each of the Ubuntu Operating Systems – 18.04, 20.04, 22.04. These are the images that will be used when creating servers.
One of the nice benefits about using our private cloud providers is you can customize these images and use them as the baseline operating system – a feature we don’t offer in our public cloud providers.
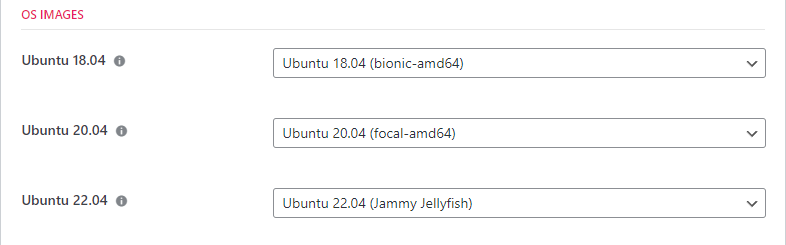
Care must be taken to only choose Ubuntu images instead of other Linux flavors!
Root / Sudo User
Next, enter your root user. If you have customized your images to use a different user that’s what you would enter here.

If you leave this blank, the ‘ubuntu’ username will be assumed to be the primary sudo user.
SSH Keys
Now you’re ready to enter your SSH key-pair information. As mentioned in the prerequisites above, you need to upload the public portion of at least one SSH Key. However, if you haven’t done that yet, you can use the CREATE SSH KEY-PAIR button to automatically create one for you – just remember to save your private key somewhere safe!

Save
Save your settings using the SAVE SETTINGS button at the bottom of the screen.
You should now be able to deploy servers into your OpenStack Private Cloud!
Using Multiple Projects
The basic OpenStack provider can only be used for a single project with a single network configuration. In order to use it on multiple projects, you need to install the VIRTUAL PROVIDER add-on. Once that has been installed, you can create a virtual provider for each project/region/network configuration – learn more in the Virtual Provider documentation.
When you create a new project in OpenStack, don’t forget to update the default security group to allow for the http, https and ssh protocols. This is an easy step to forget.
Known Issues & Limitations
- Unless the provider is customized, servers are created with the default security group and default network settings.
- SNAPSHOTS – we support taking snapshots. But they will show up as regular images in the settings area. This means that if you take hundreds of snapshots it’s possible that the IMAGE dropdown in the settings area for this provider will become unwieldly and sluggish.
More Topics In Multicloud
- All About Cloud Server Providers
- Alibaba ECS Provider: Introduction, Installation & Configuration Guide
- DigitalOcean Provider: Introduction, Installation & Configuration Guide
- EC2 Provider: Introduction, Installation & Configuration Guide
- Exoscale Provider: Introduction, Installation & Configuration Guide
- Linode Provider: Introduction, Installation & Configuration Guide
- UpCloud Provider: Introduction, Installation & Configuration Guide
- Hetzner Provider: Introduction, Installation & Configuration Guide
- Vultr Provider: Introduction, Installation & Configuration Guide
- Google Compute Engine: Introduction, Installation & Configuration Guide
- Microsoft Azure Provider: Introduction, Installation & Configuration Guide
- Lightsail Provider: Introduction, Installation & Configuration Guide
- Proxmox Private Cloud Provider: Introduction, Configuration & Installation Guide
- Changing SSH Keys For A Cloud Provider
- Custom Images
