Server Sync: Switching To The Destination Server
In order to switch to the backup server you need to do two things:
- Update your DNS records for the sites to point to the backup (destination) server and
- Disable server sync on the origin server.
It is very important that you disable server sync on the origin server otherwise the sites will continue to sync from origin to the destination (backup) server which will overwrite any changes that occur on the destination server.
If this is a temporary switch, you do not have to do anything else. When you are ready to switch back to the original server, you just need to update the DNS again and, optionally enable SERVER SYNC again.
Permanently Switch To The Target Server
If you need to make the destination server the permanent primary server and want to start to manage the sites on that server from the WPCloudDeploy dashboard you need to point the existing app records to the destination server. Here is a summary of how to get this done:
- Enable Advanced Metaboxes in SETTINGS
- Bring up the site record
- Update the PARENT ID record to point to the backup server record. The ID for the backup/destination server will be shown in the SYNC column on the server list screen.
- Remove the SYNC option permanently from the origin server.
- Install callbacks on the destination server
- Setup backups on the destination server if it was setup on the original server.
- Disable Advanced Metaboxes in SETTINGS
Here are more detailed instructions:
1. Enable Advanced Metaboxes
- Navigate to WPCloudDeploy → SETTINGS → MISC
- Scroll down to the SHOW ADVANCED METABOXES section
- Check the SHOW ADVANCED METABOXES checkbox
- Scroll down to the bottom of the page and click the SAVE SETTINGS button
2. Get the POST ID for the destination server
The POST ID for the backup/destination server will be shown in the SYNC column on the server list screen. Please make a note of it because you’ll need it for the next step.
3. Bring Up The Site Record
- Navigate to WPCloudDeploy → ALL APPS
- Scroll down to the one of the domain records that will be permanently switched to the target (destination) server
- Click on the TITLE to bring up the app record
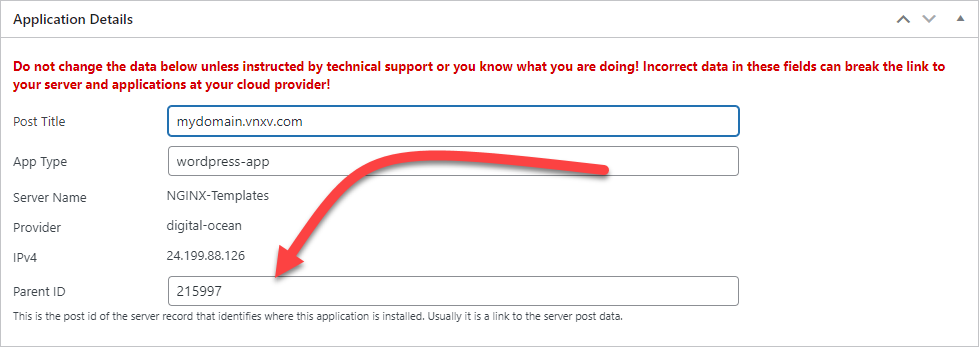
- Scroll down to the APPLICATION DETAILS metabox
- Replace the PARENT ID field with the ID (POST ID) of the destination server (you made a note of this in the prior step above)
- Scroll up to the top of the page and click the UPDATE button
Repeat these steps for all apps on the ORIGIN server.
4. Disable Advanced Metaboxes
- Navigate to WPCloudDeploy → SETTINGS → MISC
- Scroll down to the SHOW ADVANCED METABOXES section
- Un-check the SHOW ADVANCED METABOXES checkbox
- Scroll down to the bottom of the page and click the SAVE SETTINGS button
4. Install Callbacks on the DESTINATION Server
- Navigate to WPCloudDeploy → CLOUD SERVERS
- Scroll down to the DESTINATION server item in the list
- Click on the TITLE to bring up the server record
- Click on the CALLBACKS tab
- If CALLBACKS are already installed for some reason, remove them
- Click the INSTALL CALLBACKS button
5. Cleanup
- If you have setup backups on the individual domain records you should remove and re-add them. Otherwise, if you have setup server wide backups on the origin server you should similarly set them up on the destination server now.
- Double-check that the DNS for all the sites are now pointing to the new server.
- Double-check that server sync has been disabled on the origin server.
- For each site, you should disable and re-enable CRONS to make sure that those have been added to the destination server.
- If you have made changes to PHP.INI or NGINX or OLS vhost files, you’ll need to update the destination server with the same changes.
- Shutdown the origin server or, at least, remove callbacks so that it doesn’t attempt to send data to WPCloudDeploy. Alternatively you can just delete the server.
If you have questions please our support team for more help if you’re in a situation where you need to use the backup / destination server as the primary server.
More Topics In Server Sync
