Alias Domains
WPCloudDeploy does not have official support for alias domains. However, we know that there are times when they might be needed – usually when moving content from one domain to another and needing to make sure that SEO isn’t being impacted with the move.
For SEO purposes you can’t just redirect all content using just the top level domain because all urls will be redirected there.
In other words, you can’t just setup a redirect such as https://olddomain.com* to https://newdomain.com.
This is because you’ll find that a url such as https://olddomain.com/article will be redirected to https://newdomain.com instead of https://newdomain.com/article.
For SEO purposes that’s a disaster.
When properly setup , an alias domain will serve content from the new domain while still showing the old domain in the URL, thereby preserving your SEO juice.
In this article we’ll show how you can do this by editing the configuration files on your server. Unfortunately this technique only applies if the old domain is on an NGINX server – it does not apply if it resides on an OpenLiteSpeed server.
Note: In this day and age where you have a tool like CloudFlare, you might be better off doing the redirects there. But if you cannot use that, then this method might work for you.
Step 1: Create a Site With the Old Domain
In the WPCloudDeploy dashboard, create a site with the old domain. Make sure that the DNS points to it and that the old site can be rendered. If you already have this site up and running, then no need to do anything else with it.
You might want to turn on the NOINDEX option in WordPress settings to prevent Google from indexing the site if you’re not going to be immediately handling the next few steps.
Step 2: Log into the Server
You’ll need to log into the server where the old domain / site is located using SSH – please login as ‘root’ or a ‘sudo’ user:
Step 3: Edit the vhost File for the Old Domain
Open the vhost file for the old domain:
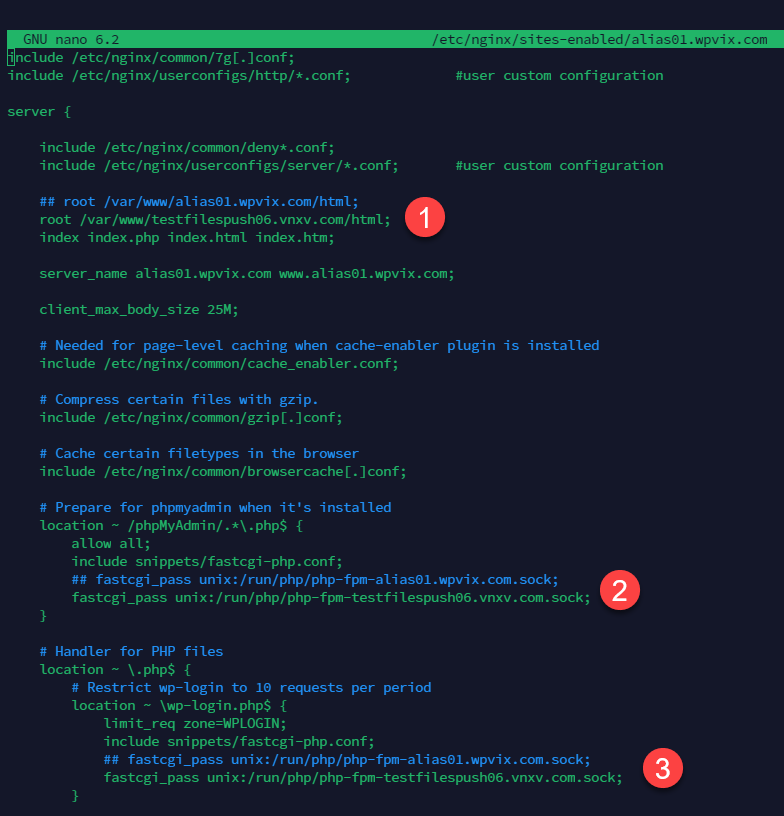
sudo nano /etc/nginx/sites-enabled/olddomain.com
Replace the lines shown in the following images with the new domain:
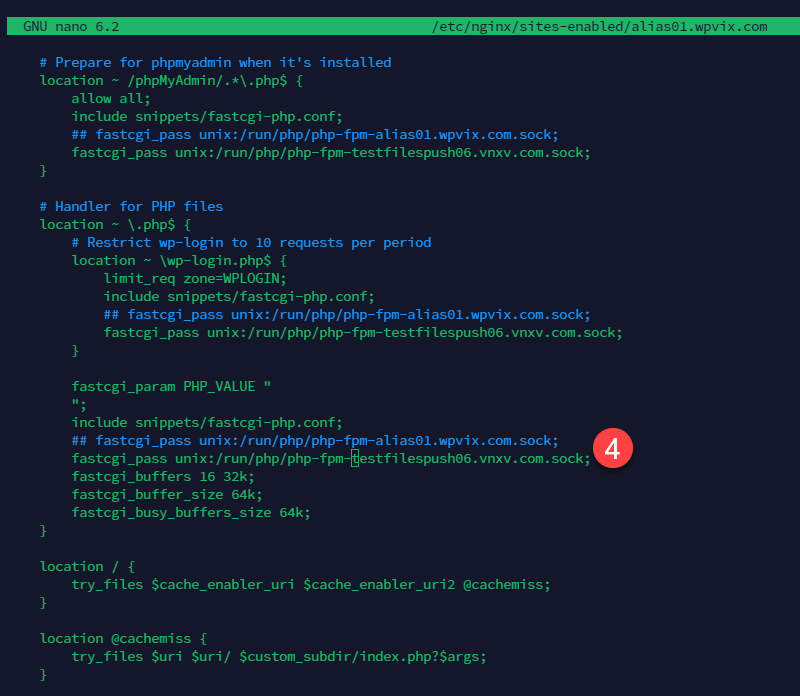
One more:
Save the file:
ctrl-o <enter>
Exit:
ctrl-x
Restart the NGINX server
systemctl restart nginx
or
service nginx restart
In the images above, the new domain is testfilespush06.vnxv.com. The old domain is alias01.wpvix.com. You’ll notice that we commented out the lines with the old domain so you can get a better idea of what you’re replacing.
Step 4:
Test the site. Navigate to the old home url – you’ll be redirected to the new home url. But, if you navigate to a url such as https://olddomain.com/my-article, you should see the content from the new domain but with the URL in the browser remaining as https://olddomain.com/my-article
Wrapup
By owning and managing your own servers, you’re able to do things that are outside the feature scope of ‘standard’ software or SaaS services. This is an example of something that you can do even though it’s not officially supported inside WPCloudDeploy.
With this technique you’re going to want to be careful about what operations you perform on the old site using the WPCloudDeploy dashboard. Once you make this change WPCD has no idea that they have been made so certain operations might fail.
It might better serve your situation to move the old domain onto it’s own VM (or a VM dedicated to alias domains if you have more than one) before making this type of change so that any side-effects will be restricted only to that server and domain.
More Topics In Command Line
