Custom Post Type Quotas
You can create quotas for CUSTOM POST TYPES and apply them to sites using Site Packages. The most common use case for this would be when you’re using WooCommerce with WPCloudDeploy to offer site subscriptions to your customers.
You can create multiple QUOTA PROFILES and assign them to one or more SITE PACKAGES. These SITE PACKAGES can, in turn, be assigned to one or more products. Or, one can be selected when you manually create a site.
For example, if you have three pricing plans, you can create QUOTA PROFILES for each of them and assign them to site packages which are, in turn, assigned to products that use those pricing plans. Each pricing plan might allow for a certain number of pages, images or articles/posts.
Getting Started With Quota Profiles
To use Custom Post Type Quotas, you must first do two things:
- Enable it in settings
- Ensure that you have our premium WooCommerce module installed and activated.
To enable Custom Post Type Quotas in settings:
- Navigate to WPCloudDeploy → SETTINGS → APP: WORDPRESS SETTINGS → SITES
- Scroll down to the CUSTOM POST TYPE QUOTAS section
- Check the ENABLE QUOTAS option
- Scroll down and click the SAVE SETTINGS button.
Custom Post Types Internal Names
You will need to know the internal name of the custom post type(s) on your customer sites that you’ll be using for quotas – usually these will be the same as your template site if you’re running a SaaS.
For core WordPress the most important post types are are simple – ‘post’, ‘page’, ‘attachment’. But for other plugins you might need to send a query to the developers or dig into the plugin code. Some plugins such as SEOPRESS maintain a screen where they allow you to set options for each custom post type registered on a site, so that’s another way you can view a list of them.
Create A Quota Profile
A QUOTA PROFILE needs to be created before you can apply quotas to a site. You can create a new QUOTA PROFILE as follows:
- Navigate to WPCloudDeploy → QUOTA PROFILES
- Click the ADD NEW button at the top of the list – if this is the first time you’re using this option the list will be blank
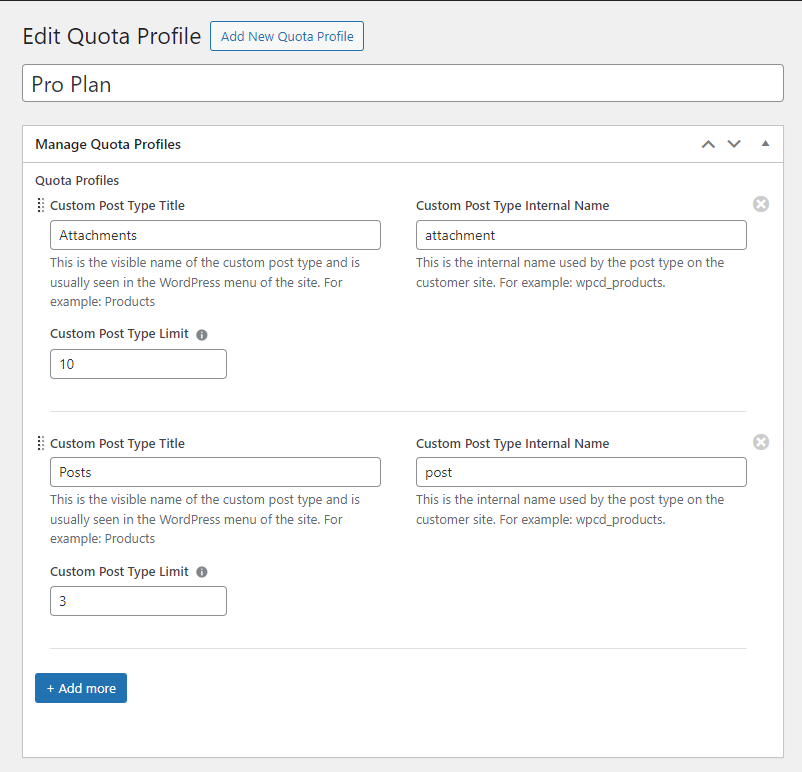
- Give the Quota Profile a title – for example, “BASIC PLAN QUOTA”
- In the CUSTOM POST TYPE TITLE field, enter the public name for the custom post type – eg: “Posts” or “Products”.
- In the CUSTOM POST TYPE NAME field, enter the internal name for the custom post type – eg: “post” or “attachment” or “wpcd_product”
- In the CUSTOM POST TYPE LIMIT field enter the maximum number of records you want to allow. If the site goes over this amount it will be considered ‘over quota’ and your designated actions will apply (we’ll cover those below)
- You can add more Custom Post Types with the ADD MORE button.
- When you have added all the post types to which you want to apply limits, scroll up and click the PUBLISH button on the upper right of the screen.
Note: the CUSTOM POST TYPES used must exist on your customer sites.
If this is the first QUOTA PROFILE you’ve created you’ll need to assign it to a SITE PACKAGE before it can be applied to a site.
Apply A Quota Profile to a Site Package
A Quota Profile does nothing until it’s used by a Site Package. To apply one to an existing Site Package:
- Navigate to WPCloudDeploy → SITE PACKAGES
- Click on the TITLE of the package that you’ll be updating
- Scroll down to the OTHER & MISC section
- Select a Quota Profile from the QUOTA PROFILE drop-down field
- Scroll up and click the PUBLISH button on the upper right of the screen.
Now you can use the Site Package with the Quota Profile in any WooCommerce product or when manually creating a new site.
View Quotas For a Site
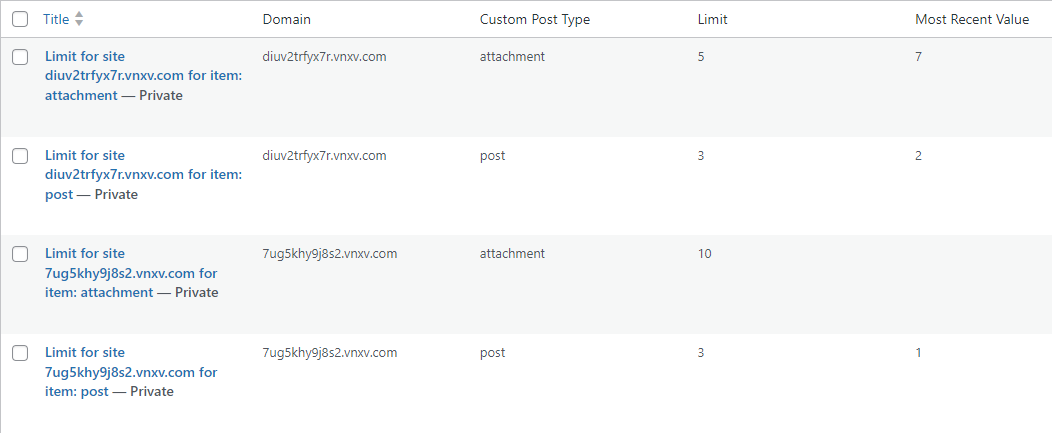
Quotas are applied to a site at the time it’s created. The limits in the QUOTA PROFILE will be copied as individual records into the QUOTA LIMITS screen – this preserves the limits for the site even if you change the QUOTA PROFILE in the future.
To view the quotas for a site:
- Navigate to WPCloudDeploy → QUOTA LIMITS
- Search for the site domain using the SEARCH QUOTA LIMITS search box in the upper right of the screen
- You should see one or more records showing the Custom Post Type, the Limit / Quota and the most recent count for that CPT pushed from the customer site
Change Quota Limits for a Single Site
If you change the quotas in a QUOTA PROFILE, the new limits only apply to new sites. All existing sites will retain their old quota limits.
However, you can edit the records in the QUOTA LIMITS screen to change the limits for an existing site.
- Navigate to WPCloudDeploy → QUOTA LIMITS
- Search for the site domain using the SEARCH QUOTA LIMITS search box in the upper right of the screen
- In the list of records for the site you can click on the TITLE to bring up the EDIT screen
- Change the CUSTOM POST TYPE LIMIT field to the new value – this is the new quota
- Click the UPDATE button on the upper right of the screen to save your changes.
Add a Quota Limit To An Existing Site
While it shouldn’t be a common action, you can manually add quota limits to an existing site without using a Quota Profile. You just have to add the limit records as follows:
- Navigate to WPCloudDeploy → QUOTA LIMITS
- Click the ADD NEW QUOTA LIMIT button at the top of the list
- Give the new limit a title – for example: “Limit for site domain.com for item: attachment”
- Choose the SITE from the site dropdown
- Enter the internal name for the custom post type in the CUSTOM POST TYPE INTERNAL NAME field
- Enter a value in the CUSTOM POST TYPE LIMIT field – this is the new quota for the custom post type
- In the PUBLISH box in the upper right, click the EDIT link next to VISIBILITY and change the visibility to PRIVATE
- Click the UPDATE button on the upper right of the screen to save your changes.
Over-Quota Actions
What’s the use of a quota without a way to enforce it? In WPCD you can configure what happens to a site when it exceeds a quota in the global SETTINGS area:
- Navigate to WPCloudDeploy → SETTINGS → APP: WORDPRESS SETTINGS → SITES
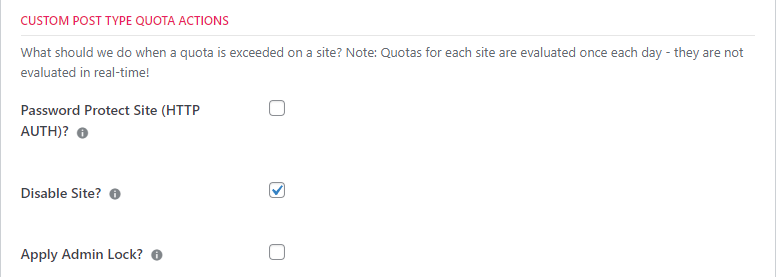
- Scroll down to the CUSTOM POST TYPE QUOTA ACTIONS section
- Check the option(s) you desire – you have a choice of four: PASSWORD PROTECT the site, DISABLE the site, APPLY ADMIN LOCK, APPLY EXPIRATION
- Scroll down and click the SAVE SETTINGS button.
Quotas & Site Expiration
You can combine Quotas & Site Expirations in an interesting way.
You can set a site expiration when a quota is exceeded – example, 30 days. This allows the site to stay up for a period of time after the quota is exceeded. Then, when the expiration date arrives, stricter expiration rules can apply (such as deleting the site or locking it.)
Related Articles
Important Notes
- Quotas are evaluated once a day when callbacks are run and data is pushed from servers to the plugin.
Availability: Requires WPCloudDeploy 5.7 or later.
More Topics In Admin
- Restoring From AWS S3 Into A New Site or Server
- Backups With AWS S3
- Restoring From Backup
- 6G Firewall (Deprecated)
- 7G Firewall
- Native Linux Cron
- Disabling Sites
- Password Protect A Site (HTTP Authentication)
- One-click Login (AKA Passwordless Logins)
- Remove/Delete Site
- Manage PHP Options
- Add A WordPress Administrator
- Notifications and Alerts
- Managing WordPress DEBUG Flags
- Object Cache: MemCached
- Object Cache: Redis
- Monit / Healing
- DNS Integration: CloudFlare
- Site Packages
- Site Update Plans
- Site Expiration
- White Label Colors
- Adding Custom NGINX Configs
- Custom Servers (Bring Your Own Server)
- How To Change The IP Address For Your Server
- Virtual Cloud Providers
- Monitorix
- File Manager
- PHPMyAdmin - Database Operations
- Using Remote Databases
- SMTP Gateway
- Server Updates
- Theme & Plugin Updates
- Bulk Actions on Servers
- Bulk Actions on Sites
- SSH Key Overrides
- Webserver Types
- WPCD Cron Jobs
- Disk Quotas
- Using Post-Processing Custom Bash Scripts
- Bulk Copy To Server
- Copy To Server (Automated Daily Process)
- Shortcodes
- Bootstrapping A WordPress Server With Our Scripts
- Bootstrapping A WordPress Server With Our Scripts - Archive Version 4.x
- Free Setup Requirements & Checklist


