Exoscale Provider: Introduction, Installation & Configuration Guide
Installing the Exoscale Provider
The Exoscale provider is just a regular WordPress plugin – upload and activate it from the WordPress PLUGINS screen.
Prerequisites For Using the Exoscale Provider
Connecting to Exoscale and automatically creating servers requires a few more moving parts to be synchronized than simpler providers such as DigitalOcean and Linode. In particular:
- Before attempting to provision a server you must update your default security group to open ports 22, 80 and 443 (ssh, http and https).
- Create a full access IAM user role if one does not already exist.
- Generate a set of API keys that has a role with full access.
Configuring the Exoscale Provider
First, you must make sure you create and upload an SSH key pair to your Exoscale dashboard.
The Exoscale provider then needs connection and security information before it can be used. You can provide this information in the WPCLOUDDEPLOY → SETTINGS → CLOUD PROVIDERS → EXOSCALE tab. There are several steps to this process:
- As mentioned above, you must make sure you edit your default security group in the Exoscale console to open ports 22, 80 and 443.
- Create an API key-pair in your Exoscale console (generally under ACCOUNT → API ACCESS. You might need to create a full access ROLE since each key-pair will ask for a ROLE)
- Select a REGION from the REGION drop-down.
- Enter the SECRET KEY and the API KEY
- Click the SAVE BUTTON
- Click the SAVE BUTTON AGAIN. This will cause the PUBLIC SSH KEYS drop-downs to be populated from data in your Exoscale account
- Select a key from the PUBLIC SSH KEY drop-down
- Enter your private key that correspond to the public key
- Click the SAVE button
- Click the SAVE button again.
Server Defaults
Servers that are created from inside WPCD will always be deployed with the following options:
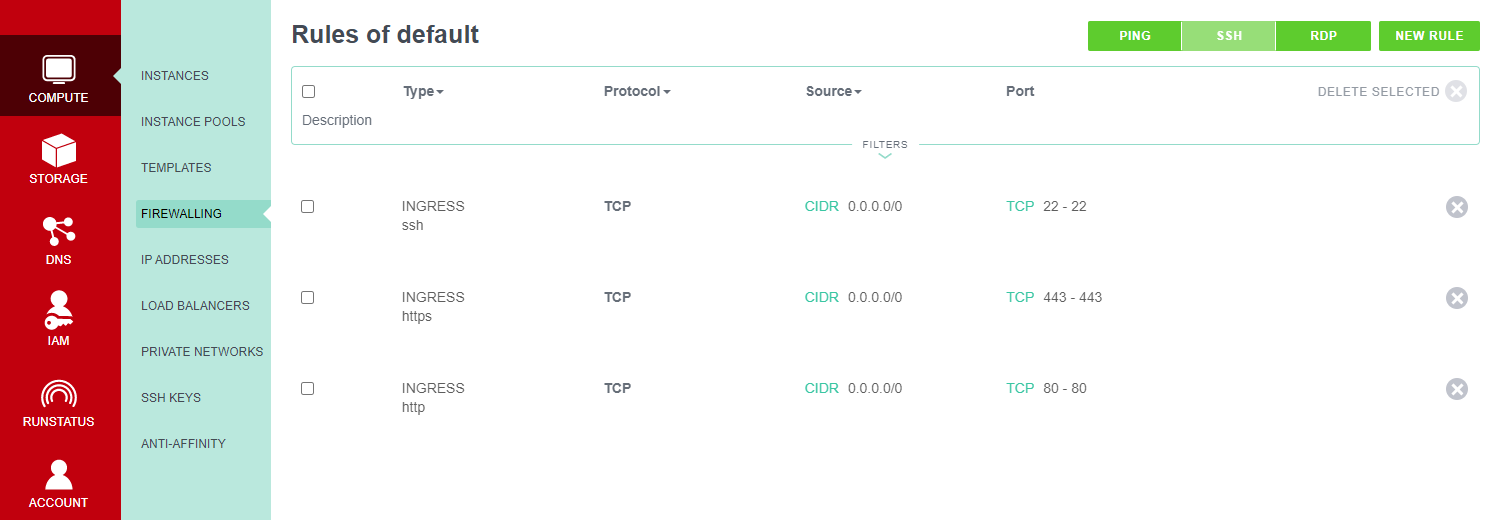
- Security Group: Default
Because we are using the default security group, you MUST make sure that you edit it to open ports 22, 80 and 443 BEFORE you attempt to provision a server inside WPCD. These rules should look similar to the following:
Using Multiple Regions
The basic EXOSCALE provider can only be used in one region. In order to use it in multiple regions, you need to install the VIRTUAL PROVIDER add-on. Once that has been installed, you can create a virtual provider for each region – learn more in the Virtual Provider documentation.
If you do not see a region you expect in the region list, please let us know – we have to hardcode the list of regions into the provider. So new regions will require an update to the provider plugin.
Notes
- All servers will be provisioned with 50GB of disk space, regardless of server size.
- The list of sizes includes a MICRO and and TINY size. These sizes should not be used since they only have 512MB and 1 GB of memory respectively. The recommended minimum for memory is 2GB. While you might be able to deploy MICRO and TINY sizes, you might run into memory issues if you try to deploy production sites on them.
- Exoscale disabled Version 1 of their API on April 30th 2024. Only Version 2 is enabled now. If you have V1 servers inside WPCD, you will no longer be able to manage them there. You will need to move the sites to a V2 server and then delete the server from inside your EXOSCALE dashboard.
Related Articles
More Topics In Multicloud
- All About Cloud Server Providers
- Alibaba ECS Provider: Introduction, Installation & Configuration Guide
- DigitalOcean Provider: Introduction, Installation & Configuration Guide
- EC2 Provider: Introduction, Installation & Configuration Guide
- Linode Provider: Introduction, Installation & Configuration Guide
- UpCloud Provider: Introduction, Installation & Configuration Guide
- Hetzner Provider: Introduction, Installation & Configuration Guide
- Vultr Provider: Introduction, Installation & Configuration Guide
- Google Compute Engine: Introduction, Installation & Configuration Guide
- Microsoft Azure Provider: Introduction, Installation & Configuration Guide
- Lightsail Provider: Introduction, Installation & Configuration Guide
- Proxmox Private Cloud Provider: Introduction, Configuration & Installation Guide
- OpenStack Private Cloud Provider: Introduction, Configuration & Installation Guide
- Changing SSH Keys For A Cloud Provider
- Custom Images
